

Before refrigerators became popular, bread boxes used to be the primary location for storing bread. Now, with refrigerators, most homes no longer have these primarily wooden cupboards in their kitchens. The structure of these boxes prolongs the bread’s lifespan, keeping it fresh for longer.
Bread boxes are still relevant today as they are practical and have decorative uses. You can build bread boxes with old boxes and scrap wood, making it a great way to utilize materials you already own and save money. Adding this video to your kitchen will make you stand out, as the bread box is no longer a common sight in kitchens.
Bread boxes can help to organize your kitchen by keeping all the bread in one place and keeping it fresh. They can also be an appealing structure with the right design. You can build a bread box by following DIY plans, which is why this guide contains various DIY bread box plans from which to choose.
DIY Bread Box Plans
The bread box is mainly made from wood with compartments for storing bread. They usually have doors with hinges. A homemade bread box allows you to create a design that perfectly fits your space. Several bread box plans here clearly describe completing the project as a DIYer.
1. Two Story Bread Box With Plexiglass Doors

The two-story bread box has two compartments to store your bread, which means more storage room. It gets even better with this design as the door feature is plexiglass, so you can see the box’s content while it is closed. The plexiglass ensures you know when to restock the bread and never run out.
This is an easy breadbox design with a clean finish. Its design makes it perfect for table tops, so you can easily see the two bread chambers, with the top chamber featuring a slant surface for an appealing design. The finish here is a natural wood stain to preserve the wood grain structure. Another exciting feature of this bread box is the top layer, which also serves as a cutting board.
To complete this box, you’ll need a 48″ 1×4 board, a 96″ 1×6 board, a 96″ 1×2 board, and a 24″ 1×2 board. These boards and other supplies, like wood glue, knobs, a magnetic latch, cutting board oil, pocket hole screws, plexiglass, decorative hinges, screws with bolts, and more, are also required for the project.
2. Classy Bread Box Design

Away from the traditional bread box designs is this classy box featuring a curved front. Its unique door design and flat top offer a surface to place flowers or kitchen utensils in small kitchens. One of the most impressive features of this bread box, aside from its beautiful door, is the sliding nature of the door. The door slides upwards like a garage door.
Due to the style of this box, you’ll need to cut several curved pieces, which means proper handling of cutting tools is required. Pine wood is the preferred lumber option for this project as it is easy to cut without splintering and provides a cheap material that reduces the project’s overall cost.
After cutting all the various pieces, assembling them may take some time. Still, with the plan, which involves a video of the project, you can complete this project quickly as an intermediate-level DIYer. Wood glue helps hold the canvas cloth to the board.
3. Simple Bread Box Design

Sometimes, complex designs can be too much for amateur DIYers to build, so simple plans like this can allow people to create a bread box even without experience. You’ll get the effectiveness of a bread box and enjoy a simple structure. This box is small, so the bread it can contain will be severely limited.
The design allows you to add holes to the bread box or leave it without gaps, as this has remained a long-standing topic of discussion. Pine is also the preferred wood used in the project, with the complete cut list provided in the plan in a tabular format to make understanding easier. This box requires a drill, sander, router, and jigsaw.
You should cut the front length at an 80° angle to ensure that the bread box door rests evenly on the top shape. The two side pieces should also feature this slight inclination, so the door covers.
4. DIY Bread Box With Classy Finish
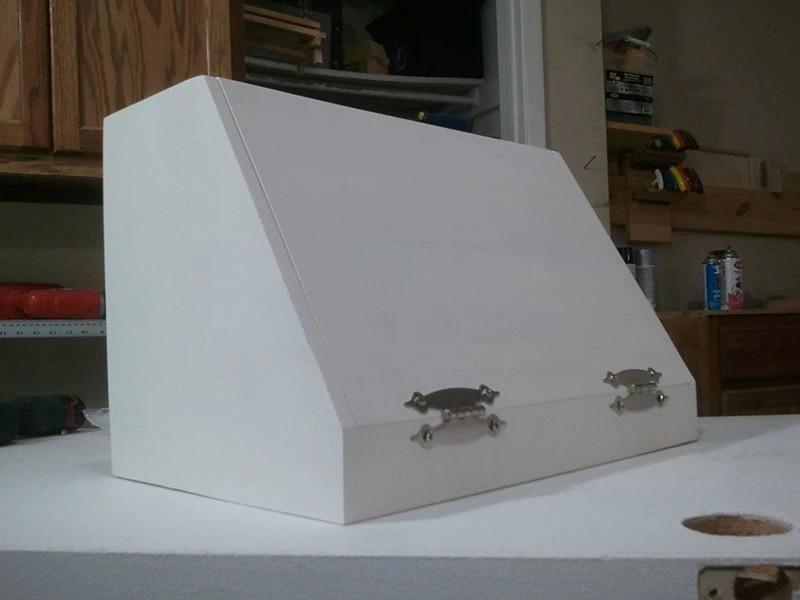
This may be a straightforward design, but its classy white finish and handles make it an exciting project. Since it is not the largest, a single 8′ 1×12 board will build this box. The size means the amount of bread it can carry is limited, but it is large enough to hold a few loaves.
The cuts for this project are straight, which makes cutting pretty straightforward. With a slanting design, you must cut the side boards with a slant to get the shape. Cutting the pieces and creating holes in each of the boxes will take up the most time for the project, as the back requires three holes to connect the sides, the top requires two holes to join the sides, and three holes to secure the back, while the front requires one spot at each end to connect the sides.
The pocket hole jig is the most preferred tool to quickly and correctly create the holes on the boards. The door knobs allow you to create a different look for your box, so choose a befitting knob or handle to install.
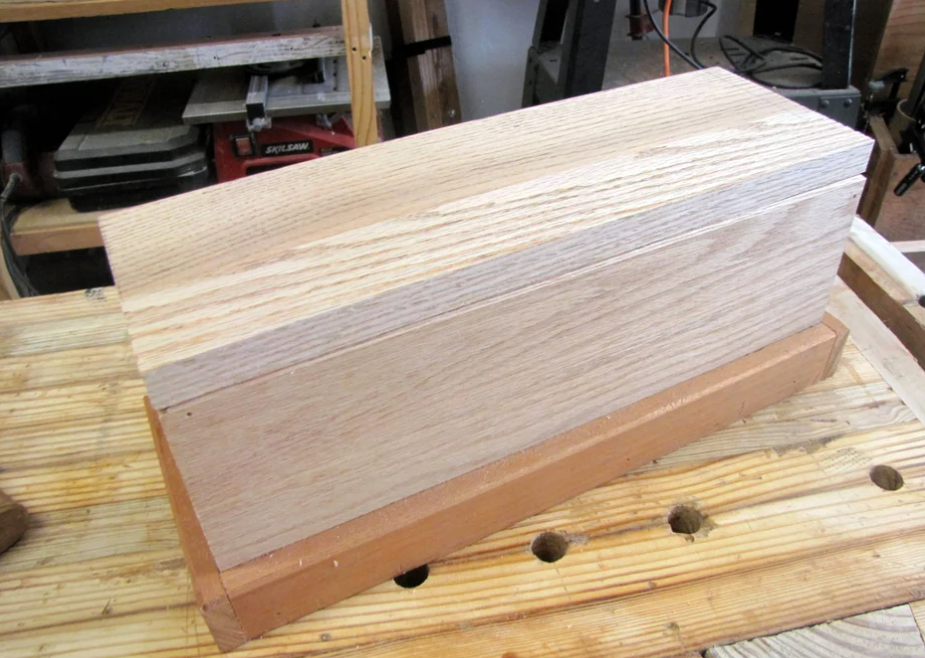
5. Hardwood Bread Box
While woods like pine and cedar are commonly used for bread boxes because of their affordability and ease of cutting, they are less durable and can affect the taste of the bread. Hardwoods, however, are durable and do not affect the bread’s taste no matter how long it stays.
To cut the 9×9-inch boards, draw a single line from the bottom-left corner to three inches off the top-left corner. Follow the plan for all the cut lists for the board pieces. Ultimately, carving words on the box depends on your preference. You can carve out the recipient’s name if you’re going to give it out.
Screws hold the pieces together while creating countersink holes, allowing you to close the screw heads and leave a clean box. The door folds out and away from the box to give unhindered access to the chest.
6. Exquisite Bread Box With Two Layers

The wood used for this project features an exquisite wood grain structure that is enhanced even further when stained. The handle shows class as it is made from a similar wood with a metal surface, with dark hinges perfectly blending into this dyed wooden surface.
It is made from a wood shipping crate with two layers to store your bread. You can also use 1″x12″x12′ board or reused pallet wood. The door opens downward with a wire to stop it from opening over. With the magnetic door catcher, the door stays shut without falling off.
Follow the cut dimensions to cut the pieces before attaching them using screws, glue, and door hinges to hold the door. Its finished look makes it a good display box that one can use as a good display in their kitchen. You’ll need quality hardwood material to ensure a durable container that lasts longer.
7. Rectangular Pine Bread Box

The pine bread box has a defined rectangular shape and a knife storage compartment for cutting the loaf. The door stretches from the top to the front, opening upwards to give enough access to your bread in the box. With a dark wood finish, the package will blend with a brightly colored background. The lower part of the box features a storage section for the cutting board.
You’ll need the box’s laminated shelving cut into various sizes; luckily, everything is contained in the guide. Other materials for this box include two pieces of 90° blind concealed hinges, wood filler, cut screws, wood glue, and any desired stain, paint, or finish.
After cutting the pieces, sand, and stain or paint them before attaching them, as this allows the color to reach all the wood parts; gluing the pieces before screwing may take longer, making creating pilot holes easier. Ensure to wait for the glue to dry before drilling.
9. Waste Paper Bread Box
Trash paper can form a beautiful bread box with the right design. This plan utilizes waste paper to build an artistic box for your bread. Painting this paper bread box will boost its appeal, mainly when a perfect blend of colors and designs is utilized.
You can make this box by rolling trash paper around a tiny stick or rod to create the shape. Measuring and cutting the rolled paper is the way to form all inclinations and sides of the box. Use glue to join the pieces to each other before joining the faces to create the package.
It is a fragile project that will crumble under heavy pressure but can last you a decent amount of time with careful usage. If you have some materials like paint and glue, this project may cost you a little to build. Even though bread boxes are typically affordable, you’ll hardly see such affordability.
10. Cardboard Bread Box
With cardboard, you can build a fantastic breadbox design. It uses recycled materials and can be completed in an hour. The splendid design added to the front of the box creates an expensive look. This affordable project will only cost you money for glue and paint.
Follow the plan to get the correct dimensions for all the cardboard pieces, mark them, and cut using scissors. With glue, you can mount all the board pieces. Making the box’s top layer with different designs will require cutting cardboard and paper. Ensure to arrange the cardboard with small spaces between each piece.
Cover the top and edges with masking tape before painting and sanding. Adding a knob and the design is easy with glue and the chosen door knob. Ensure the knob is lightweight and matches the white box color for this project.
11. Small Bread Box Design
If you’re looking for a small bread box to house a single loaf, this petite design will be perfect for your kitchen. Its small design means you won’t need large materials to complete it, nor will it require much time. While it is not the quickest, it can be completed in a few hours, considering you have to cut and prepare the wood.
1″x6″x6′ lumber is all the wood you need for this bread box. Choose between softwood and hardwood before selecting the type you want. Bear in mind that the price varies for the wood depending on the style. Wood glue and finish nails are the other materials for this box.
Make accurate cuts so all the pieces are intact and are not sticking out of the edges. Try dry-assembling the cut pieces to see how they fit and decide if any part needs further cuts. Assembling takes minimal time due to the size of the bread box. You’ll need a clamp to hold the pieces while you work.
Summary
Most bread boxes are easy to make, which makes building your bread box even more attractive. Your design and material will determine the cost, but bread boxes are generally inexpensive. This guide contains a collection of different plans so you can get inspiration to build the perfect container for storing bread in your kitchen.

 By
By


