

Have you ever watched movies with pirates and treasure hunters, hoping you
had a metal detector similar to theirs? But, you felt reality swoop in as you read
up on the exorbitant prices of a metal detector.
However, your treasure hunting dreams can come true without completely
breaking your bank. All you need are a few electric components and a simple DIY
metal detector plan.
Fortunately, we have one of those two requirements covered.
15 simple DIY Metal Detector plans to build
1. Simple Cardboard Metal Detector

Made using a few electrical components and cardboard, this metal detector is
not only budget-friendly but functional too. Additionally, the plan is easy to
follow, with the construction of each part explained in detail.
However, making the coil of the detector is not as easy and requires some
calculations. Fortunately, you do not necessarily have to make a coil. You can
buy one online if your budget isn’t too constricted. You can even make a handle
for your detector using cardboard. The handle gives a nice touch to the detector
and even helps to hold the batteries and switches.
Overall, this is a great plan if you’re seeking to build something for fun. While it
does not work perfectly outside (not always), it is fully functional when used
inside, and serves as a great way to pass some time!
2. Sensitive Metal Detector

This is a modified version of the known Russian pulse induction metal detector
“PIRAT”. It can detect a metal coin at a distance of 15 cm and larger objects at
even greater distances. Moreover, this detector is simple to make despite its
sensitivity to metal objects. With a few components as a requirement to build it,
this detector is an apt option if you’re looking for sensitive readings.
Additionally, this detector has several features which make it unique. A few of
these features are:
- Self-calibrating ability by resetting Arduino
- Time detector with light and sound indication
- Increased frequency when the object is approached
What’s more? The video tutorial attached with the plan helps in simplifying the building process, thus enabling DIY beginners to work too.
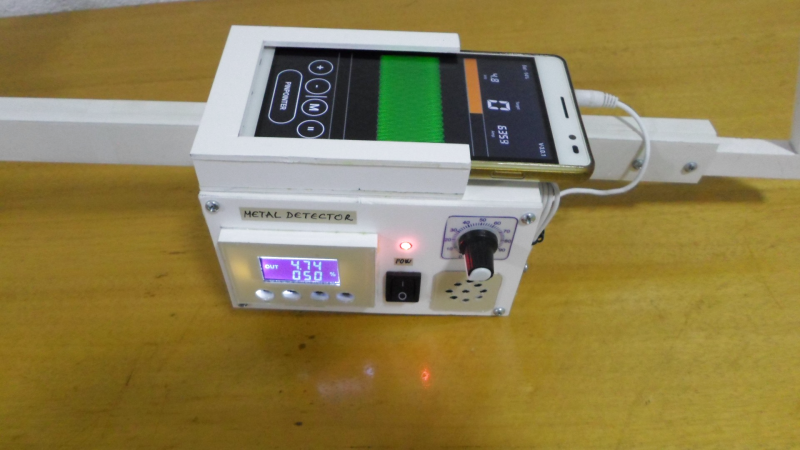
3. Outdoor Metal Detector

Designed to operate through a phone, this metal detector can have sensitive or
simple readings depending on the schematics. It requires only three components
to get completed, besides the phone. The components are two resistors and an
LC circuit. However, because of the simplicity of the scheme, its sensitivity is a
little compromised. The detector is only sensitive enough to find a coin buried in
the ground.
But, this plan gives some amazing tips on how to make a detector without
soldering. For everyone who doesn’t have the time to learn how to solder, this is
the perfect option. Accompanied with pictures for every step along with point-to-
point instructions, this plan is a must-try for anyone who is gadget friendly.
4. Arduino Metal Detector

Made using a toy weed-whacker, this detector has adjustable sensitivity settings.
As the sensitivity settings are moved from lower to higher, it starts detecting
smaller items. It can pick up frequencies from larger items like soda cans and
cell phones in its lowest sensitivity setting. Whereas it is also good enough to
detect screws and coins in its highest sensitivity setting.
Moreover, even the range of this detector can be extended by increasing the
magnetic field created by the inductor.
There are two ways this could be done:
- Increasing the current flow through the conductor
- Increasing the number of wire wraps in the inductor coil
This DIY metal detector works well to detect small things in your home which
cannot be seen through the naked eye.
5. Upcycled Metal Detector

If you’re working on a slightly constrained budget, this plan is the answer to your
problems. Made using an AM radio, tape, and a small calculator, this detector is
apt if you’re trying to just have some fun detecting metal in your home.
Uncertain about whether this would work? Try getting your detector close to a
spoon and notice how your calculator starts working. The reason it works is that
the calculator’s electronic circuit produces a radio frequency signal which is
reflected off the spoon. These reflected radio waves are what we hear from the
radio.
Make your very first metal detector using three basic materials, in five steps or
even lesser!
6. Low-Cost Metal Detector

This DIY metal detector is made using only five things- a cheap chip, an AC
condenser, two search coils, and an earphone. Irrespective of its plainness, the
detector works well and has a decent scanning range, varying from 12.5 cm to
15 cm.
A few unique features of this detector are:
- Replaces search and model generators with transmitters
- The scheme has only two basic components.
- Adjustable sound volume
Moreover, since the scheme is highly detailed, the chances of making errors are
minuscule, making this an awesome plan to follow!
Bonus Read: Since a driver is needed in many of the plans, go through these
reviews of the best impact drivers of 2023 for making a better choice.
7. Eco-Friendly Metal Detector
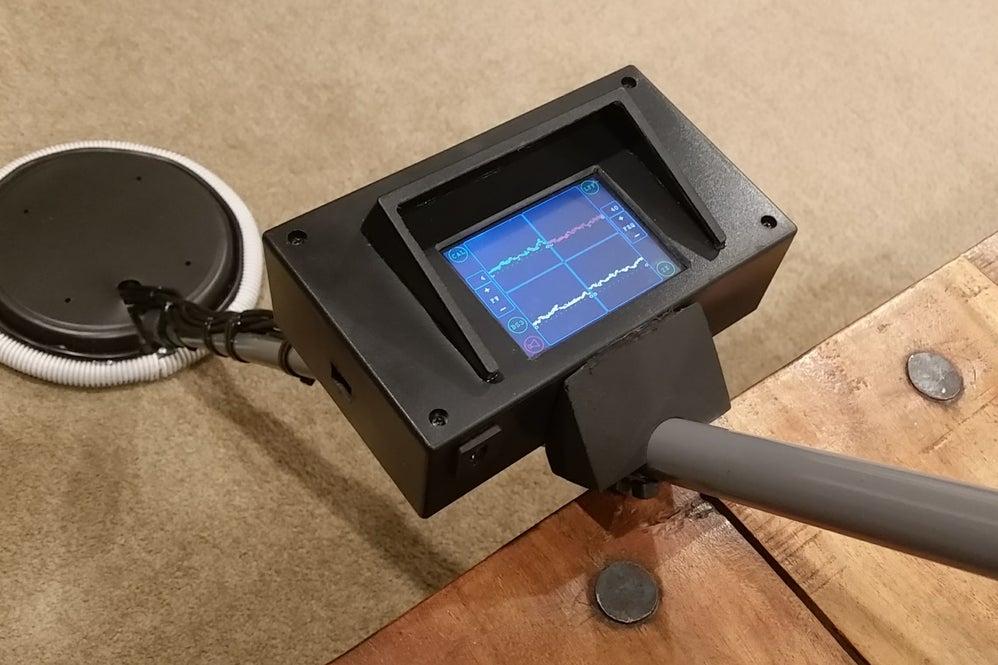
The main problem while using a metal detector is able to narrow down a
place to dig. However, this metal detector helps solve that problem. It has four
search coils and a color touch screen to identify and pinpoint the location to dig.
Additionally, even your search system is made advanced and much easier with
this detector. Some new features incorporated in the search system are:
- Auto calibration
- USB rechargeable power pack
- Four different screen modes
- Frequency
- Pulse width adjustment
Even digging is made simpler through the wooden skewers which are attached to
each coil. These skewers push into the earth on the location you have
pinpointed. This reduces the need for digging and, therefore, lessens the impact
on the environment.
Lastly, this detector can pinpoint up to a depth of 7-10 cm, making it ideal for
searching for lost coins and rings in the park or beaches.
8. VLF Metal Detector
Based on a metal detector called Smart Hunter, this very low frequency (VLF)
the metal detector uses transmitter and receiver coils in a double-D geometry.
Moreover, the detector has high sensitivity and can detect a coin up to a depth
of 25 cm. Sometimes, larger objects can be detected up to a distance of 1 m
too.
The application of this detector is run through a phone, using a custom metal
detector app. Additionally, it even has an audio amplifier and speaker fit into the
device to make it work more efficiently.
9. Four Transistor Metal Detector

If you’re in for some serious treasure hunting, this plan is for you. With the ability
to detect coins at a depth of 3-4 inches, soda cans at a depth of 6 inches, and
metal pipes at, even more, this detector has a high sensitivity reading.
A few things to keep in mind while making this detector are:
- The earphones used must have a high impedance.
- Note the ground pin on the connectors.
- Always wrap the wires in electrical tape.
- Adjust the metal shaft to balance the detector
It is also advisable to test the unit for any malfunctions before you start using it.
Once it has been tried and tested, you can start looking for the coins and rings in
your garden, park, or even the beach!
10. High Sensitivity Metal Detector

This metal detector has high sensitivity and can be used to detect coins buried in
the soil up to a depth of 15-20 cm. The plan has a detailed diagram of the
scheme and the sensor. Primarily because it is important to manufacture the
sensor correctly to make your detector work well.
Remember, since this detector is a little more advanced than the rest, it’ll take
the experience to work with it. However, once you have learned how to use it,
you will even be able to differentiate between the types of metals being
detected.
11. Pulse Induction Metal Detector

Pulse induction systems use a single coil as both the receiver and the
transmitter. This DIY metal detector has a pulse induction system, and it can
differentiate between ferrous and non-ferrous metals.
Additionally, it is a symbiosis of Arduino and Android and has high sensitivity. It works through a mobile app that can be downloaded on any smartphone for free.
The coil of this device is made using isolated copper wire with a diameter of
0.4mm. It contains 25 windings shaped in a circular form with a diameter of 19
cm. Remember, don’t keep metal objects near the coil.
Although the making of this device sounds basic, its working is phenomenal. It
can detect a small metal coin at a distance of 10-15 cm, while larger ones can go
up to a distance of 30-40 cm. If you don’t believe the results, the accompanying
video of the working of this device should convince you!
Bonus Read: Buy a toolset today if you’re an enthusiastic DIYer.
Check out these best cordless toolsets and combo kits.
12. BFO Metal Detector

BFO (beat frequency oscillator) works by mixing two signals to produce an
audible beat frequency. While one oscillator stays fixed at a specific frequency,
the other one varies its frequency slightly around the metal. It is the change in
pitch produced that informs users of the presence of metal nearby. Therefore,
the change in frequency has to be high enough to be noticeable.
Mostly, a change of 200 to 100 Hz is required. This means that the search coil
needs to operate at a high frequency. To make this happen, you should
preferably have a 30 turn coil which is approximately 15 cm in diameter.
Moreover, it is important to test your detector before you start working with it.
Fortunately, this plan teaches you how to do that. You can use your signal
generator to generate a signal close to that of the search coil. The difference
between the two would be the audible range.
Lastly, you should use a plastic pole as a handle for your metal detector. Once
you have everything set in place, and you can start your treasure hunt!
13. Portable Metal Detector

This plan is another way to make a cheap and easy DIY metal detector. However,
one different feature about it is that it’s portable! It also offers great capabilities
through the 3 mm LED light for signaling and a potentiometer to adjust the
volume when searching.
The plan has used some different materials to make a metal detector. For
example, the coil of the detector has been made using an empty box of Pringles.
This works well as it is not always easy to find coils with the same MH that you
require. While the circuit is hot-glued inside an empty toothpaste can.
Another tip to follow while making this detector would be to test the circuit on a
breadboard to see if it works. This would even help in finding conclusions about
the range of detection.
You can work on upcycling cans and boxes to make this device, therefore
economizing and getting a portable metal detector.
14. Arduino Metal Detector
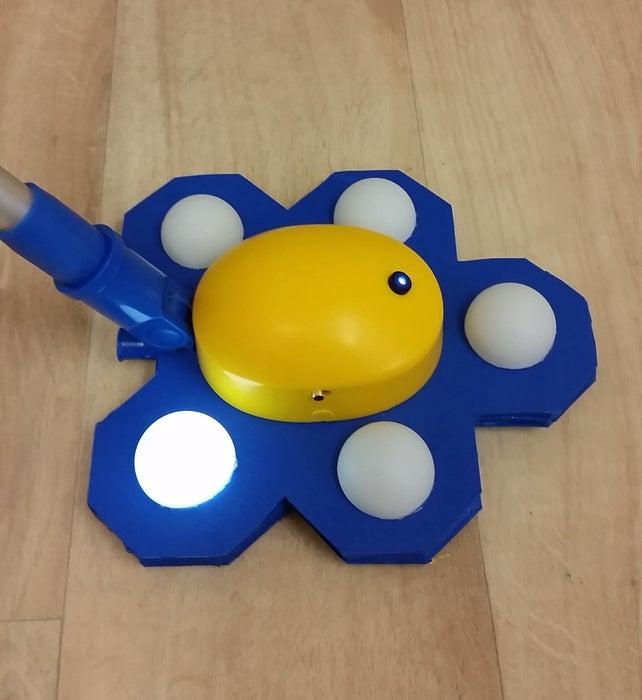
A metal detector does not always have to look boring, and this plan proves that.
With five separate coils that light up when metal is detected, this DIY metal
detector is a great option. Especially if you are looking for something out of the
box. Its vibrant blue and yellow color add to its beauty, making this detector an
attractive choice for many DIYers.
The entire motive of this plan was to have some fun and to replace the sound
indicators with light indicators. Even the circuit board of this device looks
different than most others. While most devices usually have a plain square-
shaped circuit board, this device does not. It has a hexagon-shaped circuit board
to not only match the shape of the external cover but to avoid interference with
search coils too.
Finally, this device is even waterproof. Painting the plastic cover on top and
bottom ensures that the device steers clear from water damage, making it
possible to use outdoors on dew-laden grass.
Bonus Tip: Keep wires short and with minimal overlap. This assures the cabling
has no movement and maintains the stability of the circuit.
15. Outdoor Arduino Metal Detector

Most Arduino metal detector plans seem intimidating because of the number of
components required to build them. But not this one. The requirement list for
building this detector is much lesser as compared to most others, and it works in
a pretty efficient manner too.
The main components required to build it are:
- A common capacitor
- Resistor and diode
- Search coil
- LEDs
- Speaker/ Headphones
Another advantage to building this detector is that it can be powered from a
single 5V. Therefore, this detector doesn’t require many resources, yet it works
perfectly. Moreover, it can even differentiate between ferromagnetic and non-
ferromagnetic metals.
When using this detector, it is important to leave the coil ~5s away from the
metal. As you start getting closer to the metal, you will notice the green or blue
LED lights flashing, while a beeping sound will be heard from your earphones.
The color of the lights and the pitch of the beeps help differentiate between what
type of metal you’ve found.
Conclusion
Making metal detectors can be a great way to get some hands-on experience
with physics applications. Moreover, hunting using metal detectors can form a
great hobby in itself.
A few tips to keep in mind while using a metal detector are:
- Take care to refill all holes and leave no damage.
- Keep search coils close and parallel to the ground.
- Test it with a few household items before taking it outside
Be mindful of not trespassing and ensuring metal detecting is allowed in the
property you’ve decided on scanning. But most importantly, have fun and happy
hunting!
You may want see some other DIY plans here:

 By
By


