

Doors with solid cores are heavier and more reliable but also more expensive, and this is why those with hollow cores are the most popular, especially among people on a budget. However, these hollow doors are prone to damage that leave holes in them.
The holes can range from small to extremely large, but one thing they have in common is that they all look unsightly and reduce the reliability of the door. In addition, sharp objects, extended ends of furniture, and more can make holes in a doorway.
Solid core doors can withstand most of these external pressures without significant damage. Hollow core doors, however, will give way under minimal pressure.
Fixing doors involves filling up these holes with suitable materials and ensuring it doesn’t affect the doors look, feel, or integrity. The good thing is that you can repair door holes by following a straightforward method.
It requires no fancy material or particular skill to practice. In addition, repairing holes in doors as soon as it occurs will not only stop the hole from expanding, but also preserve the integrity of the door.
Materials Needed
Before we get started, here are some of the materials and tools you’ll need to fix holes in doors:
- Low-expansion spray foam insulation
- Utility knife
- Plastic putty knife
- Drop cloth
- Rubber gloves
- Fiberglass insulation, paper towels, or cardboard
- Orbital sander
- Sandpaper
- Primer and paint
- Chip brush
- Rag
- Solvents like lacquer thinner
- Epoxy or polyester-based putty
- Masking tape
- Drywall compound
How to Fix Hole in Wood Door?

Fixing holes in a hollow-core door isn’t a difficult challenge. By following these steps, you can patch holes and renew their looks. You can fix the damage without taking down the door; however, doors flat down on a worktable are easier to sand.
The stress of bringing down the door and replacing it after fixing it may not be worth it except for extremely large holes.
Step 1: Prepare

Preparing the site and yourself will ensure a smooth operation without injuries and damage. Firstly, place a drop cloth around the work area to prevent spillage from materials touching the floor.
You also want to wear clothes you wouldn’t mind ruining, since some materials like paint and expansion foam are challenging to remove when they touch your clothes.
Wearing rubber gloves will protect your hand, especially from the stubborn expansion foam. Next, cover the perimeter of the hole with masking tape. The tape will protect the area and reduce the cleaning you’ll have to do later.
Step 2: Create Smooth Hole Edges
It is easier to work with a hole with smooth edges as it reduces the chances of being cut by a sharp edge and provides less resistance for any filler to stick to the wall. Use the utility knife to scrape off all the edges of the holes, creating a smooth area. Ensure you don’t chip off more than is required and expand the hole.
Step 3: Fill the Hole

Hollow doors have almost empty spaces between the two boards, so filling them with paper towels or cardboard is the first step to raising the surface towards the board level.
Crumple the paper towels in bits and fit them into the holes, slightly going over the perimeter of the hole. The paper aims to hold the expanding foam that is coming next.
Sometimes, the first few bits you put inside the door will fall into the hollow space; when this occurs, keep adding the bits till it reaches the hole level.
Step 4: Cover with Expanding Foam Insulation
The expanding foam insulation is quite difficult to remove from surfaces, so it is essential to ensure minimal spillage when working with it.
Once you attach the trigger to the spray tube, wrap a rag around the tube when not in use to prevent accidental spillage. The trigger is removable so that you can take it out for extended periods without use.
Gently spray the expanding foam insulation into the hole, allowing the foam to expand and fill up the hole. You’ll also notice a bulge out of the door by excess foam. Avoid high expansion foams as they expand with a lot of pressure, damaging the door.
Step 4: Allow to Dry
Allow the low-expansion foam to dry for 24 hours or at least overnight, so the foam must have completed expansion and solidification.
Typically, the instructions on the foam tube will provide a more accurate drying time as some take a long time while others dry faster.
Step 5: Trim Excess Foam
Allow the foam to expand and harden before trimming. Next, use the utility knife to cut off excess foam bulging out of the door. Place the knife edge flush on the door surface to scrape the excess.
Sometimes a utility knife may no longer be efficient in removing the excess foam, especially closer to the door; in this instance, a one-sided razor blade will serve.
Typically, it is ideal for trimming the foam a few millimeters below the surface so the other fillers take it up to the surface.
Step 6: Apply Auto Body Filler

An auto body filler brings durability, as it is hard and durable. First, mix the two parts of the auto body filler on a different material to activate it, and use the putty knife to apply the filler to the hole.
Spread, smear, and force the auto body filler on the hole surface to fill up any hole and cover the foam. Some types of auto-body filler do not require mixing to activate; check the instructions on the body for the exact steps.
Next, use the edge of the rubber putty knife to scrape excess filler from the top and edges. The auto-body filler takes about 30 minutes to harden and cure completely.
Step 7: Sand
Allow the filler to cure before sanding. Then, use coarse 100-grit sandpaper to sand the top of the filler, remove any excess, and pay attention to the edges where it meets the door. Sand again with finer sandpaper to remove scratch marks.
Step 8: Add a Coat of Joint Compound
If your door is extremely smooth, you want to match the smoothness by ensuring the patched area is just as smooth. This extra step ensures the smoothness of the area. Next, smear a coat of joint compound on the surface and allow it to dry for 24 hours before sanding.
Step 9: Prime and Paint

Apply drywall or wood primer to the patched area to prepare it for paint. Allow the primer to dry, and apply a few layers of interior wood enamel.
You can paint only the patched area, but this may show uneven paint tones since the paint on the door might have faded. It is best to paint the entire door to ensure a single door.
Before painting the entire door, remove, or cover all hardware like hinges and doorknobs. Choose the desired paint color and paint the grooves and panels first before covering the surface using long, even strokes of the paint rollers.
Next, use a paintbrush for the edges, grooves, and panels.
Also Read:- How to Paint Wood? A Step-by-step Complete Guide
Step 10: Allow to Dry
Leave the door to dry for at least 24 hours so all imperfections, paint line marks, and missed areas can be visible. Ensure no one touches the door as it dries to avoid print marks on the paint.
Step 11: Reapply Paint
Apply a second paint coat to the door to improve the look and correct errors. Doors painted with more than one coat tend to have a finer finish. Allow the paint to dry for several days before reattaching and using it.
How to Fix a Hole in a Solid Core Door?
In solid core doors, holes are less pronounced, and more cracks and spaces are left behind from removed hardware, like nails. Using epoxy wood filler or an auto body filler can repair such damages.
However, larger holes may require drilling and fill with a dowel first. Here’s how:
Step 1: Drill
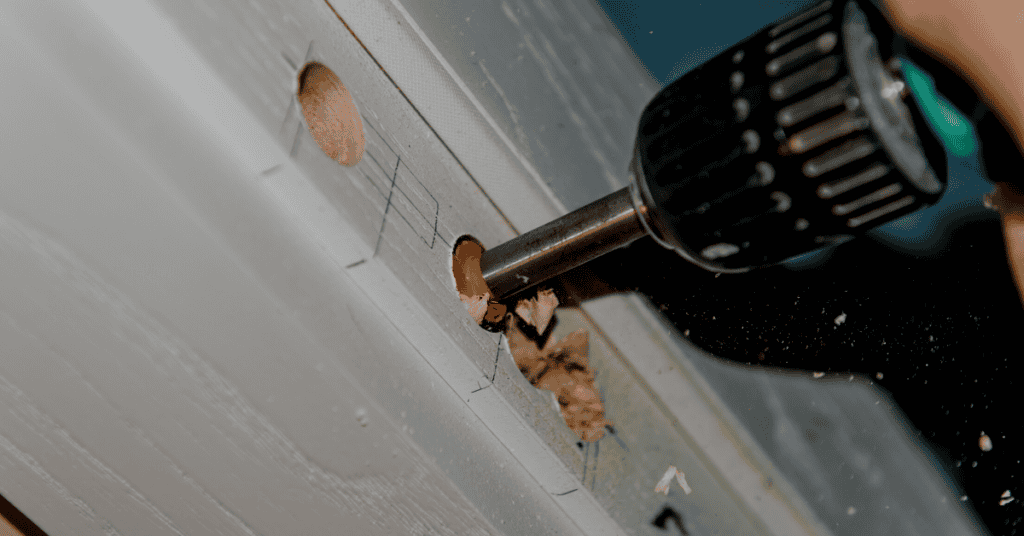
Use a drill bit with the same diameter as the dowel to create a hole large enough for the dowel. Ensure to drill so lightly that you don’t create more cracks in the door.
Also Read:- 5 Best Floor Drill Press for 2022
Step 2: Insert the Dowel and Sand
Cover the dowel with glue and gently tap it into the hole. Use a handsaw to cut the excess dowel flush with the wood surface—sand with coarse sandpaper to level the area.
Step 3: Fill With Putty and Sand

Use a rubber putty knife to smear putty on the area, forcing it into any hole. Allow the putty to dry for some hours and sand properly first with coarse sandpaper to level the putty and then with fine sandpaper to get the required smoothness.
Step 4: Finish
Choose the desired finish and cover the area. Since most solid core doors are not painted, a simple stain or finish may be enough. You can also use wood fillers with a natural wood look to ensure the patched area is not visible.
Summary
Repairing holes in doors, whether it is hollow or has a solid core, is easy with the right guidance. Materials required for this task are easy to get, with most available in your garden shed. Carefully moving furniture and heavy tools will prevent door damage and ensure durability.

 By
By


