
Drywalls find use in straight surfaces like doorways and walls. The challenge is when you need to form a curved wall or an archway.
The good news is that drywall can be bent to any form that you need. It easily tackles ambitious curves with ease.
Here is a DIY guide on how to bend drywall efficiently and expertly to achieve the desired result. It is recommended that you practice the bending technique on a spare drywall piece and then move on to your live project.
Precautions When Bending Drywall
Before we start with the DIY steps, it is best to keep these precautions guide handy.
Drywalls will always bend. But when you push the board center and hear a crackling sound, it is a cause of panic. It indicates that the board is losing its strength. If you push it harder, it will snap right from the middle, and you want to avoid this.
Drywalls bend to a limited radius when dry. It would help if you thus wet it a bit to let the water soak into it to make the drywall flexible. Take care that the drywall should not be soaking wet but has enough moisture to bend.
You May Also Like: Woodworking 101 Guide: Basic Skills Every Beginner Should Know
How to Bend Drywall?
Figure Out The Radius Needed For the Bend
Determining the radius required for the bend lets you calculate the drywall thickness that you will need. It is a simple process. Just measure the area where you desire to set the curve. If the bent radius is high, you will need thick drywall. The proper thickness makes the later steps easy.
Measure the area where you wish to set the curvature. You will need a tape measure to figure out the radius.
Here is a guide to ensure you get the thickness right.
- For 15 foot radius, use 5/8 inch drywall
- For a 10-foot radius, use ½ inch drywall
- For a 7-foot radius, use 3/8 inch drywall
- For a 5-foot radius, use ¼ inch drywall
Choose The Drywall

Once you have calculated the radius, choose the drywall as per the thickness that matches your calculation. If the radius is large, you will need a thick drywall board. The right consistency and curve match make drywall bending easy.
Wet The Drywall
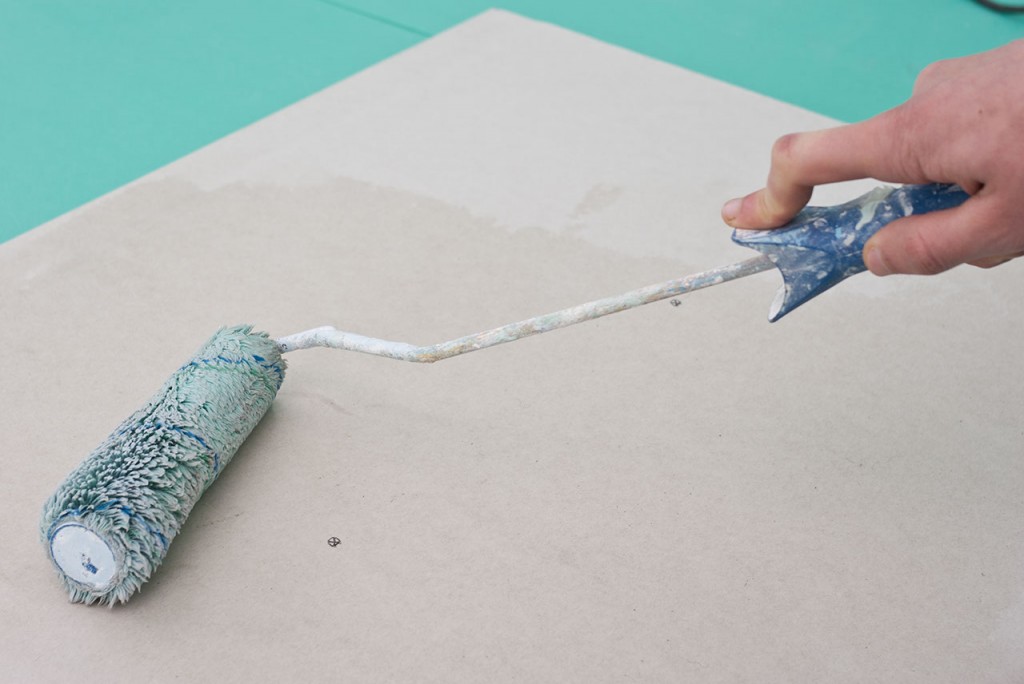
In this step, you will have to wet the drywall. The stage is crucial as it makes the drywall flexible, giving it the desired shape.
The technique is as follows. Lay the drywall flat on the concrete floor. Use a sponge or paint roller and wet both sides. The step does not need a lot of water, so make sure to apply it consciously. Excess water ends up damaging the boards and makes the drywall useless.
It is sufficient to wet the paper on both sides. It takes a little water to get a pliable board that is easy to manipulate.
Make The Drywall

Once the drywall is wet, give it the desired curved radius. You may even get a form in the curved shape. If you have it, then all that you need to do is to place the drywall on it and pull the ends inwards. Do not put a lot of pressure or force the ends. It will make the drywall crack or, even worse, may snap it into pieces.
Dry and Place the Board

You have the curve ready. Let the board dry, and then put it in its place. You may have to leave the board overnight to dry thoroughly. Once it is dry, the new form will serve effectively for the project.
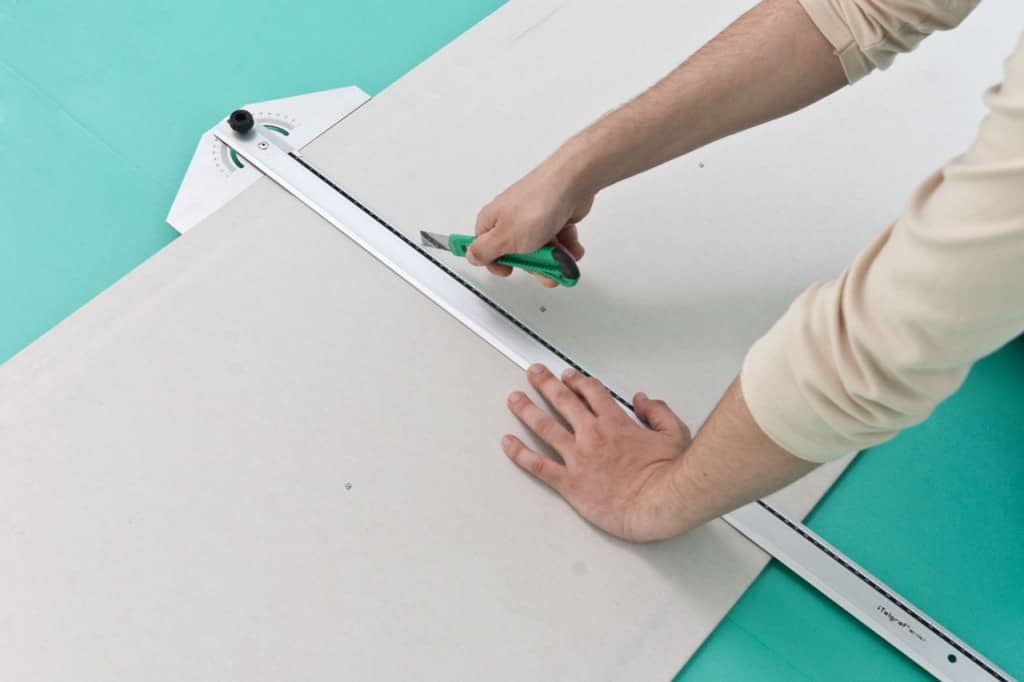
Alternatively, you can also try to score the drywall using a utility knife. It should be approximately one to one and a half-inch apart. To achieve the drywall board bent, break the paper when you score.
Also Read: 10 Best Drywall Sander Reviews for 2023
Bending Conventional Drywall – The Methods
- Use a roller or brush to wet the plasterboard on one side. Leave it for 5 to 15 minutes to let the moisture get absorbed in the gypsum sheet layer. Assemble the wet sheet by screwing it in the metal profiles. When the material dries, it becomes solid, and this holds its shape. The method should be used when you need a slight bend. Else the sheet may break.
- A needle roller is used to reduce the bending radius of the sheet. The sheet thus stays perforated on one side, and this makes it easy to bend the drywall. Before you bend it, soak the sheet in water at room temperature.
- You may also use a sharp knife if you do not have a needle roller. The cardboard layer should be cut on one side of the sheet in a 1-5 cm interval. The cut should be placed perpendicular to the workpiece bending line. The notched frequency determines the drywalls bending radius. If it is a concave structure, then cut the cardboard from the inside. If the sheet is bent outwards, then cut the front surface. You do not need to use water in this method.
- The method should be used if you need a small bending radius. Usually, a mill is used for this. Else a knife also works, but this affects quality.
Bending Drywall For Arches
Arch Gypsum Plasterboard GKLA
If you need arches or semi-arches in your interior project, you will need to purchase a gypsum board with unique arches designed for this purpose. It is also required if you need to make a wavy or a dome surface.
The material thickness is 6.5mm. These sheets are easy to bend. Therefore, it serves even in areas when the bending radius is minimal.
To install arched gypsum plasterboards, you will need to use arched profile frames with cutouts on the sidewalls, which allows a smooth bend.
Here are three methods particularly suitable if you wish to bend drywall for arches.
- Roll a gypsum cardboard sheet using a special awl or roller. Moisten the drywall, ensuring that water does not pass on the other side of the sheet. Place a plasterboard sheet on the form. If you do not have any mold, bend the sheet gently to get the desired radius and fasten it. Now insert the sheet in the arch and attach it. This method is preferred because you do not need any extra equipment or tools.
- If you need to make a small-sized arch, then cut fragments from the sheet material and cut a radial surface. Fasten each part onto a metal frame and treat it using putty. You may also cut on one side of the sheet and bend it. Putty gives it the desired shape.
- To make a shallow arch, use a plasterboard sheet of 6 to 9 cm. The plasterboard should not be pre-treated. Drywall should then be applied to the frame and fixed with screws. You, however, need to take care that the sheet is uniform.
As you see, if the drywall sheet is thin, it bends easily and takes a neat round shape.
Bonus Read: Joint Compound Vs Spackle: What’s the Real Difference?
Tips
- When you use arch GKLA on the wall or in the partitions, the design must be robust.
- A conventional drywall sheet is used for the first draft layer. Next, it is used for ceilings and walls.
- Installing the second layer or arched plasterboard gives the structure rigidity and a smooth bend.
- All the layers are made up of arched drywall. The number of layers varies, ranging from two to four. The method lets you craft a smooth and round surface. It, however, includes immense labor and material cost.
Also Read: How to Install Tile Edging? Complete DIY Guide
Conclusion
You will usually see curved surfaces made of drywall in interior design. All the methods have a similar basis but differ in the devices and tools used.
Bending drywall is not a straightforward task. If done improperly, it is sure to break. So follow this DIY guide which handholds you through the steps to efficiently and quickly bend drywall.
Related Topics:

 By
By


