

Whether you are a professional woodworker working on commercial projects or a hobbyist with a lot of DIY projects in the house, one tool that is a must in any woodworker’s armory is an orbital sander.
But to make the most of it you’ve got to know how to use it. From, loading the paper, applying the right amount of pressure to dust removal, there’s plenty you need to learn before you can craft the perfect table or bed.
And in this guide, we’ll tell you all about it.
How to Use an Orbital Sander?

But before we tell you how to use an orbital sander, here’s a low down on the anatomy of an orbital sander:
- Power switch – Used to turn the sander on/off
- Housing motor – The engine of the sander
- Sanding pad – Smoothens or buffs any surface
- Dust bag – Saves you cleaning time by holding in the dust
- Battery – The power source of the sander, though some are electric-corded sanders
- Palm grip – Makes it easy grip the sander
And some basic grit settings you should know about.
- Fine: 150-180 – Ideal for providing finishing touches to the surface
- Medium: 40-60 – Want to get rid of stain, paint, or rust? Those are the magic numbers.
- Coarse: 20-36 – Ideal settings to get rid of the current finish on a surface or smoothen a rough surface.
Now, let’s dig into the process:
Step 1: Loading the Sanding Paper
Once you choose the best grit level for the job from the above-mentioned reference, the first and foremost step is to load it on the base of your sander.
Most orbital sanders come with a hook and loop system and help you quickly remove the old sandpaper and set up the new one. Once the loading is done, don’t forget to double-check the alignment of the pad and the base.
In case you plan to use the existing sandpaper, make sure to check and remove any leftover splinters from the previous job for a smooth result.
Step 2: Get the Material Ready
You do not want the material to be moving around as you sand. Thus, it is best to clamp it to a heavier object around or put it in a vice.
Step 3: Do a Quick Test
Once the sanding paper and the material are in place, it is time to give it a quick test. Just turn the sander on and move it in a circular motion on any scrap wood lying around the house. If everything checks out, it is time to rock n roll.
Step 4: Sanding the Material
Before you start sanding, you want the sander to be running at full speed so give it between 10 to 15 seconds after turning it on. Another thing you want to ensure is that you always move the sander with the grain and do not angle it.
Step 5: Clean the Material
Move it over all the rough edges and once you feel they are smoothened, put the sander off, dust the splinter off the surface either using a brush or clean cloth and voila, you are good to go.
In case you think it needs fine-tuning, all you need to do is load sandpaper with a finer grit and repeat steps 2, 3, and 4.
Mistakes to Avoid When Sanding

Now that you know what you need to do it is also important to understand what you shouldn’t be doing, especially if you have been using other types of sanders. That is because an orbital sander works in a slightly different manner so make you avoid these mistakes.
Going Fast and Furious Right off the Bat
Simply put, sanding is neither a 100m dash and nor a marathon. In fact, we’d compare it to a 400m race. Believe it or not, the ideal speed for sanding is around 10-12 seconds per linear foot which means you should cover only about an inch in a minute.
Sounds too slow? Well, if you do not want the sander to leave circular motion designs all over the surface, it is the speed you must follow.
Applying Too Much Pressure
One common mistake almost every newbie makes in a hurry to get done with the sanding is to apply a lot of pressure onto the sander.
Well, all you are doing is slowing the motor down and, in turn, slowing yourself. Not just that, you also risk damaging the sander’s body
Orbital sanders work perfectly fine with little pressure because they are designed to work like that.
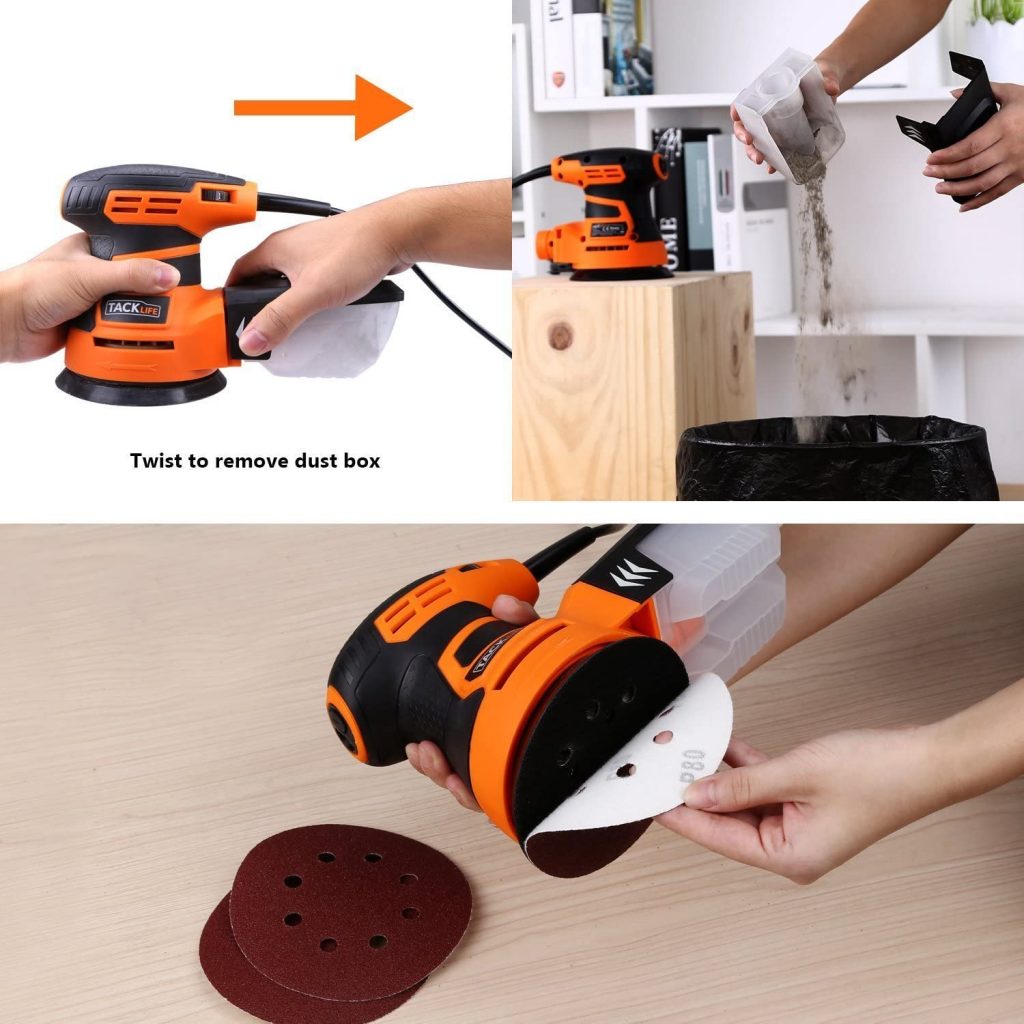
Buying a Sander With No Dust Removal
You might get a sander with dust removal since it helps reduce your work post the sanding but guess what, there’s more to it.
It also plays a vital role in maintaining the efficiency and durability of the sander. That is because the dust can easily get stuck between the padding and the object, in turn, resulting in rougher edges.
This is one of the reasons I recommend going with the Rockwell Orbital Sander. It is equipped with a cyclonic dust removal system. This is a special technology that can differentiate between the dust and air and pull the dust into the dust box.
It performs much better than any brush or cloth would at not just keeping your surroundings clean but you won’t have to constantly stop sanding to dust off the material either.
After the sanding is done, you can also use a vacuum cleaner to clean up the remaining mess and empty the dust bag in the dustbin.
Some sanders also allow you to hook up a vacuum directly to it and these also work pretty well. In case you have trouble with the hose, you can easily get an adapter for less than $10.
Angling the Orbital Sander
Almost any newbie woodworker who has tilted their sander has regretted it almost immediately. After all, what could have been a better way to remove those burn marks and uneven surfaces, right?
Orbital sanders are designed only to work on flat surfaces. So what do I do with these problem areas?
Simple, just do it manually with a block of sandpaper (trust me, you won’t regret it). But if that seems like a long-drawn process and you want something faster, a hand planer should work just fine.
Finishing Without Hand Sanding
While orbital sanders are great, nothing matches the quality that sanding manually with hands towards the end can provide. That is because some orbital sanders can leave swirl marks.
All you need is a flat sanding block for the job. Just make sure you continue to do the sanding in the direction of the grain.
If you do not have a sanding block and do not want to wait for the new one to arrive or don’t want to spend on it, no problem. Check out this video below and learn to make a sanding block at home itself.
Not Understanding Sanding Ddiscs
Yes, your sander generates the power and moves around to smoothen the surface but the bulk of the sanding work is done by the disc you load at the bottom. This is why it is important you know everything there is about sandpaper grits.
Yeah, a few movements with the wrong grit and all those hours of cutting and drilling will go down the gutter. We have already mentioned the various grit sizes and what they are used for above so make sure you use that as a reference in the beginning.
Also, these discs cost less than a dollar so you do not have to use the same sandpaper over and over again. And when buying new discs, avoid going for the cheapest, low-quality ones as they may have oversized grits that can leave scratches on the surface.
Plus, they last not more than 1-2 projects which means you will ultimately be spending more.
As far as storing discs is concerned, I usually keep the used ones standing on a shelf in my workspace as they come in handy for the small tasks.
Believe it or not, these used sandpapers are great for hand sanding the curves and the round edges. They also are useful when you need to turn the lathe for a project.
Lastly, if you are not sure about the grit size on the disc or are generally forgetful, make sure to note it down on the back of the disc with a permanent marker.
Not Wearing Safety Gear
When sanding, do not forget to wear glasses, gloves, and even a dust mask. That is because the finer particles can just as easily cause you mild to serious allergies or infections of the lungs.
Glasses keep the splinters from going ino your eye and damaging your vision and gloves help absorb any vibration, in turn, ensuring you do not feel any tingling or have aches in your palm or fingers the next day.
Read more: 10 Best Spindle Sander Reviews
Few Tips to keep in Mind When Sanding
Tip 1: If you are worried you might tip the sander while working on a narrow surface, it would be best to let go of the handle and grab it by the neck for a better grip.
Tip 2: For larger or commercial projects I would recommend going with a belt sander since it covers a bigger area.
Another thing you can do is use two sanders, i.e. one in each hand. But this will take some practice as you need to move them in the same direction without applying too much pressure to prevent over sanding certain parts.
Let’s just say, this one is for the real pros to attempt.
Conclusion
For any woodworker, orbital sanders are essentials as they help provide a premium finish to any project and the best part about sanders is that they aren’t that hard to learn.
All you have to do is focus and make sure you do the basic right and within 3-4 uses, sanding will be a breeze for you.
In case you have been using sanders before and have additional tips to share, do drop them in the comments section below or write to us via the contact form. You can also send in your questions if you are having trouble working with your orbital sander.
Till then, happy sanding.

 By
By


