

Depending on your tools, you may require separate storage space in your backyard to keep them. In addition, you may need a space to carry out some of your DIY projects safely without accidentally leaving harmful objects that can harm kids or pets. Whatever the case, a shed becomes a necessity in your backyard.
Now that we’ve established how important a shed is, you can go ahead and build your desired shed if you know the exact design and the plan to follow. And this is where it gets challenging since many have no idea about the design or detailed plan to build a shed. Before we talk about designs and plans, considering the size of the shed is quite important because this can affect the type of tools you store or activities you can do in the shed.
A 12×24 shed is a common shed dimension for people looking to build a large shed space that can carry large tools and afford them space for other activities. Generally, large sheds will require more materials, resources, and space to build. This piece focuses on providing interesting 12×24 shed ideas and plans to build in your backyards.
12×24 Shed Plans
12×24 sheds are large and easily accommodate most garden tools like lawnmowers and other hand tools. If you’re a DIY enthusiast who likes to execute projects, you’ll also find 12×24 sheds quite appealing. Here we’ll be highlighting some interesting plans with these specifications. These plans vary from type of roof to main material used, among many other variations, so that you can get close to the perfect shed for your backyard.
1. Lumber Shed with T1-11 Siding
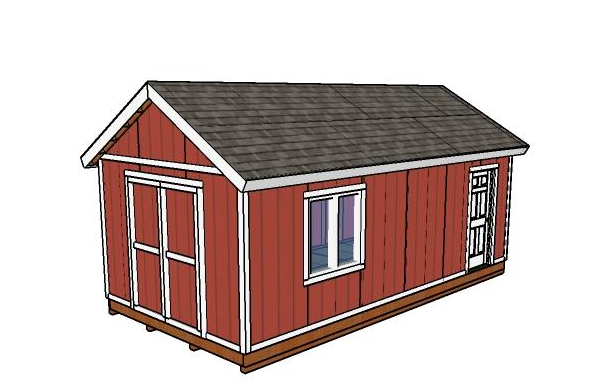
Here’s this 12×24 shed with all the frames made from lumber and the sidings from T1-11 material. This shed utilizes the popular plywood material that is easy to find and an effective flooring. It features a gable roof and two doors. The larger two double doors are located by the shorter side of the shed, while the single door is by the corner of the 24 ft side. As with most building projects, you’ll require tools like the miter saw, drill machine, carpenters level, sander, and more.
The two doors make access easier, especially as you can move larger tools through the double door. In contrast, the single door can provide quick access to the particular end of the shed. Building this shed typically starts with four pieces of 4×4 lumber forming long skids that support the floor, which is built using a 2×8 lumber frame. The 2×4 lumber is the most widely used as it joins the frame and makes it easier to attach the T1-11 siding material. Building a gable roof is easier than most, with this plan further simplifying the process by dedicating two parts to the roof.
2. 12×24 Highly Aerated Shed

Here is another 12×4 shed plan featuring a gable roofing style. However, this shed comes with four large windows on all sides, making it super aerated and suitable for proper storage and working in the shed. In addition, it sits on a block foundation giving it a stable base to carry the weight of this large shed. Aside from the properly aerated area, the shed also features two regular and double doors, all situated on one side of the shed. Having more windows increases the overall building time for this plan, with more measurement required and generally more resources depending on the type of windows.
The plan uses materials like PT lumber for the foundation, T&G plywood, concrete for the foundation, pressure-treated SPY for floor framing, treated skid, joist, and OSB for sheathing, among others other materials. You’ll find a detailed plan with all the materials and the plan with accurate dimensions you’ll need to build this 12×24 shed. This is a durable shed that will withstand touch climatic effects without damage. Pressure-treated materials usually cost more than regular lumber.
3. 12×24 Shed With Pressure Treated Lumber
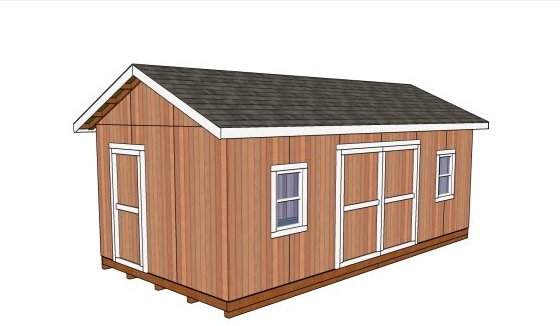
Investing in the best materials to build your shed is one of the best ways to ensure quality and longevity – this is why this idea utilizes pressure-treated lumber to make all the structurally relevant parts, including all the frames. In addition, pressure-treated lumber is extra fortified to prevent pest attacks, moisture damage, and more. Think of it like an upgraded version that can do what the regular lumber does and more, albeit costing more.
For this plan, you’ll require different sizes of pressure-treated lumber, T1-11 siding, regular lumber, rafter tiles, joist hanger, wood filler, structural nails, stain/paint, and more. In addition, you’ll need a jigsaw, drill machine with bits, miter saw, tape measure, and spirit level, among others. You can complete this shed in one day if you have some woodworking experience.
4. Double Section 12×24 Shed
Large sheds with an area up to 12×24 ft like this offer you so much variation, and this plan made by Keimpiece carpentry utilizes the extra space so well by having two sections. One section is a gym area, while the other is a workspace and storage area, with the two sections featuring double doors and two windows each, so cross ventilation is possible. This plan features all the materials, dimensions, and tools you need, like a wen track saw, cordless paint sprayer, planer, and sander, among others. To get the exquisite finish for this shed, you need a decent DIY experience and the right tools.
The plan features a visual presentation of the shed processes, from the floor framing to the final finish. Depending on your intended use, you can utilize the sections however you deem fit. The idea utilizes a solid frame first before adding sidings and roofing materials. Due to the materials used for this shed and the type of finish, it costs quite a lot to build. However, the result proves it is worth every penny you spend.
5. Classy 12×24 Backyard Shed
The idea is to start with a solid base, which is why this plan starts with framing the floor area with wooden posts held in concrete. The plan features a single door in front for easy access into the space and then a large 8×6.4 roll-up garage door for uninterrupted access and easy movement of tools like lawnmowers into and out of the shed. There are three glass windows for optimal air circulation, especially if you spend long hours working inside your shed.
The finishing for this shed is the most visible and is featured in the second part of the plan. The first part of the plan includes the floor and all the frames, including the hip/gable roof frame. The second part finishes with exquisite finishing with sheathing and roofing materials, glass windows, doors, and the gutter to gather rainwater. The cost of completing the plan varies depending on location and labor costs, if any. Typically, building a shed is faster and easier with one or two helping hands. However, it can still be completed alone if you can dedicate the time and energy to it.
6. 12×24 Shed With Single Slope Metal Roof
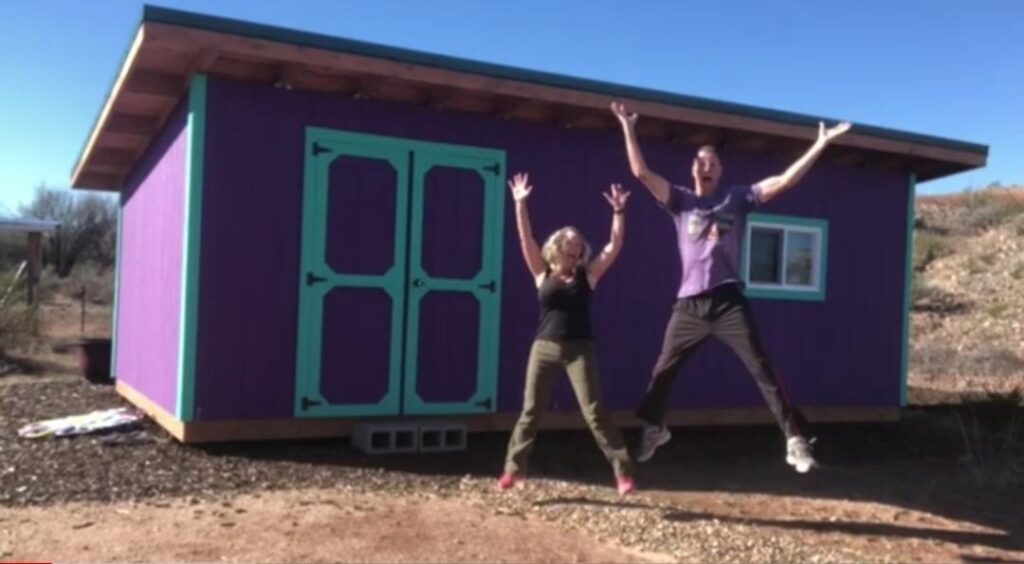
Here is a comprehensive 12×24 shed by Midlifeprices you can build in your backyard and enjoy the many benefits of a large shed space. This bold-looking shed uses a single-sloping metal roof, unlike the more popular gable roof in many backyards shed designs. Single-slope roofs are easier to build and require fewer materials, so they will typically be more affordable. However, they may have durability issues, especially in areas with strong winds. In addition, the plan features double doors and windows for air.
This shed is built on skids placed on gravel to provide stability and prevent moisture damage. Joist hangers sit on top of the skids, with plywood covering the frame and completing the floor. All the wall framings utilize 2×4 materials aside from the door and window frames, which are 2×6. The roof utilizes 2×4 wood for the rafters connected to the front and back walls using rafter tiles of various types. To show the detailed plan, it contains a ten-part series from building the floor to the final presentation. This shed is almost ready for use, with OSB sheathing covering the walls and a metal roof over the moisture blocker on the roof frame. Find out the complete plan by following the ten series starting from here.
Summary
While backyard sheds are common now, large sheds are difficult to find in backyards because of the resources required to complete them. However, if you have the space and resources, you may find the extra space quite useful, whether as a storage space, workspace, or even a gym area. By following any of the guides above, you should find the process straightforward to finish. Some plans are more beginner-friendly than others, with all the plans having different variations depending on your needs.

 By
By


