

Are you a shooting enthusiast? Attending plenty of backyard afternoons with your best pal where you’re shooting bottles, fruits, and probably even birds? Or do you make frequent trips to your forest cabin and give hunting a fair shot? Consider checking out these DIY portable shooting bench plans. There’s no better shooting experience than what comes with a platform for accuracy, stability, and in turn precision.
Most of these benches are super easy to build and can be done in a day’s work. Never worked with wood earlier? This woodworking guide will assist you in building a solid portable shooting bench, both in appearance and construction.
Being portable, all of these DIY shooting bench ideas are compact in structure, lightweight, and offer a quick-open and quick-close functionality. Rather than wasting a hoard of bullets and cartridges, simply get a shooting bench. This assures that each shot counts and you’re not aimlessly firing bullets. Besides, you also get an exceptional grasp of your aiming skills.
17 Best DIY Portable Shooting Bench
Here are 17 of the most effective DIY portable shooting bench plans to help up your firearms game:
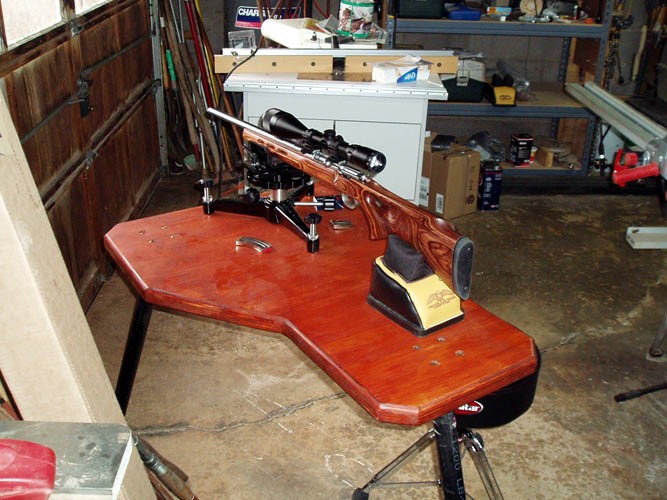
1. Sturdy DIY Portable Shooting Bench

This plan comes with a technical drawing indicating ideal measurements for the shooting bench. Along with the materials and every little detail that you’ll need to cater to, the DIY plan can be completed in under $75.
Weighing 55 pounds, you can make the legs foldable and have precision shooting experiences as your reward. Don’t forget to weld a cap at the end of each leg, this prevents dirt particles from collecting and ruining the alignment of your bench. Make sure the end product is refinished using quality polyurethane coating.
Supplies:
- Three legs 31’’ long, 1 ½ ‘’ galvanized pipes
- Twelve stainless steel bolts 2 ½’’ x 3/8’’
- Three 1 ½’’ couplings
- Twelve nylon lock nuts
- Three 4’’ x 4’’ x ¼’’ steel plates
2. Portable Swivel Top DIY Shooting Bench

You can break this shooting bench down and carry it wherever you like! It comes packed with several highly valuable features that even a commercial product may not offer. Apart from building a portable swivel top, you can also use the rear leg to adjust the elevation of this shooting bench.
This guide also shows you images showcasing the unassembled components! It will provide you with a visual assurance that it seamlessly fits in a large duffle bag. Even better, you can attach it to a receiver hitch extension, fold the bendable legs, and take it across locations.
3. Super Comfy Shooting Bench Plans

The segregation in steps makes this complex-looking shooting bench an easy to build a piece of equipment. The guide is divided in a systematic manner and has 3 steps each for building the top and leg mount, and then assembling both the parts.
As you want to maintain the uniformity of the top surface to erase the slightest possible discrepancy in aiming, you need to perform exemplary finishing to prevent damage from weather and rough usage. Either apply Formica or a Marine varnish, or even an outdoor deck weather sealer. If you’re looking for something that you may already have, then go for polyurethane varnish.
Supplies:
- 28’’ x 36’’ x 1’’ plywood
- Three 1 ¼’’ galvanized floor flange
- Three 1 ¼’’ x 30’’ galvanized pipes with threaded ends
- Three Screw-on galvanized metal end caps
- 1’’ x 4 ½’’ x 24’’ Oakwood
- Six each: 2’’ x ¼’’ and 1 ½’’ x ¼’’ diameter wood screws (attached countersunk heads)
4. Classy DIY Portable Shooting Bench
This DIYer calls it a “jury-rigged” portable shooting bench. His creativity sparked him to use an old aquarium for the metallic base. What do you think you can reuse?
Apart from the sandbag and sturdy gun resting equipment, this portable shooting beach has ample of features to leave you surprised.
Additionally, the number of images through each step of this guide will make this DIY project a very doable task. There are also a few variations once the main structure is built. This gives readers the option to make it into a one-piece shooting bench with a pressure pad, amongst other variations.
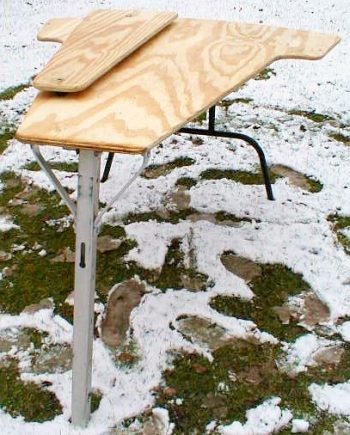
5. Attached-Seat DIY Portable Shooting Bench

Some digging made us come across a Reddit user who has generously posted free DIY plans for download on his thread. The plans come with ambidextrous capabilities. All the shooter has to do is twist the table upside-down and reverse the seat-locking component.
As you will be using plywood, it is of utmost importance to give the final piece a thorough round of coating and sealing. Leaving it exposed could force the structure to rot and lead to ugly-looking swollen ends. This beats the purpose of offering you precision while also throwing your valuable time in the drain.
6. Four-Legged DIY Portable Shooting Bench

This is as simple as it can get! No unnecessary burdening parts, just a plain strong sheet of plywood that is sanded to perfection. Be warned, the plan is not as detailed as the rest, but basic carpentry skills should easily take you through this DIY project.
Pay extra attention while attaching the legs as even a slight miscalculation would lead to improper foldability. The key is the attach the rear legs to a double thickness of plywood (this helps the leg to fold to a complete flat angle). Read point number 8 in this plan for more expert insight on this step.
Most importantly, coat your bench with a heavy/dark color of walnut stain. This kills the chance of any glare while shooting.
7. Quick-Assembly Portable DIY Shooting Bench
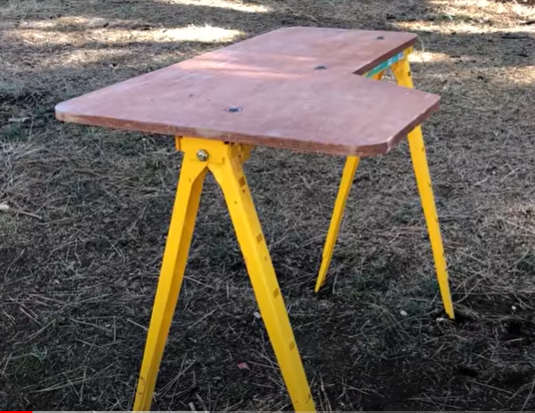
Despite the guide being in a video form, the clean design clearly exhibits the exceptionally simple usage methods for this shooting bench. The yellow legs will fold in the swiftest of manners, and when opened up, they lock into a tight position without having to put in any extra effort.
All credits to the metallic sawbucks. They are cheap, sustainable, and offer greater functional characteristics. Don’t want to deal with the hassle of bench legs that open up during transport? A Velcro strap could save you from this trouble.
8. DIY Portable Shooting Bench with Leg Rest & Seat

Could you believe this shooting bench can be completely disassembled and even fit under your car seat? Few noteworthy features are its cost-effectiveness, portability, 30 to 40 second assembly, rock-solid built, and its ambidexterity.
This plan comes with videos and perfectly crafted drawings, whether you want them with or without dimensions, or even trim ideas.
The curvy lower part of the bench provides leg rest to offer the shooter greater stability while searching for precision in his aim. Also, the table has a big enough surface area to place additional equipment or even assemble various guns without much confusion.
9. DIY Winter Swivel Top Shooting Bench
A little modification makes this way more than a portable solution. Try and make the single front leg a detachable support structure that can simply be packed in the bag when not in use. Irrespective, the lower body tripod offers more than the required room for the shooter.
Besides the swivel top, there is an added raised section on the bench that can be moved as per the shooter’s preference. This offers a wide arc shooting angle without having to continuously move the sandbag or the shooter’s position altogether. What better solution to make moving targets an easy hit?
The DIYer suggests that you don’t make an attachable seat as this could disturb your attempts at acquiring accuracy during distance shooting.
10. Elegant DIY Portable Shooters Bench
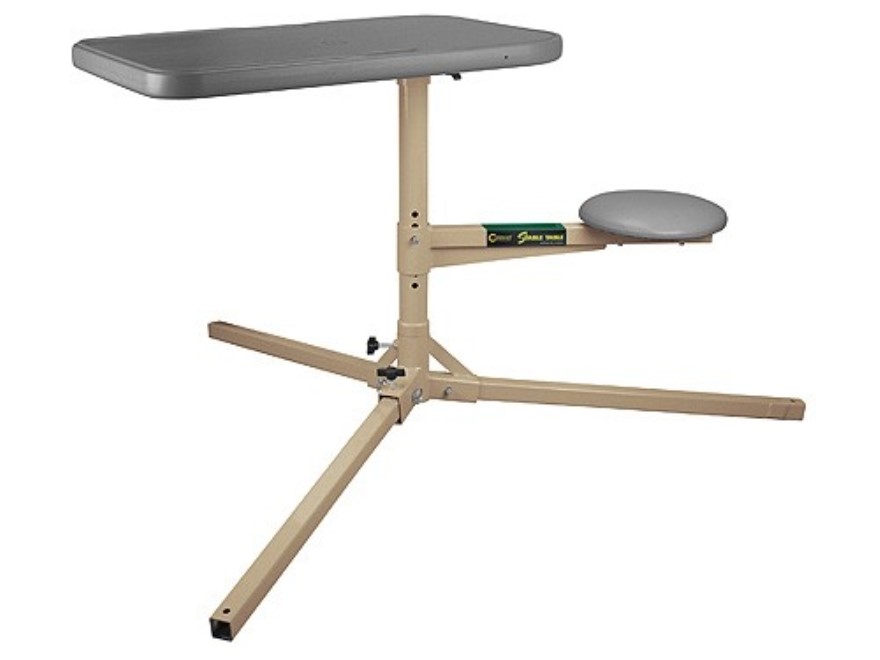
Looking for a full-fledged shooting bench construction that comes with quality attachments in the form on metallic rectangular shaped legs and a minimalistic round seating arrangement? This plan may look highly appealing but get ready to shell out more money than what all other plans in this article would need.
11. Mobile Shooting Bench Plan With Tires

Mobility is vital for large projects like this shooting bench plan featuring two tires attached to the table legs. You can easily roll this bench to your desired location with the help of the tires. The shooting bench also features two benches on either side of the table, so left-handed and right-handed shooters can comfortably shoot with their dominant hand.
Start by building the table frame using 2×6 lumber before adding three legs, with two in front and one at the back. For stability and strength, 4×4 lumber is used for the table legs. Attaching tires to the two front legs will make it easy to move the bench to a new location.
The sitting area features two benches attached to the single table leg at the back. This mobile plan ensures your shooting bench lasts longer as you can take it in when not in use, protecting it from the weather. For finishing, fill the holes with putty and allow them to dry before applying layers of stain or paint to get your desired hue.
12. Concrete Shooting Bench

Concrete is strong and durable, offering some important qualities for shooting bench needs. The benches made of concrete provide a stable surface that cannot be shaken no matter the rifle’s force. Concrete brings high stability and durability as you no longer have to worry about moisture or harsh weather damaging your shooting bench.
The concrete beach features a concrete top on a platform raised using blocks. For a substantial project, this shooting bench plan is pretty affordable. The plan features a right-handed shooter tabletop, but you can flip the design if you are left-handed.
Follow the plan, which includes a video for all the materials you’ll need, an estimate of the cost, building processes, and more. The bench and table tops are made of concrete slabs molded on the ground first.
13. Lightweight Shooting Bench With Stylish Legs

Here is an ambidextrous shooting bench where you can flip the table and reverse the seat locks with your dominant hand. The design is lightweight and portable, so you can move the bench to any shooting range. With stylish legs featuring crafty wood carvings, beautifying the shooting bench, and improving its appeal, this bench will surely attract the attention of other shooters in the range.
While it is portable and lightweight, it retains strong durability to support any rifle and withstand heavy recoil. Oversized and locking T-nut brackets hold the legs to the tabletop and can easily be dismantled to pack or move. Due to the type of nuts holding the parts, you don’t need any tool to disassemble the table.
Building this take-down shooting bench requires special cutting tools due to its stylish legs, but joining the parts together is straightforward. The bench is great if you don’t have a dedicated range and require movement to different locations to shoot. While the idea is to leave the wood as close to the natural wood hue as possible, staining is vital to protect the wood from damage.
14. Stable Shooting Bench

Start the project by cutting the pieces for the tabletop with the two 57″ parts, one 36″ piece, two 27″ pieces, one 18″ piece, two 9″ pieces, and a 15″ piece among the pieces of lumber required. Joining the pieces together needs the help of 3″ framing screws and a drill bit with the exact pattern explained in the plan.
The legs are made of 4×6 lumbers that are large and durable to give the tabletop a stable platform. Three legs, each 42″ long, will hold the frame upright and provide the necessary height to use the shooting bench comfortably. Attach the legs using 16×4″ lag screws which are large enough to hold the thick lumber in place.
The seating area uses the same lumber used for the top frame and the legs. After completing the frame with legs, the next step is to cover the tabletop using wooden boards. You’ll need to screw them firmly to the frame top and ensure they fit tightly to each other, so there are no open spaces between them.
15. Large Shooting Bench Design

Here is a large shooting bench plan designed with ambidexterity in mind. The large table surface gives the shooter enough space to shoot comfortably and enough room to place the gear bag and other shooting equipment. However, large surfaces mean more materials are required, and the weight is significantly increased.
Some materials used for this bench are five pieces of 2x4x8, three pieces of 2x6x8, two pieces of 4x4x8, five pieces of 5/4 8″ deck boards, nine 7″ bolts, and 2.5″ deck screws. With these materials, you can quickly build this large shooting bench with extra support for its legs. The miter-saw is used to get accurate lumber cuts for the project.
The bench is attached to the table legs with large screws, which provide all the support it needs. Before securing the pieces, you can notch the 2×6 lumber for the front end of the frame to create an aesthetically pleasing design.
16. Full Concrete Shooting Bench

Building a shooting bench with lumber will cause many problems and reduce its durability if you live in regions that see a lot of sunlight and rainfall. A robust, complete concrete shooting bench like this will provide the ultimate accuracy when shooting as it will not shake or move, no matter the recoil force.
The construction is in three phases, starting with building the concrete floor, three pillars by filling hollow tubes with concrete, and the tabletop slab. For the tabletop, you’ll need to construct a mold with the ambidextrous frame in mind. You then fill it with concrete so that the concrete fills up all spaces.
Liquid nails hold the concrete to the pillars, ensuring it doesn’t slip off. Concrete takes a few days to dry, so you must provide the legs dry entirely before setting the slab on top of the pillars. While this labor-intensive project may require a helping hand, it is affordable.
17. Simple DIY Shooting Bench

Here is a simple and classy shooting bench even a beginner-level DIY enthusiast can build. The design is perfect if you’re looking for a lightweight and portable shooting bench to take to your shooting range without breaking a sweat. Even though it is portable, it is durable to carry heavy rifles. However, its small surface area makes it unsuitable for large rifles.
The bench features a large tabletop cut out from a wide board, ensuring ambidexterity. This way, you can comfortably use the shooting bench, no matter your dominant hand. You can complete this project in two hours with suitable materials and cutting tools.
Some materials you need include birch plywood for the tabletop, quality glue, flathead bolts for fastening pieces, 18 to 20-degree angled NPT threaded couplings, and black iron pipe, among other materials. Ensure to properly mark the birch plywood before cutting with a table saw and jigsaw.
FAQ’s
Do you have any lingering questions about building a shooting table? Others may have had the same questions, too, so we’ve compiled this FAQs section.
Ans. Large enough to accommodate your rifle and still leave small room for comfortable hand placements.
Ans. It depends on the type of bench you’re building. Mobile shooting benches are not set in the ground so you can move them around. However, it means they may not be the most stable when shooting. On the other hand, bench legs set in the ground may not be mobile but offer enough stability for accurate shots.
Ans. Wood and concrete have significant advantages, with wood being more mobile and easy to build, while concrete provides a solid and durable platform.
Verdict
Portable shooting benches are essential if you want a stable and comfortable shooting platform. The style of your bench depends on your needs and available material, and this guide provides several plans with different styles that you can follow.
You can either work any of these DIY portable shooting bench plans for your backyard firing sessions or for the monthly field trip with the gang.
Do you resort to solving your vermin issue with your rifle? Well then might as well build a cheap and long-term shooting bench that is not only portable but also stays with you in the long run.
Have a look at the 10 best sliding compound miter saws available in 2023. They will be of great help while building a portable shooting bench.
If you have loads of time on your hands and are looking for an out-of-the-ordinary DIY project then consider inspiring yourself with these 18 DIY arcade cabinet plans.

 By
By


