

If you own a pet reptile or are planning to buy one, giving it a comfortable enclosure must be high on your priority list.
Buying a reptile enclosure can be worth a pretty penny, although not everyone can afford it. Fret not! Building a DIY enclosure for your reptilian friend is the perfect answer to your problem.
Bonus: You might also be interested in these DIY Fireplace Mantel Ideas
Not only is DIY an affordable option, but it is also a very exciting one. Furthermore, the sense of satisfaction that comes from building a beloved pet’s home with your own hands is a wonderful bonus.
We have put together a list of 13 simple reptile enclosure plans that are remarkably easy to create. Take a look!
1. Wooden DIY Reptile Enclosure
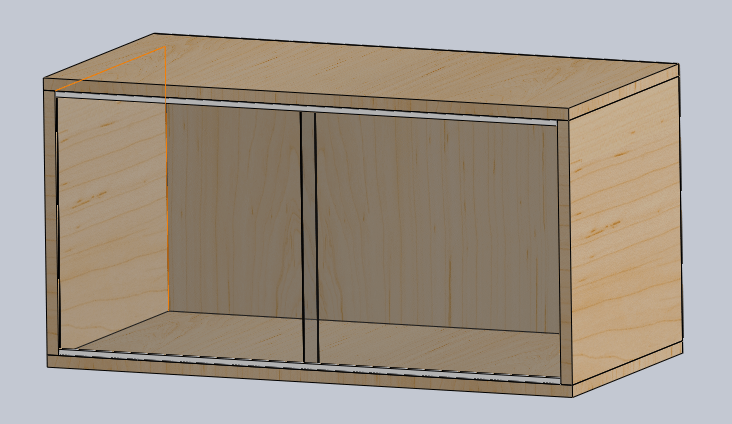
It doesn’t get much simpler than this basic wooden DIY reptile enclosure plan from Reptile Range. Just buy five sheets of wood, screw them together, and add two sliding doors at the front.
While perspex doors are pretty straightforward to install, adding glass doors requires some skill. Choosing one over the other will depend on the budget, as glass is slightly cheaper than perspex.
Also, depending on the species of the reptile to be housed and its size, you can choose to build either a horizontal enclosure or a vertical one. Horizontal enclosures are ideal for medium-sized reptiles while vertical enclosures suit smaller species.
2. DIY Reptile Enclosure Made Out of an Upcycled Bookcase
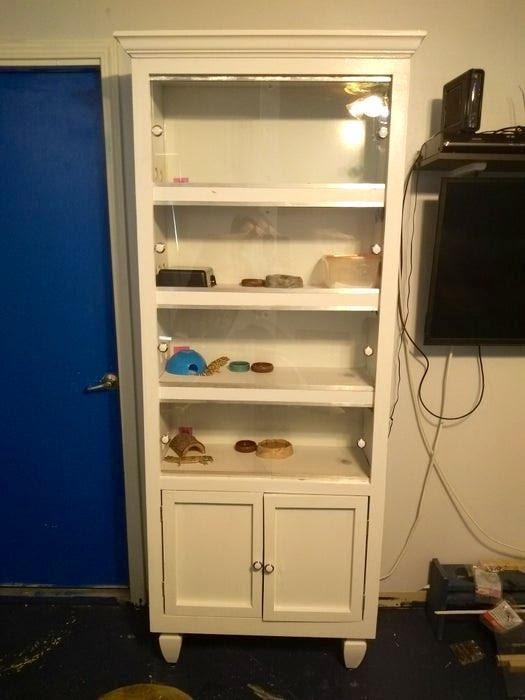
If you can get your hands on an old out-of-use bookcase, consider building this out of the mentioned DIY reptile enclosure plans. The entire process is sure to test your skills but the end product will be well worth the effort.
First, remove the doors from the bookcase, fill the holes left behind with a wood filler, and sand the area for a smooth finish. Next, drill some holes on the sides for ensuring proper ventilation.
The bookcase shelves can be finished from the inside by lining them with contact paper. However, paint is an easier alternative. Just make sure to wait for a while after it dries lest some toxic fumes should hang around and harm your pet.
All that’s left to be done is adding tracks for the sliding doors and installing them. There you have it! Your DIY reptile enclosure is ready for use.
3. DIY Enclosure for Brazilian Rainbow Boa

This DIY plan uses old, glass windows that aren’t hard to come by. If you’ve had any renovation done at your house in the past, some windowpanes are likely lying around waiting to be repurposed.
What better way to make use of them than building this special enclosure for your pet boa?
The plan is simple enough. To be sure, some care is required while cutting the glass as freshly cut edges can be very sharp. It is advisable to sand them down to avoid the chance of hazards while working.
Once the glass is cut, the cut pieces need to be assembled to make a box. To make the process easier, try to assemble the glass box in its correct position, so you don’t get confused later. Use GE silicone I along the edges to join the pieces of glass together.
Next, add wood trims to the sides facing the front. These trims come in handy when you need to fasten the door and hinges to the terrarium. Once that is done, install the door using a drill and screws.
Done! That wasn’t so hard, was it? Have a go at this simple DIY reptile enclosure plan to build an inexpensive but stylish home for your scaly friend.
Bonus tip: Looking to upcycle old wine bottle crates? Here are 50 beautiful Ideas to do so.
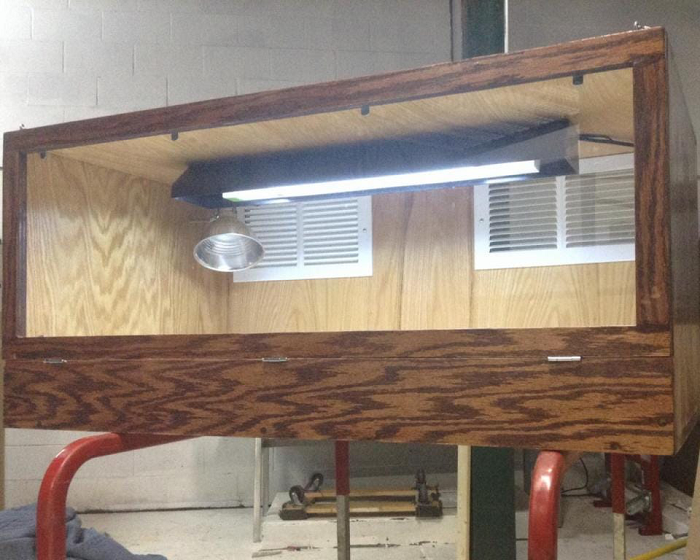
4. DIY Reptile Cage

You would be surprised to find how easy this enclosure is to create once you have found an old readymade cabinet. Old cabinets will cost you less in terms of both money as well as the time taken to build a new one from scratch.
Decide which parts of the cabinet are useful and which ones need to be discarded. Remove the useless ones and replace them with hardboards, if required. It is very important to seal all the edges and seams with a sealant such as GE Silicone I. This prevents moisture from building up inside the cabinet.
Next, insert vinyl flooring on the inside and then proceed to add glass tracks at the bottom. The only thing left to be done now is installing the sliding glass doors and your custom-made enclosure is ready!
5. DIY Iguana Cage

If you own an iguana, you would agree that adult iguanas are fantastic beasts. Needless to say, their enclosures must be equally fantastic. This DIY iguana cage plan lets you build one such enclosure.
The great thing about this plan is it allows you the freedom to choose whether you want an indoor or an outdoor cage. Instructions are provided for both and the materials required are slightly different in each case. For instance, you only need fence posts for making an outdoor cage.
Once you’ve decided where you want to set up the iguana cage, the first step is to assemble the frame. It’s best to do so in an open space so you can work with the large frame pieces without being restricted. Just insert the wooden fence posts and connect them with longer framing pieces.
Set the door, attach the wired mesh, put in some substratum such as plants, and voila! Your DIY iguana cage is ready to welcome its esteemed reptilian guest.
6. DIY Bearded Dragon Enclosure

Another DIY reptile enclosure plan involving upcycled furniture on our list, this one from Instructables provides a cheap and easy-to-make option.
Simply disassemble any old dresser or cabinet, remove damaged or useless parts, install plywood on the inside and outside, and add slide rails for the doors at the front. Additionally, remember to drill some vent holes into the back or the sides of the cabinet to ensure proper airflow.
For the final flourish, slide plexiglass panels into the glass tracks, screw poultry fabric to the top and it is good to go!
Want to learn the basics of tile cutting? Check out this comprehensive tile cutter guide.
7. DIY Turtle Tank With Underwater Tunnel

Are you the proud owner of a turtle? And are you looking to give your swimming friend a proper home? This turtle tank project is just the DIY reptile enclosure plan you need.
Yes, it involves a lot of careful planning, a hoard of tools, and some very skilled execution, but the tank, when built, is nothing short of beautiful.
The project becomes a lot easier if one can find an old aquarium. The rest of the process like cleaning, painting, and finishing the aquarium goes fairly smoothly.
Adding the underwater tunnel is the tricky part. You can choose to avoid building it if the work appears tedious. However, for an exotic-looking turtle tank, you should give it a try!
8. DIY Chameleon Lizard Cage

Chameleons are sensitive reptiles and can be a little difficult to sustain as pets for a long time. As such, their enclosures should be built while keeping their absolute comfort into consideration. The best way to do so is to replicate their natural habitats in any cage made for them.
For this reason, a DIY chameleon cage plan such as this one by Reptiles Magazine is an ideal choice.
The plan involves buying an appropriately large hardware cloth, rolling it into a tube, and securing it at the top using fasteners. Use silicone to fix the tube into a plant saucer and cover any sharp edges for a perfect finish.
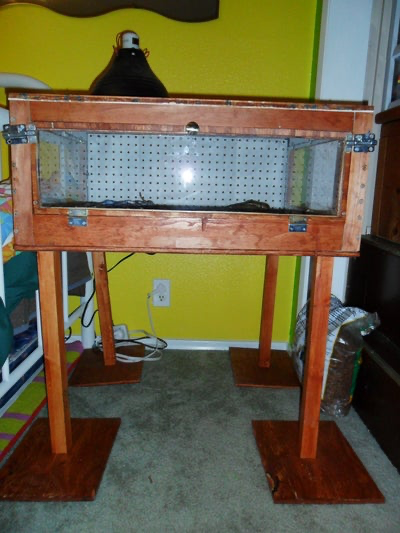
9. DIY Indoor Tegu Enclosure
Tegus require a horizontally long terrarium with an in-built burrow where the creature will spend most of its time. This DIY indoor tegu enclosure plan has all these features and is detailed and simple-to-follow.
For a cheaper enclosure, consider making one with a door that opens at the top instead of at the front. You can simply use plexiglass at the front to create a viewing window. In case you build it to open at the front, once again, plexiglass can be used as the entire door.
Ground coconut fiber is the right substrate to use as it is easy to clean and absorbs moisture as well. As for the burrow, any hollow utensil or pot that is sufficiently large and has a small opening will work well.
10. Simple DIY Reptile Enclosure Plan
Basic and easy enough to build, this simple DIY reptile enclosure plan is an exemplary choice for reptile owners. The design is based on a melamine enclosure and is customizable according to size.
The melamine needs to be bought as a sheet, cut to suit measurements, and the individual sheets should then be joined together using screws. PVA glue helps seal the cut-out melamine which can then be ironed at the edges for a smoothly lined finish.
For good measure, add a sealant along the edges and allow it to completely dry off. The final step is to install a sheet of glass at the front. There you go! The DIY reptile enclosure is finished and ready for use.
11. DIY Reptile Enclosure Plan Made Out of Acrylic Terrarium

A DIY reptile enclosure made entirely out of acrylic is not only lightweight but also nice to look at. Add the durability of plexiglass to the mix, and you have a pretty solid structure to work on.
If you have the necessary tools, the list of materials can be dealt with easily enough. Even so, having to buy the tools should not act as a deterrent for the DIYers among you, as the next DIY project is always within sight.
To avoid unnecessary hassle, get the acrylic cut by your plastic supplier. Mark the places where you have to drill the holes. Always remember to use progressively larger drill bits to drill acrylic, otherwise, it may crack under pressure.
Glue and clamp the pieces together for a sturdy finish.
Bonus tip: Thinking of revamping your outdoor seating? See this list of fantastic DIY Sofa/Patio Plans.
12. DIY Simple Wooden Reptile Enclosure
This is a simple reptile enclosure, and as such, is ideal for first-time DIYers. No fancy tools are used in building this wooden enclosure. All you need are a clamped T-square, a circular saw, and a drill and you can cut the pieces of wood easily.
The barrier at the bottom helps to keep the substrate from falling out of the cage. Suitable substrates include soil, wood shavings, sand, newspaper, and moss. Choose any one based on the needs of the reptile that will be housed in the enclosure.
To finish the design, simply drill some vents holes at the back and add wooden frames at the front where you can install sliding glass doors.
Bonus tip: Budding woodworkers should check this review of the best chainsaws you can buy for your next project.
13. DIY Reptile Cage For Ball Python
This is a custom DIY cage for a ball python but can be used to house a variety of snakes. The size of the cage depends on the size of the snake or reptile that will go in it. Do note that the larger the dimensions, the easier it will be for the reptile to roam around freely in the cage.
Use two pieces of plywood to cover the top and the bottom of the cage as well as an additional sheet for the door frame. A handy tip is to add the top plywood at the end for a smoother installation.
Conclusion
Reptiles have different needs as compared to other pets such as dogs or birds. For this reason, their enclosures must be designed to accommodate their special requirements.
This list of 13 simple DIY reptile enclosure plans includes many beautiful and functional designs that will help you make a cozy and comfortable home for your pet friend.
Bonus tip: Want to build a dream bunk bed? Check out this list of 68 amazing DIY bunk bed plans.

 By
By


