

Looking for an answer on how to tile a bathroom wall? Then this is just the article for you!
Hiring a professional is going to cost you a bomb. But there is another route too. Taking the bathroom tiling work as a DIY renovation or self-build project can help in pinching the pennies. The secret is in proper preparation, planning, and execution. And we are here to help!
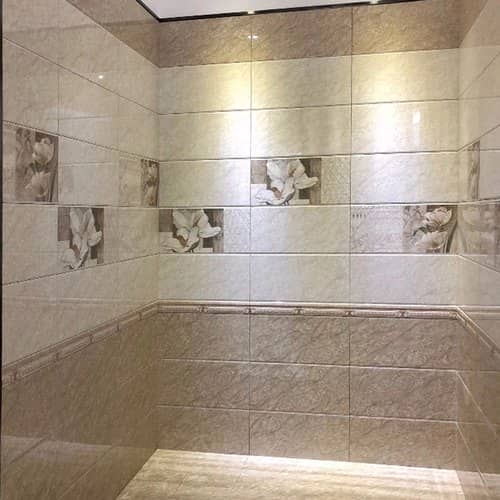
Why Tile Your Bathroom Wall?
We agree that there are many options when it comes to designing and decorating your bathroom wall. So why chose to tile?
If you have already been browsing through the internet or flipping through home decor magazines, most of the suggestions would be leading you to tile your bathroom walls. And this is not without a reason.
- Tiling is a practical choice, perfect for adding to the decor, and also fits the purpose.
- Tiles prevent algae, and fungi growth is easy to wipe the condensation off and is hygienic too. No wonder tiles easily find a place in these humid and wet bathroom walls.
- Tiles have the potential to change the aesthetics of your bathroom, giving it a more spacious and luxurious look.
- And these last beyond 15 years, so tiling is a value for money, long-term investment.
Choosing a Tile for Your Bathroom Wall
The options here are endless, which could get your mind to wander. In a nutshell, the world is an oyster when you go hunting for tile designs and inspirations.
The common materials, however, are ceramic, natural stone, glass, or porcelain. Then there are patterned, gloss, and textured tiles. Real stone and manmade tiles are popular too.
Natural stones add character to your wall but come with extra care requirements. Manmade tiles are a budget-friendly way to revamp your bathroom wall. These also ask for very little upkeep.
Light colors make the bathroom look spacious. Patterned tiles are in fashion now and are a unique feature in your bathroom.
So shop around a bit, get some samples and decide what fits your style and budget.
Tiling the Bathroom Walls – The Setup
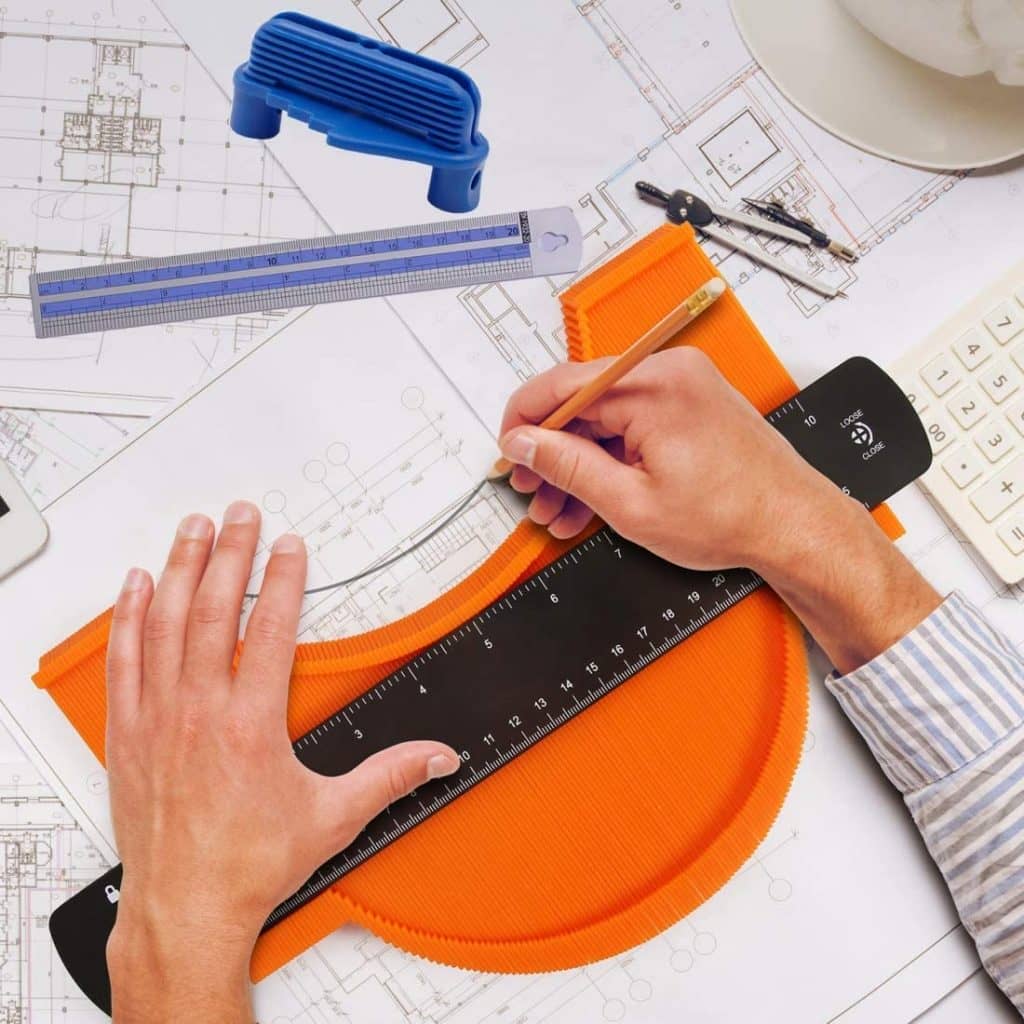
Tools
- Drill
- Grout floater and spreader
- Trowel
- Spreader for the Adhesive
- Tape measure
- Spacers for wall tile
- Grout shaper or finishing tool
- Wooden support
- Pen or pencil
- Cloth
- Cable detector and a Pipe
- Spirit level
- Battens
- Sponge
- Bucket
- Tile scribe
- Hack saw
- Window scraper
- Mitre block
- Metal ruler
Safety Equipment to Source
Tiling is messy and dangerous too. You will need to handle many sharp instruments, and thus, safety should be a priority. Here is what you will need.
- Heavy Duty Gloves
- Protective dust mask
- Eyeshields
Dust masks and goggles are crucial when you are mixing adhesive so that you do not inhale the mixture. It also protects your face. Heavy-duty gloves and goggles will keep you protected from any shattering glass if broken.
Material Needs for Tiling
- Wall tiles
- Grout protector
- Tile trim
- Screws
- Adhesive
- Water
- Grout
Preparation
The wall should be prepared before you start the tiling project. The preparation is easy. Just sand the surface down, clean it and seal it. That is all about it.
If the wall is recently installed or made of bare plaster, ply, or timber, then use a PVA primer as these surfaces are highly absorbent and will soak the adhesive.
In case using porcelain or natural stone tile, you need to seal them with the right sealing solution before and after you grout the tile. This will not cause staining or moisture ingress.
How to Tile a Bathroom Wall: Step by Step Guide
Here is a complete insight on how to carry out the bathroom wall tiling DIY project.
Step 1: Measuring/Calculating the Number of Tiles

Now that your bathroom wall is all prepared, it is time to calculate the number of tiles that you will need. For this, just measure the area of the wall and the area of the bathroom tile chosen.
The number of tiles needed can be calculated as the area of the wall divided by the area of each tile.
Add a little extra, say 10% more, to cater for any breakage or accidents.
If you wish to add grout, then include a roughly 2 to 3 mm gap between the tiles and accommodate it in your calculation.
Also important to keep in mind here is that not all the wall surfaces will support the same weight. Ensure that you know the type of wall and the maximum tiling weight per meter square that it can withstand.
Step 2: Cutting the Tile

A tile cutter is the best way to cut the bathroom tile. Mark the cutting point and draw a line with a pencil. You may also use a metal ruler, place it on the intersection area and mark it up. Score upwards and downwards to the length of the entire tile.
Place the pencil under the scored area, apply pressure and get a clean snap. Some shards could eject towards you, so make sure to wear eye protection and take proper safety precautions.
Step 3: Arranging the Tiles

The tiles need to be well balanced. An asymmetrical pattern works the best. Each side of the wall should have the same length as the cut tile. Ideally, it would be best if you worked on a full tile when you are designing the bathroom wall. The result is better.
A tile gauge lets you create an even design. You need a piece of wood or a wooden batten which is half of the wall’s width. Place the tiles using spacers along the length and mark the tile points will a pencil along with the button.
Step 4: Using a Tile Gauge
The tile gauge lets you mark a midpoint, horizontally on the bathroom wall. Measure the length of the wall and then mark the midpoint with a pen or a pencil.
Place the tile gauge on the wall and line the tile point with the central mark created on the wall. Keep sliding the gauge towards the left from mark to mark till you have a gap between the batten and the corner of the wall. This will let you calculate the tile size needed at each of the ends.
If the space is more than half the tile, then it is perfect to begin. If it is less than half the tile, then move the central tile gauge mark towards the right by half a tile. It is a hit-and-trial method but will eventually work out.
After you get the point, mark the place where you will fix the first full tile. This should be done near the skirting board. Use the spirit level and follow the vertical line from the wall’s top to its bottom. The same technique should be applied on the vertical axis.
You must check the lines with a pipe detector. This should be done vertically as well as horizontally. If there are no pipes, then go ahead and screw the tile gauge to know exactly where the tiling should start from. This will ensure a visual appeal and give it a professional look.
Step 5: Preparing the tile Edge
Correctly measure the gap between the corner and the tile edge. Add any grout space in the calculation. It is a good idea to measure every gap in case the wall is not straight. Write the numbers down.
Step 6: Mixing The Tile Adhesive
The kind of adhesive that you will need depends on the wall surface. Use a mixing paddle to create a thick paste with no lumps.
Step 7: Tiling the Bathroom Wall
- Using the wood batten as a reference point, take your trowel and apply sufficient adhesive to cover up a total of one square meter of the wall. Now use the notched spreader to comb through the adhesive and give the wall an even and full coverage.
- Take the tile and place it along with the wooden batten. The tile should be secured to the adhesive. Repeat it the next time, taking care to leave spacers between the two tiles. This will ensure a consistent gap.
- Check that the tiles are flat and at a level using the spirit level. Else you will have to remove the adhesive and take the tile off and repeat the process.
- Once done, remove the extra adhesive from the surface and the grout lines. Use warm soapy water, and with a sponge, clean the area. Let the adhesive dry. Follow the manufactures guidance to know how long you should leave the tile on.
- Give enough time for the tiles to dry and then remove the batten.
Step 8: Tiling the Bathroom Wall Edges
Ensure that the tile fits the space correctly. You may either apply the adhesive on the bottom of the wall or behind the tile directly. Press the tile into its position. Tile the remaining area giving spacers to have an even gap. Wipe off any excess adhesive taking care to not scratch the tile.
Step 9: Grouting The Tiles
Grouting keeps the tiles in their place, which makes the surface resistant to water. It also adds to the beauty of the tiles. Grout is available in varied colors and adds to the design.
There are two options here.
You may use powdered or ready mix. Powdered mix dries up fast, so mix a small amount every time.
Take a small amount of the grout mixture, use a spreader and apply it to the tile. Move it well so that it gets into the joints. Large strokes up and down ensure a better result. Keep in mind that grout dries fast.
Grout the entire wall. Remove the excess grout with warm water and sponger. Use a cloth and remove any powder substance left-back from the grout to flaunt a professional-looking bathroom wall.
Investing in grout protectors is also a great idea to protect the grout from various elements like grease, water, oil, and dirt.
The tile is now grouted and clean, ready for you to enjoy.
Step 10: Tiling Around the Windows
You are just left with a tiny bit. If the bathroom wall has a window, then here is how to go about tiling the area.
- The tiles around the windows should also be symmetrical and equal.
- The placement of the tile should be in the recess.
- The grout lines should match up the grout lines on the wall.
- Measure the window recess depth with tape. Include just the depth of the wall and not the entire wall since you need to give room for the trim edges too.
- Measure every section where you will place the tile like was done previously. Write it down and cut the tile like done before.
- Tile trim the window corners to let the area look neat. Measure the width and the height of the window recess. Cut the size of the trim with a hack saw and a miter block. The cut should be at a 45-degree angle to give a neat joint to where the trims intersect.
- Start from the bottom of the window, apply adhesive and place the trim on edge. Add space and start placing the tile.
Step 11: Finish the Process When You Move to the Top
- You will need some support here to ensure that the tiles do not fall off. The wooden beam offers a sturdy support. Place one horizontally and the other vertically so that tiles are held in place.
- Give the tiles enough time to dry.
- Grout the area and wipe it down once ready to get a clean look.
Your bathroom wall tiling is complete.
Conclusion
Installing tiles will dramatically improve the aesthetics of the bathroom wall. This DIY project can be challenging if you start without preparation. But do not worry! We have broken the entire process down into tiny steps so that you can tile your bathroom wall with no hassle or hiccups.

 By
By


