

An aesthetically pleasing house has its own charm creating the perfect vibe throughout. However, building a beautiful home is not easy. You need to work on numerous things ensuring that you get it right. One key aspect of your home décor is the flooring.
The flooring layout influences the flow of your home. Floor transitions from one room to another are essential to create a seamless and smooth finish. If two connected rooms have different tiles, then its transition should be neat.
Tile-to-tile transition is not just crucial for the look but also to protect the tiles from cracking and warping.
Tile-to-Tile Transition Ideas
Let us peek at some of the options that are available for transiting between tiles.
1. Transition Strips
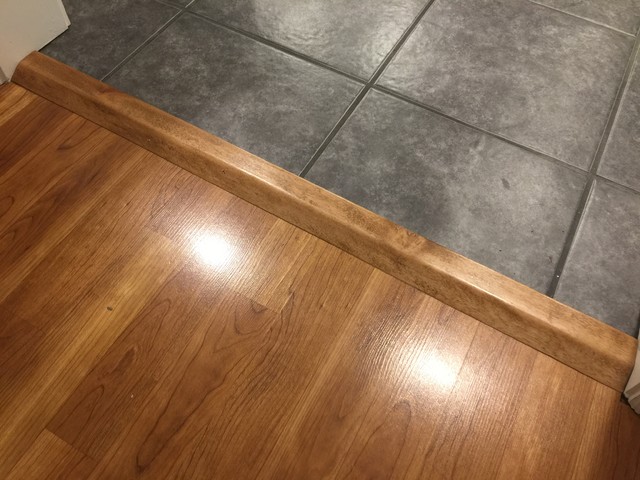
Transition strips are an inexpensive option to transit between the tiled rooms. It is a thick wood or vinyl section that fits the two flooring sections and creates a threshold. The transition strips come in varied styles. The common ones, however, include a hook that fits below the floor. In addition, it has a lip that curves on the floor, giving it a neat edge.
Transition strips are suitable for varied flooring options. These stand more for their functionality over style. The only drawback of the transition strips is that there are only a handful of options available which may not fit your flooring well and cause a visual interruption.
You May Also Read: How to Install Tile Edging? Complete DIY Guide
2. Threshold Transition
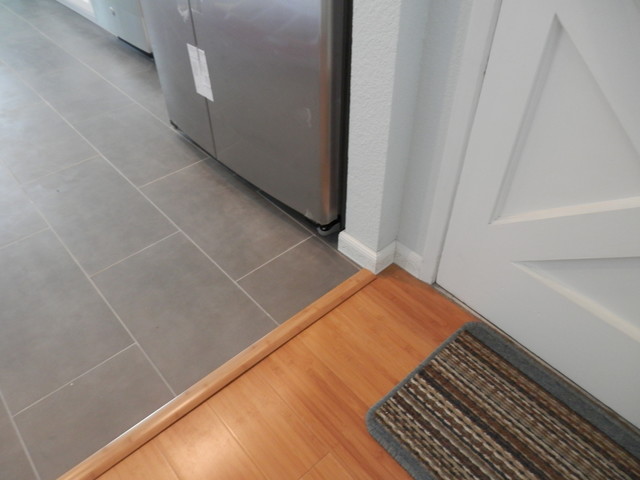
You may also choose to install a threshold transition between the tiled floors. These carry the tiled pattern from one to the other room. Thresholds are made of tile, deco strip, marble, or pebble. There are also threshold plates that serve the purpose.
The best way to install the threshold is to use the field tile from either floor, cut it into pieces, spread mortar and then install it. The transition pieces span the material gap and are flush with the floor.
If you decide to use the pebble threshold, fill the gap between the doorways with mortar and press the pebbles. It will give a clean transition between the tiled floors.
3. Color Blocking
Color blocking is a popular technique for tile-to-tile transition. It is suitable in homes where every room has a different tile. The color block creates a visually appealing transition between the rooms.
The process is simple. Just lay a row of small and horizontal tiles in a particular color in the joint between the two rooms. If the tiles in the two rooms are of the same color but in different shades, then a transition tile which is a hue between both the tile colors, offers a seamless tile-to-tile transition.
The other option is to select a complementary and matching tile color. The transition tile color should complement the tiles in the room. Modern homeowners today use a contrasting colored tile to give the transition a contemporary twist.
4. Tile Patterns
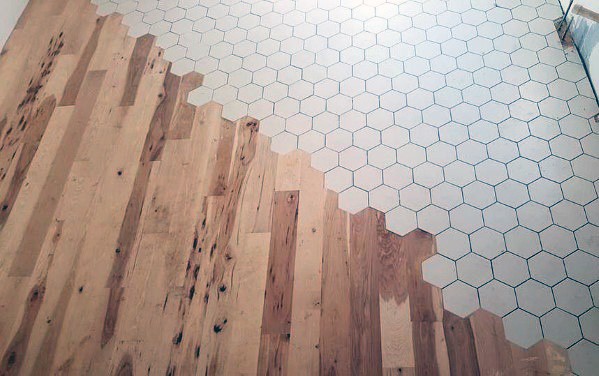
Another classic method of tile-to-tile transition is to use tile patterns. It signifies a neat transition from one to the other room. The option is viable if the tiles in each room match either in style or color.
You may make a threshold by using any leftover pieces and cut them in small triangular shapes from a large tile section of the matching tile. The tiles now should be laid in an alternate triangular pattern to create a threshold between the spaces.
Want the area to look more artistic? Then smash off the tiles to create a mosaic décor, fill the space with dark-colored grout and give the space a contrast look.
If the tiles in the rooms do not match, then a neutral tile color like cream or grey should do the trick. Use them to create a simple tile-to-tile transition pattern between the rooms.
Let us now take you through the steps of how to DIY tile-to-tile transition.
DIY Tile-to-Tile Transition
Installing tile-to-tile transition dramatically improves the look of your floor, giving it a professional finish. The DIY guide takes you through the steps of how to install a transition strip which is the cheapest and the most commonly chosen technique opted by most homeowners.
The transition strips come in various locking systems and shapes. One is fitted in the tile flooring while the other locks on a metal track. Both are equally efficient, so you are free to choose what works the best for you.
Bonus Read: How to Tile a Concrete Floor? | Complete DIY Process
Get the Tools and Equipment Ready
Here is a list of the tools and materials that you would need to begin the DIY project. If you are ready with these basic supplies, it should not take more than an hour to complete the work.
- Thin-set mortar
- Tile-to-tile transition
- Drill machinery
- Mixing palette
- Saw
- Rubber hammer
- Bucket
- Eye protection
- Safety gloves
Measure the length before you purchase the transition. For example, if you wish to install a transition between the doors, you will need a short piece.
Now that you are ready with the materials, let us quickly lay down the various steps to install the tile-to-tile transition.
Step 1
Fix the tiles and the transition strip in the doorway. This is something that you should pre-decide on. Else, cutting the jambs will not be feasible. Place an underlay in the subfloor and then the tile on top of the underlay. Use a pull saw to cut the door jambs.
Step 2
Use a tape to measure the transition length. Measure the distance between the doorway. You will need a vacuum cleaner to suck out all the dirt and debris, not letting them penetrate the two tiled surfaces.
If you wish to install the tile transition under the door jambs, then the transition should be cut a bit longer. It will ensure that it fits the door jambs on both sides.
Step 3
We will be using an aluminum transition. On one side, the tile should penetrate the transition. On the other side, the transition should cover the tile edge.
Step 4
After measuring the dimension, it is time to cut lines in the transition. You will need a saw or a miter box for the same. Once done, use a sand block and smoothen the surface. Make sure that the transitions are locked in place when you cut them.
Step 5
The cut tile-to-tile transition is ready. Check it before installing it under the doorway to ensure a proper fit. Also, measure the dimension in which you will be cutting the missing tiles. Some transitions will have holes below them which will be used for locking the transition and holding them in place with screws.
It is not necessary for all kinds of transitions. There would be instances when the screw head would cause the tiles to do not fit into the transitions.
You May Like: 9 Best Methods for Cutting Ceramic Tile
Step 6
We now start with tile-to-tile transition installation. Mix the thin-set adhesive and spread it on the floor evenly. A notched float will ensure that you get a uniform layer. The tile adhesive dries out fast, so spread it only when you have the cut tiles ready.
Step 7
Once the adhesive is spread, it is time to install the tiles in the transition. Take care not to push the thin-set glue inside the transition, which will not let the tiles fit.
Use a spirit level to check that the floor is level. Else use a rubber hammer to install the tile properly. Tile spacers should be used for proper installation.
Also Read: How To Tile Around Window? Step-By-Step Guide
Step 8
The tiles are laid. Check to see that the floor is level and that the transition is well aligned. Once the adhesive is dry, whatever you do, the transition will not budge. So take care that you get it right the first time.
Conclusion
Here we have covered all the steps to help you install the tile-to-tile transition. There are many transition options available today that do not let you sacrifice on style to make tile transition functional.

 By
By


