
Investing in a good-quality readymade dog house or kennel can cost up to hundreds and even thousands of dollars. Apart from this enormous price tag, these houses are generally drab with not much of a creative touch.
Taking matters into your hand with the help of this guide will lead to a stunning end product. In addition to that, it will also be a fun project to undertake. Get your tool bags out and start cracking on one or more of these 15 custom DIY dog crate plans.
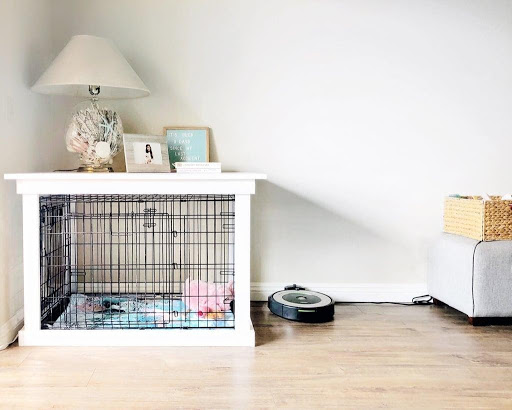
1. DIY Console Dog Crate

We are starting the list with a very worthy contender. This DIY console dog crate is both fancy and functional. It blends in like a piece of furniture and can hold 2 dogs. However, you do need a few woodworking skills to execute this project to perfection.
The console can be customized to accommodate food and water bowls. There are also two additional drawers integrated into this design, equipped for holding other dog treats or toys.
To start, you have to cut the side frame pieces to size and drill 1.5-inch pocket holes in the two wooden sideboards. Then you should proceed to attach the side pieces to the top pieces with 2.5-inch pocket hole screws and wood glue. Repeat this step to build two frames for two dogs.
2. DIY Wire Mesh Dog Crate

This is a relatively simple project, even for beginners. All you need is an electric saw, a cordless drill, clamps, a hammer, and some measuring tape. Do not forget to get 4 welded wire panels as well.
To begin, measure the length of your dog while it is lying down and the height of it when standing. A helpful tip is to add 3 inches to this length and height for optimum comfort.
A wooden board is to act as the base of the crate. You can repurpose some scrap wood for this purpose, to cut down on the cost of the DIY plan.
3. DIY Wooden Slate Dog Crate
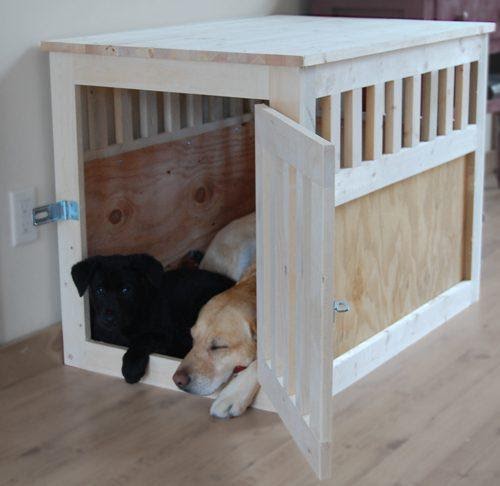
This is the best option for those who are looking for simple but durable custom DIY dog crate plans. It is recommended to invest in high-quality cedar or pinewood for durability purposes. The only downside is that it will increase the price of the project, but the end product will be well worth it.
Remember, it is necessary to drill pocket holes at the ends of the respective horizontal components. These are where the screws shall fit in. However, never add these horizontal components to the front face, in order to keep ample space for the main door.
This DIY plan features no elaborate decorative touches. The project focuses solely on building a sturdy home for your pet pooch that can be executed by inexperienced woodworkers too.
4. DIY Nightstand Dog Crate
These types of custom DIY dog crate plans are big enough to accommodate even German Shepherds or Mastiffs. Nightstand dog crates are a great way to use one space for two different applications. Thus, this makes them a viable option for apartment dwellers and others living in cramped quarters.
Try and finish the 4 walls of the crate separately first. Another idea is to use corner brackets to screw the walls together from the insides. This enables you to dismantle the wood structure and make it portable.
In the end, you can paint the dog crate to match the decor of your house or room. It will keep your pet friend close to your bed while sleeping, all while preventing messes and maintaining a safe environment. This idea is a definite must-try for all those looking to partake in a fun project as well as save up some space.
5. DIY Contemporary Geometric Dog Crate
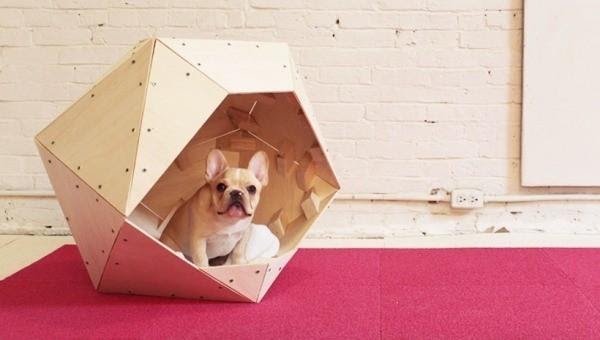
This DIY plan is a sleeker, posher version of the good dog crate. If your house has more of a modern interior patio, you can build this contemporary geometric dog crate to complement it.
Start by cutting the plywood into 3 equilateral triangles to construct this design. Assemble the pieces by screwing the angled blocks to the plywood triangles. Proceed to screw all the pieces together.
The original plans do not call for paint, but a fresh coat of paint would bring a certain charm to this DIY idea. However, a significant downside to this plan is that the geometric shape can only support smaller dogs. To make a crate suitable for larger dogs, you’d need more plywood that would increase both the cost and weight of the project. Although the increased weight would make the dog crate susceptible to collapse.
6. DIY Plush Curtained Dog Crate
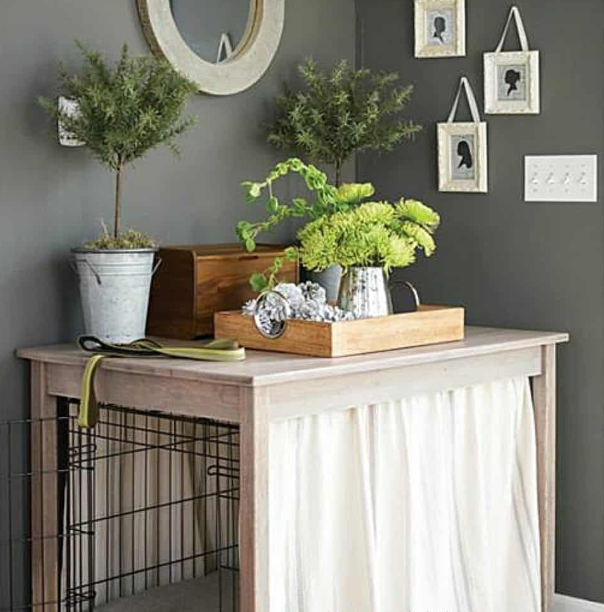
Dogs could do with some privacy as well, at least while sleeping. This inclusion in our list of DIY dog crate plans incorporates cushions and curtains to give your pet a plush experience.
For the tabletop, use five 1-inch x 6-inch pine boards and get the handy Kreg Jig to splice them together. Hang tension rods on the underside of the crate and then hang curtains on these rods. You ought to lay a small dog mattress over the wooden base to get your dog to be more comfortable.
Remember to invest in an osteopathic mattress if you have an older dog. You can finish off the top of the crate by staining it with a polish of your choice. This will create the perfect comfortable space for your pooch to rest in.
7. DIY Panelled Rustic Dog Crate
If you want a more antique looking dog crate that requires skill and time, this is the perfect option for you. This DIY dog crate plan requires serious craftsmanship and patience. Once your dogs are past the chewing phase, you can invest time in building this timeless masterpiece.
Suitable for even large breed dogs, this dog crate measures 21.5 inches high x 19.75 inches wide x 25 inches deep. The decorative grate can be made from scratch or bought from a local wood store.
Place the decorative grate on top of the doorframe so that it rests snugly inside the frame’s edges. Then flip the frame and grate over, so that the grate’s decorative side faces up within the doorframe. Finish the crate with a coating of shellac to bring out the grain of the wood. You can also add a cushion to help your pooch stay cozy inside the custom-built dog crate.
8. DIY Repurposed Crib Dog Crate
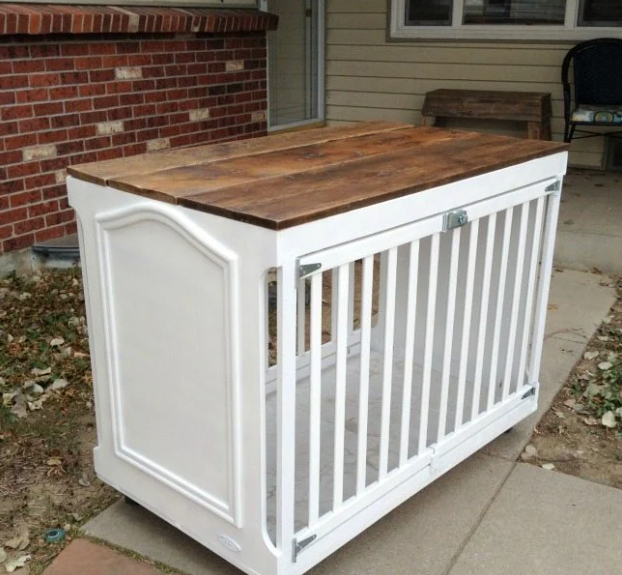
Cribs can be repurposed to make the best dog crates for accommodating larger dogs. The first step is to determine the crate size. Once the ends are cut to size, one has to proceed to make the sides.
The DIYer placed a crib rail over the end piece and added boards until she had what she wanted. She used the cut end to know how tall to make the sides since they need to be the same height. A Kreg Jig comes handy when it comes to drilling pocket holes, which is the next step.
Add pocket holes on the long pieces to attach the top and bottom boards. After the wood has been sanded down and painted over, the time comes to paint your new dog crate the color of your choice. Overall, this project is not difficult and is certainly worth a try for those wishing to utilize old items and create something new.
9. DIY Sliding Door Dog Crate
This is a viable option if you want to spruce up ordinary DIY dog crate plans. You can use a pair of drawer slides to be able to slide this entire section from side to side. If you are up for a challenge, you can even make the door out of ceramic.
However, this DIY dog crate plan does require a certain level of skill and expertise. Utmost flexibility is offered. For example, this particular DIYer did not add a latch to her crate but you can certainly do so.
If you are modifying the height of your crate, measure the overall height, and add 1 inch to the length for the front and back pieces. This will account for the height of the drawer slides in the next step. Moreover, it will give you 0.25 inches of wiggle room at the bottom so that the door doesn’t drag on the ground.
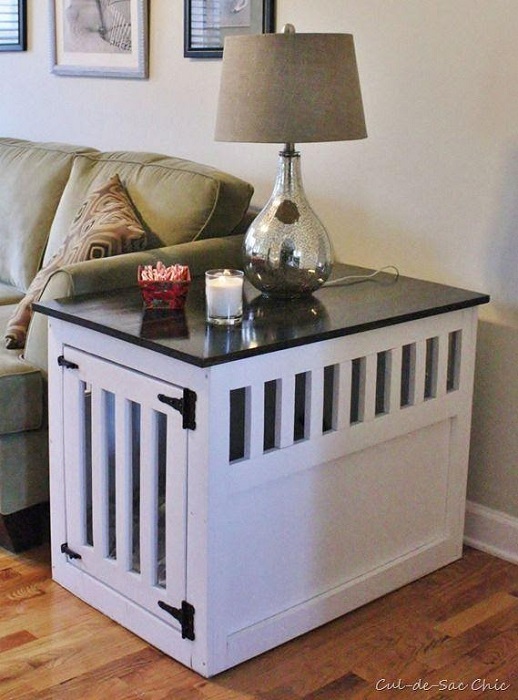
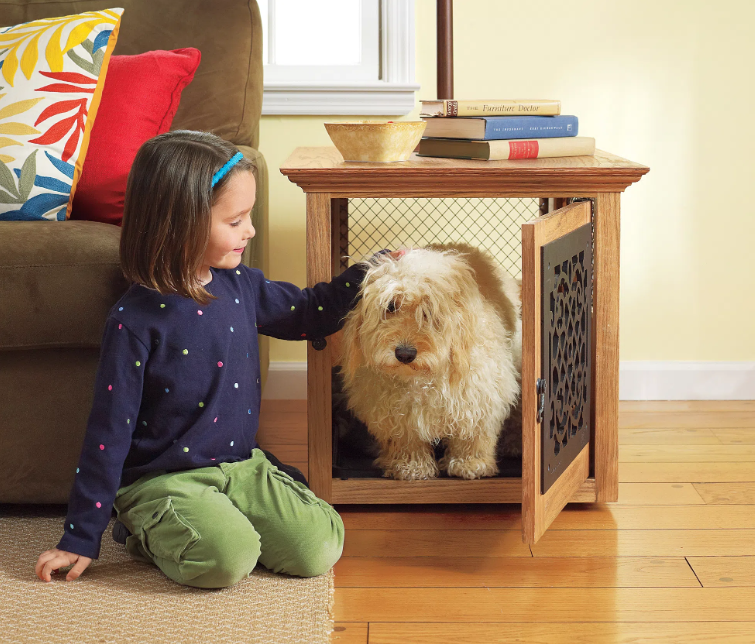
10. DIY Chic Furniture Dog Crate
Better-looking crates, ones that look like furniture can be purchased but they are typically less sturdy and not chew-proof. To add to this, they are also absurdly expensive. But this custom DIY chic furniture dog crate is budget-friendly and quite sturdy. It does not stand out as an eye-sore and promises to blend in with your room decor.
To start, get the wire crate, and build a simple frame and lid around it to give it a furniture-like aesthetic. This also adds tabletop functionality. The crate goes inside the wood frame, so the pooch never gets a chance to chew up the wood while they’re teething.
Keep in mind that when you get a puppy, you can partition the larger crate. This enables your pets to feel more snug and secure in a smaller space. You can also move the partition as your pup grows.
11. DIY Cardboard Dog Crate

This idea is best for kids and teens, looking to make something creative for their pet dogs. However, being a cardboard dog crate, it will not provide much durability or stability. Nonetheless, this DIY cardboard dog crate plan is a cheap, eco-friendly option.
For this project, you will need a cardboard box that is big enough for your dog. You will also need some duct tape, zip ties, scissors, or a serrated knife. For the screen, you can reuse the mesh from an old laundry bag.
It is essential to cut air holes in the cardboard crate to ensure optimal ventilation. You can cut these air-holes in various shapes, ranging from paw prints to simple circles. Overall, this DIY plan can make for a fun task for the kids, all while being somewhat utilitarian.
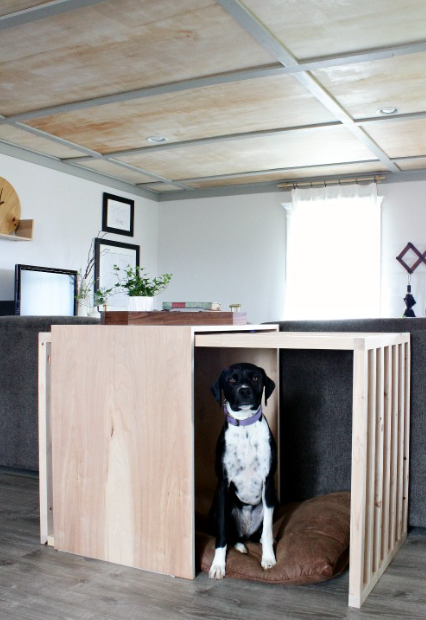
12. Triple Dog Kennel With Removable Dividers

If you have three dogs you’ll love to keep separately, try out this dog crate with three compartments. A fascinating feature of this God house is the removable dividers between each chamber. This feature means the three sections can easily be made into two or a single ample space by removing one or more walls.
Start by cutting the lumber to size with a miter saw before moving to the table saw to get the correct width for all the cut parts. The parts finally go through the miter saw again, but this time for the final and accurate cut. Building the face frame first will provide a guide to finish the other parts.
The next part to build in the series is the side panels and middle dividers before constructing the base frame. Ensure to use the router to create grooves on the insides of the side frames so the plywood boards can fit. This video plan contains all the building processes necessary to complete the triple dog kennel with removable dividers.
13. Double Dog Crate Cabinet

This design was built to fit a specific location with cabinet space, like under a large table. You can also use them as a stand-alone dog house, with the two crates offering enough space to house two dogs. This means the dimensions used in this plan were tailored to fit the available space, and you may want to measure the extent of your area.
Use a circular saw and a Kreg cutting guide to cut the plywood for the main cabinet section. The first part cut is the top panel before stripping the other pieces for the body. Use the miter or circular saw to cut down the boards and strips to the required length.
Assembling the pieces is more straightforward with the help of pocket holes. Pre-primed pine is the chosen board for the face frame and door frames since the crate will be painted after assembly. The choice of paint varies depending on your preference, but it is always best to use colors that will fit the area, especially if the crate will be going under a platform.
14. Well-Aerated Double Dog Kennel

Here is a well-aerated double dog kennel with enough space, with most sides fitted with steel bars for more ventilation. Use a table saw to rip the 1x8s into 1×3 boards, which are easy to handle. The idea of getting a beautiful dog crate is choosing the right wood side. Sides with clean and visible grain structures produce better results.
Like many other dog house projects with a clean design, pocket holes are recommended when assembling. Each frame is built separately and labeled to avoid joining mistakes that can disrupt the whole plan.
Spray paint all the steel rods before cutting them with a jigsaw. Drilling the holes on the frame sides can be tedious, but it gets better once you mark the center of the lumber and each point for drilling. Before assembling the other pieces, ensure you’ve added all the steel bars to one part of the frame.
15. Plywood Dog Kennel With Detachable Roof

One of the first questions you may have is about the durability of plywood for an outdoor dog crate. The answer is yes, provided you treat the plywood with a preserver to protect the surface and prevent moisture from soaking inside. This design uses thick hardwood plywood for the dog kennel.
The 18mm thick plywood means it is unnecessary to make an internal frame, making the project easier to complete. After gathering all the tools and materials listed in this guide, measuring and cutting each piece are the next steps. However, the crate’s size should depend on your dog’s size.
The detachable roof used for this project makes cleaning more manageable, primarily because the crate does not feature a window. The open door design provides ventilation and access to the space. You can add comfy blankets to make the area comfortable for your dog.
Summary
Dogs need their personal space too, where they can retire for the night, get warmth, and sleep undisturbed. The dog crate is often a simple house that can be placed indoors or outdoors. Selecting a dog crate to build depends on its location, the dog’s size, your building experience, and available materials.

 By
By


