

If you’re a guitar lover and own guitars, storing them should be of high priority to you, especially as the guitar is a delicate instrument with slender strings. A little hole in its body or a broken string will ruin its sound, which furthers the need for utmost care with guitars.
A guitar stand helps keep your guitar upright and safe, preventing scratches and protecting the strings. There are so many guitar stands available that you can purchase for your guitar; however, if you’re a DIY enthusiast looking for a unique design for your specific guitar storing needs, building a guitar stand will be a better idea.
Since a guitar stand is a small project and often less complicated, you can quickly complete most of the designs with minimal experience. However, if you have no prior experience building a guitar stand, it would be challenging to figure out the exact details, like measurement and design. To help you out, we’ve put together this guide with numerous guitar stand plans you can follow.
DIY Guitar Stand Plans
Guitar stands come in various shapes, sizes, designs, and the number of guitars they can accommodate. While some stands can store a single guitar, others have spaces for several others. The stand you choose should match your specific need.
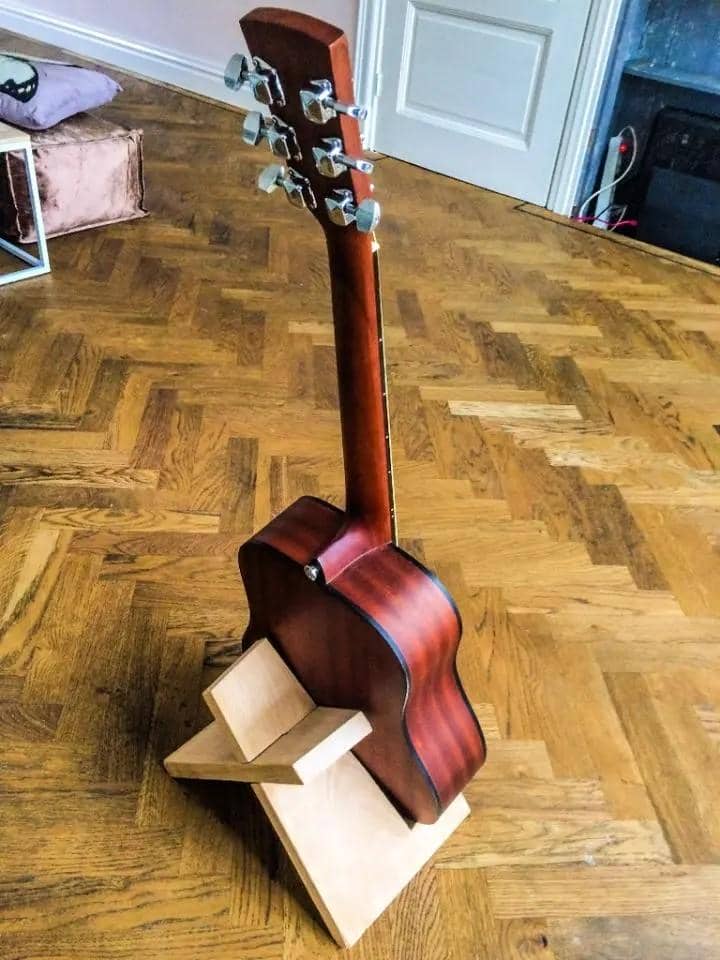
1. Custom Guitar Stand With Headstock Design

Building a guitar stand can be fun with this design showing the creativity you can explore. The stand carries a single guitar with the body resting on the two artistic headstocks attached. On the other hand, the guitar neck rests on an extended curved platform at the top of the stand.
To get the exact placement and ensure the guitar is properly secured in this stand, you have to measure the guitar’s height and thickness. A large guitar will require a wider angle between the stand legs and a longer upright arm to get balance and prevent the guitar from falling.
The typical angle between the stand legs is 30 degrees, with the upright arm featuring a resting bar at the top to hold the guitar neck. A third leg with the same dimensions and joining angle as the previous two is attached at the back of the stand. The third leg is placed just above the last two, so it becomes shorter, allowing the stand to tilt backward.
2. DIY Display Guitar Stand

You can build a stylish and practical guitar stand without creating a large project. This simple yet classy guitar stand holds only the guitar body, with the neck and headstock area towering above the stand. The stand is perfect for displaying your beautiful guitar on a platform or the ground.
You’ll need tools like the band saw and impact driver, while materials like a brass hinge, suitable finish, and 1×12″ lumber are required for the short display stand. The plan involves using a CNC router to engrave a quote on the stand, which can be any of your favorite quotes. Since it’s a display stand, having a catchy or inspirational quote on the stand to keep you going is a welcome idea.
Finishing is essential for an attractive look, with Waterlox finish among the most preferred. Cutting the stylish stand is the most delicate part of the process, which is why a band saw is preferred, although you can utilize a jigsaw. A peel-and-stick felt pad is used on the areas the guitar will come in contact with the stand to prevent scratches and damages. Avoid using rubber pads, which can adversely affect the finish of some guitars.
3. Simple Multi Guitar Stand

If you have more than a single guitar, then tiny guitar stands accommodating one instrument will no longer function as you’ll need a stand that can hold all your guitars. Here’s a plan for a multi-guitar stand holding up to three guitars of varying sizes. You don’t have to build it for a limited range of guitar sizes as it can accommodate small to large guitars.
Fancy and secure neck holders cut on the top board of the stand helps keep the guitar firmly in place while providing an aesthetic appeal. While this design is for three guitars, you can increase the size of the stand and include more neck holders.
Painting or any finish of your choice brings the design to life, with vibrant paint the preferred option for this design. However, for a simplistic look, you can utilize other finish types, including nautical wood stains. Add felt pads to all the areas where the guitar comes in contact with the stand for extra protection.
4. Single Board X Guitar Stand
If you’re looking for a simple and minimalist guitar stand, here is a plan that utilizes a single board to build an X-style stand. The design uses minimal space, so it’s perfect where space is a concern. It can accommodate a single guitar as you can adjust the size of the stand to fit the type of guitar.
You can complete this project with a few cuts from a single small board, making it one of the most simplistic designs on this list. It uses minimal material and requires the barest woodworking experience to complete. You can use any durable board, including upcycling boards from other projects. However, ensure the boards are damage free to ensure longevity.
Disassembling the project is easy as no joining is required. Complete the project by staining or painting with the finish of your choice. The cuts make it easier to fit and create a perfect stand for your single guitar instrument.
5. Stylish Guitar Stand
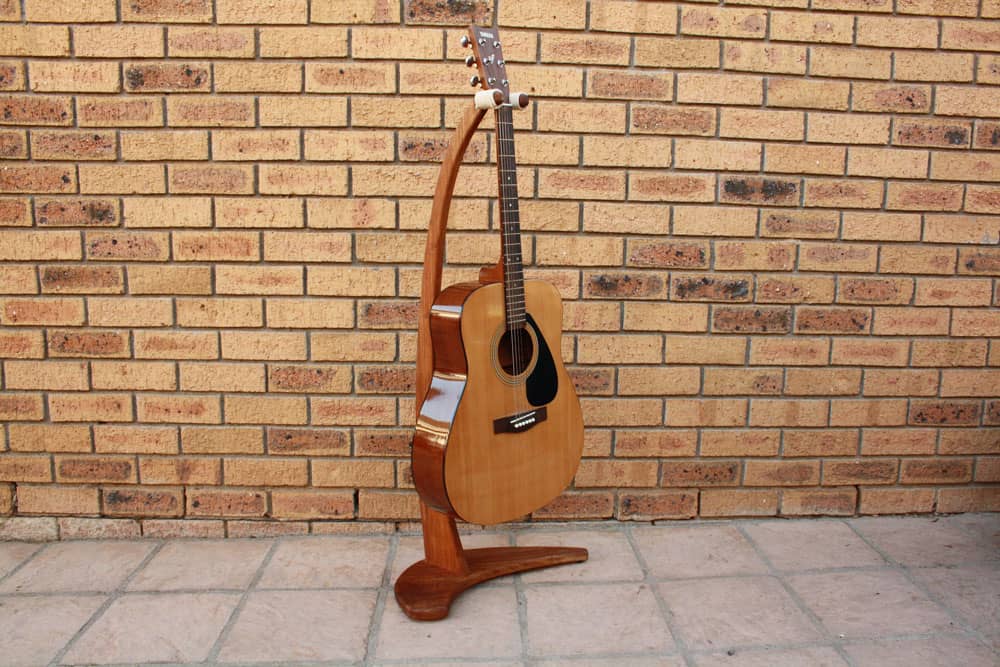
Here is a guitar stand as stylish as it comes with a curved arm and the headstock holder being the only point of contact with the stand. It is an ideal display stand to showcase your beautiful guitar instruments in the most apparent corners of your home.
For the project, you’ll need tools like a drill, power sander, router, glue gun, and jigsaw. Materials like hardwood with appealing grain structure, wood screws, wood glue, and cotton rope combine to complete the stand. The arm and leg of the stand feature curved surfaces, which improves the appeal. The dark finish makes for an exquisite look.
The project starts with plotting accurate curves on the workpiece to ensure your cuts follow the pattern using the jigsaw while the router smoothens the ends. It would be best to fix a neck hold wrapped with a felt pad to protect the guitar’s headstock.
6. Large Multiple Guitar Stand
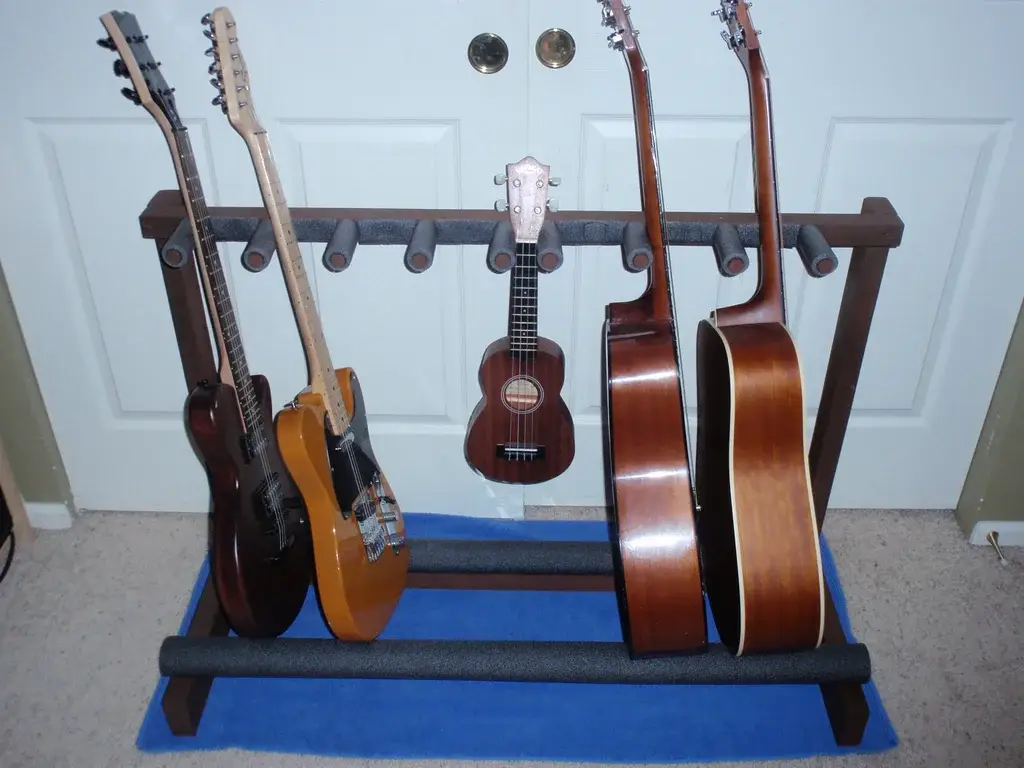
Owning an extensive collection of guitar instruments can prove a challenge to store correctly, and that is why a large stand where you can safely keep all of them is needed. This stand can hold up to 7 guitars of varying sizes, with the neck and bottom hold wrapped in foam pipe insulators.
Get tools like scissors, sanders, wood saw, drill, and drill bit, among other devices. You’ll need foam pipe insulators—one 2×4″, 2×3″, and 2×2″ wood, and a 36″ long dowel. Joining the parts is easy with drill bits and screws.
This multiple guitar stand is a simple project you can complete in a few hours. The process involves cutting the wood, sanding, joining the pieces, finishing, and padding with insulation pipes. This project utilizes brown paint on a red primer. While priming and painting are optional, it improves the overall look and ensures the stand lasts long.
7. Boomerang Guitar Stand

Before you get started making this boomerang-inspired stand, you should get ¾” plywood, ¼” craft foam, ¼” tee nuts, spray glue, ¼” x 1½” screws, 1½” drywall screws. You should also get tools like a circular saw for cutting, a drill driver to create holes and drive screws, and a portable knife.
Start by cutting the plywood free hand with the help of the circular saw using the dimensions provided in the plan. You’ll require a band saw or a jigsaw to make more intricate cuts for this project. A drill bench or handheld drill will create the necessary holes for the project.
The joining process involves gluing and screwing the pieces through the pilot holes already created. Joining all the pieces will form a stand that looks like a boomerang and can hold up to three guitars. Ensure to gum felt pads on all the parts touching the guitars.
8. Guitar Stand Stool
The plan offers the combination of two other valuable projects. How about a guitar stand attached to a stool providing you with a small table, a storage space underneath, and a guitar stand beside it? This stand is an easy project to complete for all its additional features due to the straight pieces and regular joining processes involved.
The project requires more materials than most other stands since it consists of a stool and a stand. You’ll need plywood, a ¾” thick quarter sheet, and different screws for this project, while tools like a circular saw, miter saw, Kreg pocket hole jig, accu cut knife, drill, and tape measure are essential.
Start by cutting all the plywood pieces before building the stool by joining them with screws. You can then choose your favorite side to add to the guitar stand. Blocks on the edge of the stand prevent the guitar from rolling off. Finish off with the finish or stain of your choice.
Summary
The guitar stand is one of the best ways to store and ensure it is not damaged. Guitar owners know how delicate the instrument is, from the strings to the body, which makes properly storing the tool important. As a DIY enthusiast, you can save cost and build the perfect guitar stand.

 By
By


