
Dogs are adorable creatures, and the birth of young puppies provide one of the most pleasant feelings you’ll ever experience as a dog owner. The period after the birth of puppies requires utmost attention and care to ensure the vulnerable puppies survive.
The first home for your puppies is usually a whelping box containing soft clothing and a short ledge around it. Whelping box ensures the puppies are safe, warm, and not crushed by their mom. If your dog is pregnant, it is time to prepare a whelping box for the incoming puppies. While you can buy whelping boxes from stores but as a DIY enthusiast, where’s the fun in that?
Building a whelping box is not only affordable but also allows you to build custom designs to fit the space, location, and other needs peculiar to your home. If you don’t know how to go about building the perfect whelping box, do not worry, as we have compiled a list of amazing whelping box plans for you.
DIY Whelping Box Plans And Ideas
Whelping box comes in varying shapes, sizes, and designs that separate them from each other and provide unique features. In this section, we highlight whelping box plans and ideas covering a wide range of designs, sizes, and styles.
1. DIY Open Bottom Whelping Box

This whelping box sports an open bottom for extra cushion and to reduce the risk of injuries from nails and other joining tools. Instead, steel corner braces are used on top of the box, and steel tee nuts between the plywoods. The setup helps the whelping box stay lightweight with their easy-to-disassemble parts, making it also easy to store when not in use.
The box features small cutouts on the plywood to serve as handles and make it easy to move. The large cutout on one side provides easy movement in and out of the box for the mother while restricting the puppies. Its size and the quality of the wood ensure it can fit large dogs without damage.
You’ll need 4’x8′ sheets of ⅝” plywood, 2x4x60″ lumber, quart polyurethane varnish, wood filler, steel three-corner brace, steel tee nut, and stainless steel button head socket cap for this project. While tools like a screwdriver or drill bit, table saw, router, and round-over bit are also required.
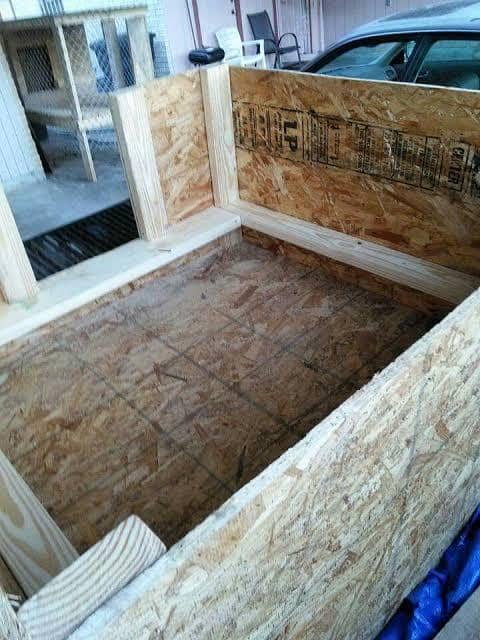
2. Large Whelping Box with Door

The whelping box carries the mother and her puppies, so you may need to build a giant box, depending on the dog breed. This large design is great for a large dog breed with several puppies. It features a door with a door latch so you can close it when you want. There’s also a covering on one side of the whelping box that keeps the box extra warm and comfortable.
The large project requires a lot of materials which is why a large MDF panel is used for this project. The panel is 4×8 and ¾” thick which is then cut into four places to get 2×4′ boards. You’ll still need to make more cuts using a circular saw and a dremel on the bottom edges of each of the four boards. Mark the center of the front board and cut out a door.
Pay extra attention when cutting MDF panels, as they are not the strongest and can break. For more durable boxes using this plan, consider other stronger plywoods. The plan uses fleece material to pad the floor and the insides of the box while paint covers the outsides giving it a vibrant look.
3. DIY Plywood Whelping Box
Building this whelping box has four phases: the door, box, floor, and puppy rail. The folding door is the first to be built for access into the box. While installing hinges on the door, you want to ensure the hinges are on the outside and the door’s top half can fold away from the door area.
Use the plywood cut in the dimensions indicated inside the plan to make the four sections of the box. With screws holding the pieces going from outside to inside the wood strips, you ensure they are aligned properly to avoid any screw tip protruding from the wood. Gait hooks on the top of each corner add to the durability of the whelping box.
This plan utilizes two 4x1x48″ wood strips and two 4x1x40″ wood strips with 3×5/8″ mending braces to build puppy rails inside the box. A 48×48″ plywood piece serves as the floor and is attached underneath the box using screws going from outside into the wood strips. Always add puppy rail to prevent the mother from crushing the puppies against the wall.
4. Pressboard Whelping Box

Pressboards have high mechanical strength and chemical purity and can be a great material for building your whelping box, as shown in this plan. The edges of the box are covered to hide imperfections on the wood but are also useful in improving the box’s strength.
At 4×4 feet, this square whelping box will carry the mother and a few puppies of an average-sized breed. The pressboard is covered with a white fonalica-like finish that creates a smooth and attractive surface. While the plan features the processes required to build the box, it is not quite detailed, which makes the plan more suited for intermediate-level builders.
Before you get started with building this pressboard whelping box, you should get these materials; pressboard, caulk to fill in holes, mat for the box floor, PVC pipes, PVC end caps, aluminum angle iron, wood screws, glue, and channel iron. You also need to source tools like markers, large scissors, C-clamps, saw, hammer, PVC pipe cutter, screwdriver, and drill.
5. Simple Whelping Box
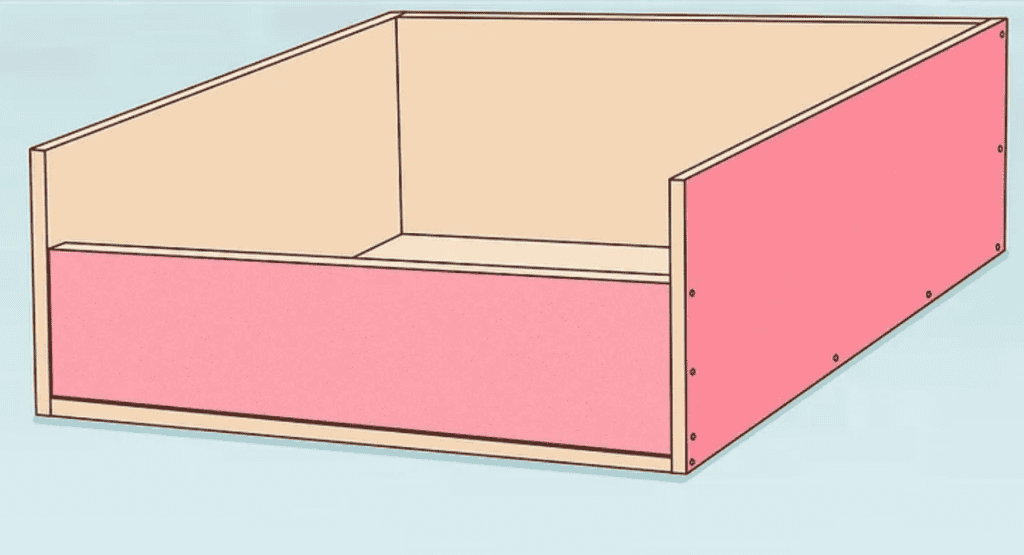
Here is a simple Whelping box design you can build even as a beginner DIY enthusiast. Its simple structure relies on making the right cuts and joining using common attachment methods. The plan utilizes ¾” thick 4 x 8 feet plywood to make the box. Use a saw to cut this piece into four equal pieces.
You’ll also need a 4 feet square for the box floor, which you will cover with self-adhesive contact paper and secure with a staple gun. Cover one side of all the other pieces using the self-adhesive contact paper before joining the pieces with screws. Bear in mind that the parts with contact paper will serve as the outside-of-the-box.
Ensure to keep the front board shorter than the rest to make it easy for the mother to enter and leave the whelping box. Some tools and materials necessary for this project include a staple gun, saws, drill, screws, self-adhesive contact paper, newspaper, and plywood. Place newspaper across the box floor to make it more comfortable for your dogs.
6. DIY Whelping Box for Small Dogs
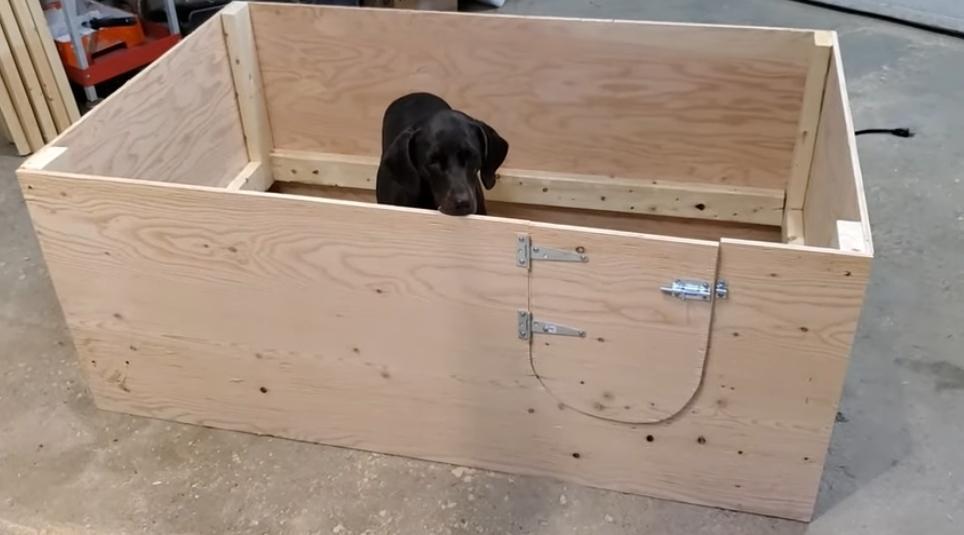
Most whelping boxes cater to large dog breeds, leaving small dog breed owners having to improvise to get the size suitable for their dogs. This box features a high enough dog that makes it easy for the mom to access the area but difficult for the puppies to leave. With the door latch helping you to keep the mom inside the box when required.
You’ll need a 4×8 sheet of plywood, three 2×4″ lumbers to build puppy rails inside the box, two hinges to hold the door, a bolt latch to lock the door, 1 ½”screws to hold the wood, and ½” screws to hold the bolt and hinges to the wood.
Cut 20 ½” pieces from the 2×4″ lumbers before starting the assembling process with the screws. The cutting process involves cutting the plywood into two across the long ends and then cutting them further into two across the short ends to get four boards. Ensure to keep the smooth side of the boards inside to protect the dogs from injuries.
7. Secure Whelping Box With a Clean Design

The tools you need are; a circular saw, drill, tape measure, and marker, while materials include a 4×8 foot sheet plywood, lumber for the rails, handles to make it easy to move the box, hinges and door latch, screws, oil-based polyurethane to seal the wood.
Measure the door on the front board and cut it out, keeping the cutout intact. While most whelping box doors swing from the side, this door opens downward, which is more durable and safe. Before assembling the cut pieces, it is important to drill pilot holes into the boards to make attachment easier and prevent board damage due to extra pressure.
Such a large whelping box is vital when expecting several puppies, but ensure to add rails inside the box to protect the puppies. Find out how to attach the 2×6 lumber to form rails inside the box by following the plan. Apply several coats of polyurethane over the box to increase its durability and allow you to use it for many litters.
FAQ’s
Sometimes the building process or choice of material can pose a problem. To make these easier for you, we’ve compiled common questions about building whelping boxes and their answers.
Ans. Use bedding, soft clothing, and wood shavings on the whelping box floor to provide warmth and comfort during birth and for the puppies’ early days.
Ans. Measure the length of the mother, add a foot to it, and square it to get the appropriate whelping box size. Bear in mind that this size will also be dependent on the number of puppies you’re expecting.
Ans. Padding the box, adding insulation, and keeping the room temperature suitable for the dogs are some of the ways to maintain a healthy whelping box temperature. Some dogs prefer a cooler temperature than others, so you want to check the ideal temperature for your dog breed.
Summary
This article makes it easy for any DIY lover to build a suitable whelping box for their dog and puppies, even with little experience. With several plans giving you the option to choose the most suitable design for your specific needs.

 By
By


