

Children’s rooms call for accessible storage facilities that play the role more than a wardrobe. This is because other than their clothes, they have tons of toys that need a space to be placed away when not in use.
Stuffing them into a corner, letting them lay around, or over-populating them into the closet is a messy and temporary solution.
Many parents turn to baskets, storage crates, and other items that can be easily bought at the nearest supermarket. However, these boxes might only make the room look cluttered and add no personalized touch.
This is when these DIY toy box ideas come into the picture. How lovely would a fully-customized and handmade toy box be?
These 17 DIY toy box ideas offer various builds, materials, styles, sizes, and difficulty levels to choose from. You could go for a box with lids or wheels, or maybe double up the functionality by incorporating a sitting space or a play bench with the storage box. But no matter which plans you choose, the results of the hard work would fill your kid’s room with your love; and empty it of its mess, too.
17 Easy DIY Toy Box Ideas
Also, either of the below-mentioned DIY toy box ideas can complement these sturdy DIY tablet top ideas. Nothing beats a multipurpose DIY project offering a toy box, seating arrangement, and a small table!
1. DIY Toy Box Crate

If you are looking for a rustic toy box that would take some primary skill levels to build, then head over to this plan. It suggests you utilize left-over board or ‘raw’ ones and fuse the dents’ aura and uneven alignments to make it into an eye-catching toy storage box. These natural flaws contribute to the captivating look of this crate.
There are no fancy cuts involved. This makes it a simple task for individuals who are not proficient woodworkers. The plan uses non-mortise hinges, although the butt variety or the continuous ones can be utilized as alternatives.
Check out these 30 beautiful DIY lampshade plans. It’s never a bad idea to introduce children to the world of aesthetics.
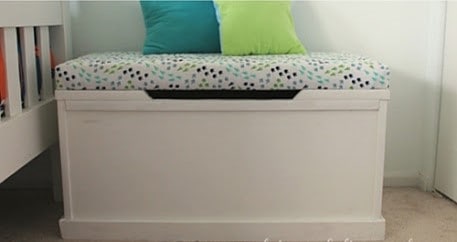
2. Wooden DIY Toy Box + Play Bench

Build your kid a wooden toy chest that serves as a classic yet modern style. This medium-sized DIY toy box idea has three inset levels that set it apart from standard storage boxes.
Cutting out a long and straightforward contemporary finger slot would let you operate the lid with ease.
Speaking of the lid, you can choose not to include it in your project, unless you want to provide your child with a play bench. For that, ensure that you place rubber or felt pads on the lid to protect the front.
3. Simple DIY Toy Storage Box

A spare afternoon is all you need to build this basic DIY toy box. The plan primarily utilizes hard glue to hold the wooden boards together, instead of nails. Nails are used only to keep them intact while the glue dries.
Add a coat of lacquer as a protection for the wood. After that, you can customize the look as per the bedroom’s interiors, since the guide leaves out instructions for stylizing it.
Either of these ten top-notch scroll saws could help in beautifying the end product.
4. DIY Light`Weight Toy Box

Toys do not necessarily need to be bulky. Unless your kid has massive Lego sets or remote-controlled monster cars, this DIY plan would be the best option for the little ones.
It is a lightweight model since it does not utilize 2×4 boards that many conventional toy chests do.
Along with a partner, this project can be done within a day. 1×1 boards are cut into 10- 15 long pieces and attached inside the walls to act as a support system. The four hinges used are attached to these stumps for more durability.
5. DIY Upholstered Toy Box
This DIY toy storage plan comes with a upholster attached to the lid. It can make for an excellent cushioned seating for adults and children, while simultaneously holding toys in its broad and deep space.
The box itself is constructed using particle boards that give the chest a long lifespan.
The upholstery is made using foam covered with a layer of quilt batting and then a fabric piece. You can add lid supporters after installing the upholstery for additional safety.
6. DIY Slow-Closing Toy Box

Slow-closing lids require more than just regular hinges. These require soft closing hinges and a couple of other devices like the ‘stay,’ which is a type of lid support.
The plan advises that those looking to get a paint-grade finish should opt for 18mm MDF and other wood sheet materials. But if you are settling for a stain-grade style, then A1 plywood can be utilized.
7. DIY Farmhouse Toy Box

If you are looking for a no-fuss toy box plan that does not include a lid? This open-ended toy box should fit the bill! The DIYer also throws in the option of adding castors to the bottom, to make the box mobile.
The built uses shiplap to make the small structure sturdy. It also instructs you to cut the corner posts according to the three shiplap boards’ height put together. This becomes an extra step, but it does not take up much time and brings a desirable visual charm.
8. DIY Wooden Crate Toy Box

The use of wooden crates in this DIY toy box idea makes it a project that takes up a maximum of four hours. Using two unfinished wooden crates, you can construct a toy box that seamlessly fits into your house’s theme.
The inclusion of swivel cartels lets the kids move it around quickly. Finish it off with a clear glaze, and your remote toy storage unit is ready for use!
9. DIY Toy Box Bench

People with basic to intermediatory skills in woodworking would love this project.
To achieve this sleek design, there will be a need for an artsy perspective and some carpentry mastery.
You can fulfill the need for both a sitting area and toy storage space with this plan. Be informed, and the structure would take up a fair amount of space.
With the heavy boards used, it can take around two days to complete it, staining included. Full overlay European hinges are used to suit the design. These hinges are also amongst the easiest to install.
10. Easy DIY Toy Box

Build an effortless storage setup using this plan. It is suited best for people with a carpeted floor, since the original guide does not include a bottom for the box.
The construction is also the right choice for DIYers who have recently begun experimenting with wood and do not want to spend much time on a significant but lightweight toy box.
11. DIY Giant Wooden Letter Toy Box

Lettered building blocks inspire this unique toy storage space. Fit for an infant or a young child’s room, this giant cube could easily store tons of small toys.
All the screw holes are hidden inside or behind the framing, and the corners are sanded off to ensure that the structure is not hazardous.
The only extra effort required here would be to paint the details of the letter block. Parents could even put posters of their kid’s favorite cartoon characters on all sides.
12. DIY Toy Box With Seating

The plan offers a straightforward built that would give you a medium-sized toy storage solution. As an alternative to a wooden top, the lid has a webbing stapled into it, which proves to be lesser in weight but just as sturdy as a wooden board.
It is then covered in batting, followed by a fabric of your choice.
Most importantly, the leg knobs keep the box secured in one place.
13. Modern Toy Box With Simple Design

Here is a simple toy box design for the intermediate DIYer with a modern look. This plan from Ana White features a rectangular box with a hinged lid for its top cover. You can use your desired finish to create a seamless look that matches your interior.
The Land of the Nod bunk bed inspired the design and will look great in your kid’s room. With a diagrammatic sketch of the toy box, you clearly understand the dimension and look. At the same time, the complete cut list provided in the plan helps you get all the materials and their proportions.
The contraction starts by making straight tip cuts on the plywood before building the front and back panels. Diagrams of each step make following the guide easy, especially when handling intricate sections like the cover or front board with a little cutout. The finishing includes a primer or wood conditioner and stain or paint.
14. White Vintage Toy Box

If you want an aesthetically pleasing toy box that will stand out and improve the room’s look, this vintage-styled box will bring all that and more to your space. With enough room to store many toys, this large box will keep your kid’s room tidy and accommodate all their toys.
The exquisite box uses plywood with the complete list of materials and tools provided in the guide. Assembling the parts requires the help of clamps, pocket hole screws, and wood glue. You’ll need the miter or jig saw to cut the intricate curves for the lower part of the box.
The bottom features added support before adding the plywood to increase its load-carrying capacity. Since its looks are one of the most beautiful parts of the design, you want to pay extra attention when finishing. A decorative face trim using stylish molding may be expensive but are effective at creating that vintage look you desire for this project. Furring strips are more affordable options to replace the face trim.
15. Rolling Crate Toy Box

Wooden crates are storage spaces to keep diverse materials, but following this guide can make your kid’s toy box much more effective and appealing. The plan assumes you already have a crate to use, so you may have to follow a separate crate-building guide if you’re without a crate.
Swivel plate casters make these boxes highly mobile as you can roll them to a different position, even when filled with toys. The idea is to beautify the crate by covering it with high gloss paint, addicting casters, and reinforcing the structure to carry as many toys as possible. You’ll find a detailed six-step process to completing this project.
Newbies with minimal DIY experience will find this project easy to accomplish. Only a few materials are needed if you already have a crate to upcycle. The design is an open-top toy box with kids’ playthings hanging off the storage box.
16. DIY Wild Animal Cage Toy Box

If your kids have a lot of wild animal toys in their playroom, building a wild animal cage-styled storage box would be a perfect idea. You won’t need to remind your kids to properly stash their toys when not in use, as the cage serves as a reminder. Clear woods like redwood is the ideal material to use for this storage project.
Only the box frame requires 14 ft of 2×6 lumber, which you’ll cut into suitable sizes by following the cut list provided in the plan. Other hardware materials like washers, screws, cage bars, and hinges are vital for this box.
You’ll need to drill the cage bar holes into the top and bottom lumbers in the front frame. Clamps and screws are essential materials when assembling this piece which should start from the back to the front stand before attaching support rails. Ensure to sand and oil the finished project to give it an appealing look and protect the wood.
17. Fluted Toy Box

Kid playthings can range from small cars to larger dolls, requiring a suitable storage section. This sizeable fluted box can accommodate the toys while keeping the area decluttered and attractive. Here’s a free plan that shows you how to build this fluted box with a lid.
You’ll find a complete list of materials and tools, but you’ll need to pay a small amount to access its lumber and cut list section. Nevertheless, you can build this project without it by following the detailed guide that includes diagrams with each step’s dimensions.
Start by building the box before adding the bottom frame, which acts as support and legs. Adding the pole wrap around the container creates a fluted design. Depending on the atmospheric conditions, you’ll need to glue the pole wrap to the plywood for about 24 hours to get a solid attachment.
Summary
If you need help developing a befitting idea to build a kid’s toy box, these 16+ ideas and plans will provide enough inspiration. With a suitable storage box, your kids can tidy up after playing with their toys to keep the area clean and prevent injuries.
The above-listed plans feature various designs, requirements, and sizes while requiring different DIY experiences to complete. Choose the most suitable design based on your needs and create the perfect toy box.

 By
By


