
A router table houses your saw and provides a stable surface for your cutting material. It is essential when dealing with large materials as it prevents clumsiness and promotes safety in your workshop. Getting a router table in your work area is necessary for faster, safer, and more convenient cuts.
You can buy this table from a store or build one yourself. The choice depends on your needs and capacity; however, making a router table is fulfilling and costs a fraction of a premade table.
A simple plan will be beneficial if you’re interested in building this router table but have yet to gain experience. This is why we’ve compiled an extensive list of DIY router table plans for you. The methods vary in style, size, and difficulty, so you have a design that matches your requirements.
DIY Router Table Plans
Router tables bring organization to your workspace, especially as it gives a stable surface for work. Surprisingly, such a large project usually uses regular essential woodworking tools, takes minimal time, and is affordable. Let’s look at our list of free DIY router table plans.
1. Full-Sized Router Table With Multiple Drawers
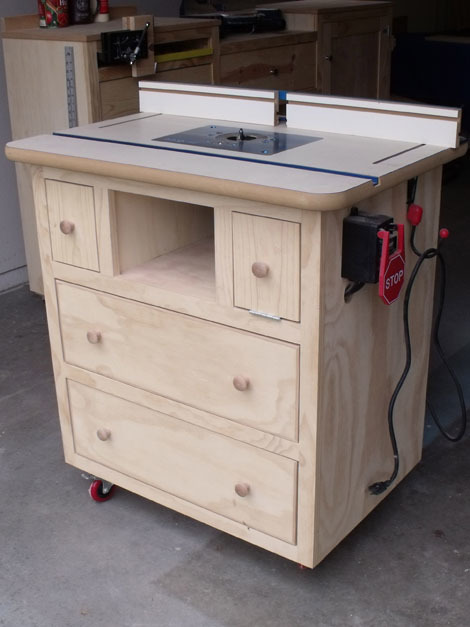
Starting our list is this full-sized router table featuring several drawers with varying sizes. This is a complicated project requiring a lot of drawer-making skills. Due to its additional features, you’ll also need a full day or two in the workshop to build this router table.
It was built with casters underneath to make it easy to move around your space. Using a similar type of wood and finishing it with other furniture in your workspace is recommended to get a uniform design. However, ensure the chosen wood is durable enough and has a pleasing look.
The plan is described clearly and would require a lot of materials to build the cabinets, drawers, storage spaces, and table. All the drawers are fitted with metal glides for easy operation. Check out the complete plan to build this full-sized router table.
2. DIY Router Table With Adjustable Fence

Here is a simple-looking, easy-to-assemble router table featuring an adjustable fence, a dust collection system, and router and vacuum control switches. The intricate wiring and unconventional leg shapes push this table from a novice to an intermediate level. However, it still maintains its simple look with light stains giving it a natural wood look.
For this project, you’ll need durable plywood, wood glue, 2×4 lumber, wire nuts, wire staples, a switch and outlet with their covers, long carriage bolts, wing nuts, and a washer. It requires the standard cutting tools alongside the supplies.
While the table area is easy to cut and assemble, you’ll face a serious challenge when cutting the legs and the dust collection section in the fence. The project will take less than 8 hours for an average DIYer to build and will come at a reasonable cost.
3. Stationary Router Table With High Fence
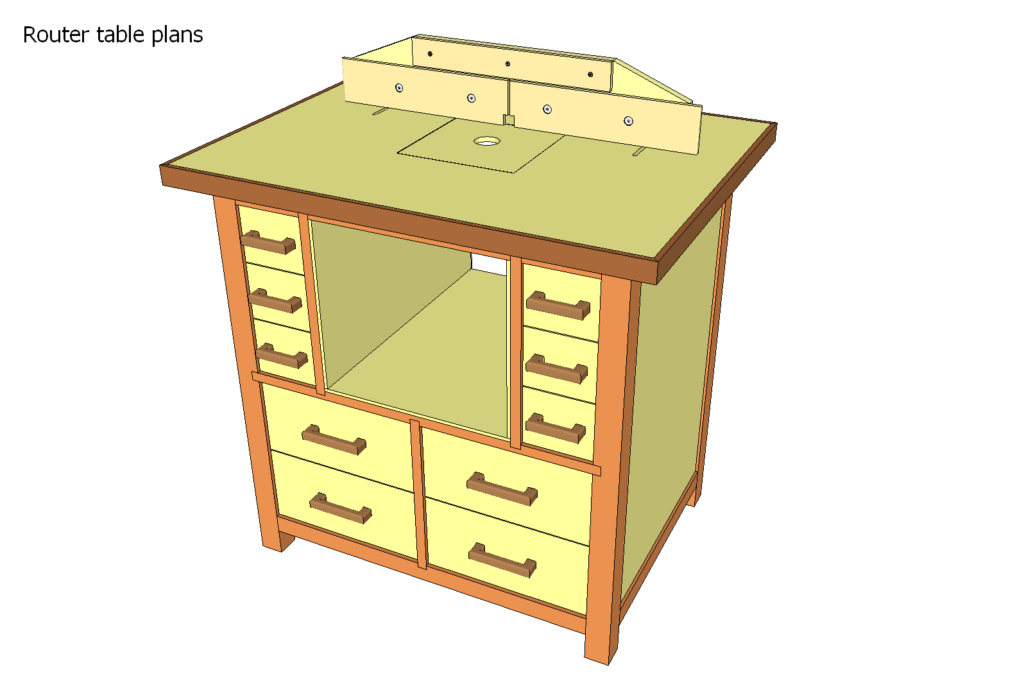
While most router table plans in our list focus on written descriptions, this stationary router design uses detailed diagrammatic illustrations. It uses several mortise and tenon joints across the project to give it a durable structure. However, this means building this table will require a lot of expertise.
Inside the plan, you’ll get a diagram of all the parts, complete with each dimension and the assembling pattern. You’ll also find a cut list containing all the elements, sizes, and quantities needed to build an 82x60x86 router table. With several drawers available, you’ll have enough storage space to organize tools in your workshop.
This advanced-level router table will take a lot of time to make, but its design and features compensate for the time and effort put in. You should expect to spend more time building the drawers and the table frame.
4. Mini Router Table

A mini router table is perfect when housing a small router saw and for conserving space in the workshop. It can be placed on or attached to the general workshop table. This design is 16 inches tall, 16 inches long, and 10 inches deep. Instead of a full-sized router table, building a small table is an economical choice.
The guide uses a table saw to cut scrap wood for the project; however, you can utilize a circular saw for the cuts. The circular saw proved useful for crosscutting and rip-cutting the lumber to size. Start by building the fence, which features the base and the face.
The mini router table uses a basic design with no special features besides its dust collection port attached to an external collector. Its size and design mean you can complete this project in under a few hours using scrap wood from previous projects.
5. Wide 3-in-1 Router Table

Away from the mini table is this wide 3-in-1 table that can function as a router table, table saw, and workbench. The versatile table shelves are made from laminated MDF boards; the table frame uses 2x4s, while the legs use 4×4 lumber for stability. The table legs sit on casters, making it easy to roll to different locations.
Despite its size, it still classifies as a portable table due to the caster legs. While it does not have the most elegant design, it is functional, with a lot of space to work on large materials. The cost of making this table is low, and you can complete it with limited tools.
The guide is broken into seven steps with additional tips to simplify the process. You’ll also find a list of all the supplies and their required quality. You can finish the table in 4-6 hours with this information.
6. Router Table From Reclaimed Table

If you have an old table or can get one, this router table design should be at the top of your mind as it repurposes this old furniture into practical router tables. You don’t need to start from scratch with an old table, as simple adjustments are enough to mount your router.
Since the table is usually free, the project’s overall cost is almost negligible, especially if you have standard woodworking tools. You’ll get a simplistic router table that requires little effort.
Get a drill with drill bits, a jigsaw, screws, and the router to recycle the old table into a router table. Depending on your table, you may need to remove some drawers and shelves to create room for the router. The plan shows how you can achieve all these.
7. Router Table Using a Rockler Router Table Top

Sometimes it is easier to utilize a premade table top to get precise router usage. This design uses the Rockler router table top on its table, featuring several storage compartments to house your tools and keep the workspace organized.
Apart from the top, the table is 36″ high, 24″ wide, and 18″ deep, providing a decent-sized base for handling your cuts. 1x2s, 1x3s, and 2x4s are the preferred lumber sizes for building the table frame. Since you’re not making the tabletop, the project takes less time and resources.
Sheathing with poplar further strengthens the frame and gives it more durability. Poplar is a durable, soft wood and will not significantly increase the table’s weight. The guide features a pictorial description of each step, making it easy to follow.
8. Router Table Top Design

While the previous design involved building the lower part of the table and attaching a premade table top, this plan focuses on creating only the tabletop. It features a chalkboard and MDF top, giving it an attractive and durable surface. You can connect it to a workbench or clamp it to a working surface.
You can make or purchase the router base plate attached to the work surface. Use the MDF and chalkboard combination to create an adjustable fence and cut out a small clearance route underneath using the base plate as a guide. The guide shows a pictorial direction on how to mark this cut point.
With the help of a pocket hole drill, you can open a hole to build a wood holder for the vacuum. Attach the MDF and chalkboard surface to a frame made using 2x3s with additional base plate supports. Before attaching it to a workbench, ensure the surface is flat.
9. Clean Router Table Design

This router plan shows that simple designs can look visually appealing. Getting the materials right is the first step to getting a clean but appealing look. This plan uses melamine, plywood, and 2×4 lumber as the primary materials for the table. Its combination and finishing produce an aesthetically pleasing design.
Instead of starting the frame as most plans would, this one begins with the legs made from joining ½” plywood attached at 90° using glue and brad nails. The idea is to build a table 33″ high, so you can adjust the leg’s height using this figure in mind. You have completed the frame by bracing the table and including caster’s.
Making a 32 x 18″ table surface is easy by joining a melamine board to a ½” plywood using glue, with the melamine as the table surface. To make the fence adjustable, include a T-track in the melamine board. The router is mounted on the removable middle melamine board for more flexibility.
10. Router Table With Angled Legs

The side of the table and the position of the router makes this table unstable with straight legs, which is why angled portions were included. However, the original added that only the back legs needed to be angled at a later update since the instability was noticed there. By straightening the front legs, the operator gets more room.
The table is mobile due to the casters attached to the legs with castor locks preventing the table from moving when in use. Dowels are this project’s primary joining materials, giving you a strong and neat joint with a fast joining process.
The table is 35 inches high, with the plan including other dimensions to complete the process. You’ll also find video descriptions for some of the steps that make the process easy for intermediate woodworkers. You can use a lower shelf to store frequently used equipment while cutting.
11. Simple and Spacious Router Table

This plan is combined with simplicity and space, providing enough room to work on your material and adding multiple plugins for better usage. It is ideal if you’re on a strict budget but require a decent-sized table.
It is suitable for small routers and features a fence divided into two parts. With the top hanging over the frame, you can clamp a board to act as the fence if you decide not to add the fence to the plan. This concise plan has a cut list and the complete building process.
The space between the two fence parts is used to attach the dust collector, with this idea featuring a cover fastened to the table using glue. However, the builder agreed that screws are better, as you can unscrew them when changing the dust collection system.
FAQ’s
Do you have any questions about building a DIY router table? We noticed some questions are recurring among DIYers building router tables, so we’ve answered them in this section.
Ans. Mini router tables are easier to build, use fewer resources, and are ideal for small, less complicated projects. While full-sized router tables use more resources and take longer to make, they are perfect for large projects.
Ans. Mobile router tables feature castors underneath the legs, making moving them around your workspace easier. You’ll need caster locks to keep the table in place when unused. These router tables are suitable for adjusting to their location and are usually for smaller tables.
On the other hand, stationary router tables lack mobility but are more stable without the possibility of moving when in use. They’re ideal for larger tables where their position are fixed in the workspace.
Ans. Adjustable fences require more building resources but allow you to adjust the fence position, including outrightly removing the fence when needed. On the other hand, fixed fences are easier to build but are not flexible since you cannot move them.
Finally
Router tables are vital if you want a stable surface that can support you while cutting using routers. Building these tables may require some techniques to ensure they are flat, sturdy, and have the needed height. The plans in this article are detailed enough for DIYers of different skillset to follow.

 By
By


