
Searching for a wine rack to showcase your Sauvignon Cabernet, Chardonnay, or decades-old Zinfandel? If you’re a daily wine drinker and enthusiast, the presence of a wine rack could be a great platform to showcase your preferred choice of wine.
These DIY wine rack plans can be easily customized because of their small overall size. Even better, you can install it in your kitchen, dining room, or even your living room. You will find that each of these plans is highly creative in nature and uses materials that have high odds of being accessed from your home or shed itself.
It is fair to say that you would spend at least 10 times lesser money by incorporating either of these DIY wine rack plans, rather than acquiring the services of a designer.
DIY Wine Rack Plans
If you’re looking to build a wine rack to keep your wine safe, here is a collection of free designs with clear plans to follow. They include plans of varying designs, sizes, and experience levels.
1. Wood Crate DIY Wine Rack

This X-shaped wooden crate takes less than 6 hours to build and can hold 12 to 14 wine bottles safely. There are also palm-sized gaps on either side to make it easy to carry around. Now, you can even keep a wine rack in the open for your backyard parties.
Two important factors are that you must use Miniwax wood stain to stain the crate before doing anything else, and then use a quality wood filler to assemble the X-shape with an assurance of long-term durability.
You can use the top of this crate as a mini-table when you are having one-on-one drinking sessions with your partner.
It shouldn’t take you more than $15 to $20 to purchase the materials and complete this DIY wine rack plan.
2. DIY Wood Plank Wine Rack

One plank of wood is all you need. Yes, you heard that right! Ensure to give an even spacing between every hole and also account for the bottle tilting factor. This rack will not hold the wine bottle in an upright position, instead, it will hold it with a 60 degrees slant.
Ideally, head to a hardware store with your wooden plank and use their 1.25’’ Forstner bit and standard drill saw. This drill bit size is chosen as per the standard size of the cap area of wine bottles.
Wondering how will you hang this shelf? You can use L brackets, pelican brackets, or a hot glue gun.
Supplies:
- Sandpaper
- Standard Drill Saw
- 1.25’’ Forstner Bit
- Wooden Plank
- Tape Measure
- Pencil
3. DIY Barrel Wine Rack

You will need only 2 wine barrel staves as your main components. These staves impart the key attribute of your wine rack being groovy. Simply ensure to follow all the drilling angles and bolt sizes to create a safe wine rack.
The best part is that you can install this wine rack on any wall in your house. A couple of drywall anchors and 3’’ wooden screws can manage the weight of 5 bottles.
There is a step-by-step instruction manual, video guide, and plenty of photos to offer you visual guidance.
Supplies:
- Power Drill
- Clamps
- Wrench
- Tape Measure, Ruler, and Pencil
- Hand Saw
- Orbital Sander
- 4 U-bolts
- 16 nuts of 5/16’’
- 8 washers
- Wood Stain
4. DIY Wine Rack Plan with Game Table

Multipurpose household equipment is always a treat! This guide teaches you to build a 10-bottle wine rack along with a lower drawer, wide shelf, and an even larger table. You could add some fun to your parties by making this the game table.
The legs of this wine rack table’s legs are slanted and impart a unique look. If you don’t plan to move the table around too often, you could even store some items under this piece of furniture.
If you’re looking for a classy final product, pay utter attention to the detailing in the finishing. Use paint and wood stain in a manner that creates subtle yet catchy patterns. This could go on to be a decade long addition to your living room.
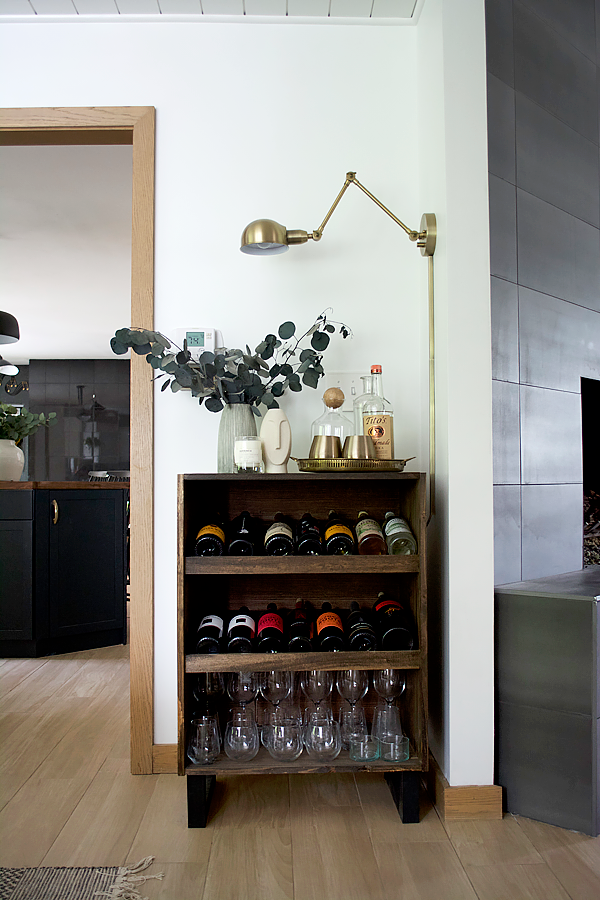
5. DIY Wine Cabinet with Rack

This wine cabinet has 2 in-built wine racks along with a 3rd shelf to let your store your wine glasses. The presence of heavy-duty casters will make it easy to take the table to different rooms or even your backyard if needed.
One cannot call this the ideal, smart, and sustainable wine rack. It is more of a storage solution that can also accommodate dinnerware, bar glasses, and other such equipment. You will need a quality table saw and plenty of materials to be fully ready to embark on this DIY wine rack plan.
As there aren’t too many images, it is advised you prepare yourself with the tools and cut list in advance. Further down you can follow the 30 steps to building this wine cabinet.
6. DIY Modern Wine Rack Plan

This 3 piece construction wine rack is a modern design that makes use of wood and leather slings as its main part. The slings play the role of the bottle holder and the precise geometry of the wooden rack guarantees an intriguing look.
Most of the cutting and assembling would be around square-shaped wooden pieces that are hollow from the center. This is a comparatively easy DIY project and helps you acquire what the DIYer calls a ‘Sculptural Display”.
Supplies:
- Drill and bit
- Clamps
- Black timber screws
- Leather Strap, 115mm wide x 780mm long
- Polyurethane glue
- Sharp needle for stitching
7. DIY Industrial Wine Rack Plan

You’re not finding a cheaper DIY wine rack solution than this. Two 5-foot industrial pipes need to be cut in as many holding tubes as you require. You can paint it a dark or bright color based on the surrounding wall.
Most importantly, use top-notch glue to stick these pipes together. The cluster that you form will be the definite look of your wood rack throughout its lifespan. Give it a little spice and customize the lengthwise spacing as per what you find artsy.
This tutorial uses metallic gray spray paint as the surrounding walls are brown. What do you plan to use?
8. Modified PVC Pipe Wine Rack

Here is a modern wine rack design made by modifying PVC pipes such that the pipes act as the housing for each wine bottle. This rack can store up to 18 wine bottles placed by their sides inside each PVC pipe, with the pipes cut and attached in an attractive pattern.
It uses different PVC pipe sizes ranging from 1″ to 3″, with the smaller pipes mainly for decorations. You’ll need to sketch to determine each pipe’s position and the cut’s dimension. Luckily, the guide already provides a sketch with all the required cut lists.
The rack is free-standing and can be hung on the wall with its slanted shape giving it a unique shape. The idea was to match the interior decoration of the intended position of the rack so you could change the paint colors to match your area. Using a pencil, use bolts to join each pipe together after marking the joining points. Finishing this design features some pipes spray painted gold, others brown, and the rest white.
9. Curvy Wine Stack

This rack uses curved wood to build a stack for your wines. The curves create a unique look that pulls attention toward your wine bottle stack. Sometimes unorthodox designs like this are needed to create a breathtaking project.
For this curvy wine stack idea, you’ll need thirteen wine staves, a drill, a wood stain, wood screws, a chop saw, a sander, and two pieces of 1×1″ lumber. Start by marking each stave to its specific purpose to make joining easier. The large shaves were reserved for support areas, while you can keep the thinner pieces for building the shelves.
Joining the pieces with screws is easy; however, the curved wood makes it a little tricky, especially its stability. Use short pieces to join the leg ends and under the shelves to improve stability. The 1×1″ lumber is attached to the shelves to hold each wine bottle and prevent them from rolling. Attach the screws holding the 1×1″ lumber from under the shelve to prevent scratches on the wine bottles.
10. A single Bottle Wine Rack

Wine racks often carry the notion of a stack of so many wine bottles, but it can also be a rack for a single bottle with only two cups hanging off the shelf. The design properly showcases the wine while carrying glass cups for easy access. It is perfect for that evening dinner with a loved one to place close to your dining area.
It features a board from which the wine hanger and cup hangers lie. Get your small pallet screw, wood glues, 80-grit sandpaper, and wood from an upcycled project, alongside regular woodworking tools like saws for cutting and drilling bits. It is an affordable project that may not even cost you a dime if you own the tools and have some leftover materials from your previous projects.
Start by cutting and joining the board pieces before attaching the cup support. Cut two spacers into the lower wine support lumber before attaching them to the board. One of the most appealing features of this design is the position of the wine bottle, made by the hanger position. The wine hanger is slanted, so the bottle is evident and in an unorthodox position.
11. Modern Pyramid Wine Rack

Here is a wine rack built in a pyramid with layers of wine chambers thinning towards the top. Its pyramid shape gives it solid stability, making it possible to sit on a table or hang on a wall without crumbling. The clean brown finish creates a deep modern look.
This rack can hold up to 9 wine bottles and six stemless wine bottles, with its modern design ensuring it can fit on a countertop. Get your table saw, miter saw, tape measure, random orbit sander, drill and driver, planer, band saw, drill press, dowel plug cutter, dowel plugs, screws, sandpaper, wood glue, and walnut boards to complete this project.
This pyramid wine rack will only be assembled if you follow the right dimensions and mark the boards for guidance. Mark and cut the boards by following the cut list in this plan before joining the boards with glue. It would help if you stained the boards before the final assembly to ensure all wood parts are stained.
12. Single Wood Plank Wine Rack

You can create a wine rack carrying up to seven wine bottles, mostly stored upside down, with a single wood plank. The idea utilizes inexpensive but beautiful cedar wood, a drill press with angular drilling capability, sandpaper, tape measure, and a pencil.
This design is simple to replicate as the process does not require bogus instructions. Start by cutting the plank to the desired length, depending on the number of wine bottles you want to store and the available space. Typically, a 30-degree bottle angle is the most ideal, and for this angle, space each bottle hole about 4″ from each other.
Hanging the single plank shelf may prove trickery for larger shelves as they are expected to carry more load, so L brackets and pelican brackets are recommended. Check out the guide for a complete process with pictures of every step.
13. DIY Wine Rack With Numbered Label

Here is another single-board wine rack design with vertical wine placements of up to 5 layers. The wine bottles rest on their sides, with each layer featuring a numbered label. Its size makes it ideal for small spaces as it takes up only a little space and can be hung high on the wall.
Simple to build and perfect for beginner DIYers, this project features a combination of ease and style. This project requires a 2x4x10 board, 1x4x8 pine or white wood board, metal label holders, and woodworking tools. You can save money by utilizing affordable pallet boards.
Cut the 2×4 boards into 39″ long sheets before joining three 2x4s using a Kreg jig. These boards then form the singular board for the wine rack. You can then add the wine layers along the board with extended wood at the end of the layers to prevent the bottles from falling off. Adding the numbered label to each wine layer will increase its appeal.
14. Large Classic Wine Rack

If you have tens of wine bottles to store, you’ll soon realize these small wine racks are ineffective for your storage needs. Like this classic wine rack design, you need a rack accommodating many bottles. It features a storage section that stores up to sixty neatly arranged wine bottles, making it easy to sort and pack.
This large project will take a lot of materials, cutting, and attachments, but it will be worth the effort. Ensure to use durable wood to ensure the stability of the project, as the top serves are a table surface to utilize space and help with multi-functionality.
To build the main body, construct a series of identical ladders that form wine sections. The spacing between each leader is about 3.5″, perfect for holding a 750ml wine bottle.
15. Wine Bottle Rack With Stemware

Here is a simple wine rack design with glass cup storage underneath. It is perfect for hanging on your wall in the kitchen or dining area, where you can easily grab a glass and pour some wine. The rack can store up to six bottles, with the stemware rack holding up to six glasses.
Get 25″ long 1×6 lumber, 25″ long 1×8 lumber, 9″ long 1×2 lumber, 1x4x6′, wood screws, wood glue, brad nails, pocket hole screws, and hanging hardware such as wall brackets. These materials, alongside regular cutting tools like the jigsaw and table, saw with tools like the random orbital sander and Kreg jig, are required for this wine rack.
Cut the stemware slots on a wooden board before attaching the backboard using pocket holes. Complete the attachment by joining the pieces to cover the front and sides of the rack before staining with natural wood hue.
16. DIY Wine Box

Simple does not always mean unappealing, as this design has proven with its simple yet classic wine rack design with a box-like storage system. Here the wine bottle tip is extended out of the storage box through a cylindrical opening. The storage rack stands on four stylish legs similar to TV stand legs.
The materials for this project include 4×4′ plywood, one pine dowel cut into four places and used as the rack’s legs, wood stain, wood screws, hanger bolts for the legs, and leg plates. While the tools are only the table saw, hole saw, and drill.
While you can choose a suitable rack size that fits your space, this project utilizes a 24x12x18 wine rack. Make the board cuts using a table saw, while the cylindrical holes for the wine bottles require a hole saw of the right dimension. Stain before assembling the box as it is easier to stain and reach all the board parts, which will be difficult when you assemble.
17. Standing Wine Rack
Most racks are hung on the walls and kept on countertops because of their size and lack of stability. However, lack of stability is not the case for this standing rack with the ability to store several wine bottles resting on its sides and wine glasses.
The plan utilizes two boards with 15.75″x30.75″ dimensions for each side of the rack. In contrast, the top and bottom boards have 2’x16.25″ dimensions. The back piece is a ¼” plywood. At the same time, you’ll need two 2’x15″ boards for the slanted layers, which require two feet-long 2x1s to act as stoppers at the end of the diagonal layers.
The Kreg jig ensures a clean connection between the boards and prevents the bottle from scratching against screw heads. The angle for the diagonal layers should be slanted enough to display the bottle but not too much slant so that the wine is no longer touching the cork. Dark walnut stains never disappoint when you want to create a warm design that can fit into brightly colored backgrounds.
18. Circular Wine Rack

The circular wine rack features two wooden boards with cylindrical holes arranged in a parallel manner so that the wine bottle rests neatly inside the holes. You can place the rack on its sides with the wine bottles sitting in a horizontal line or a vertical arrangement which offers very little stability.
The two boards are joined using dowels, with the project taking less than three hours to complete. This easy circular wine rack project is great for beginners and DIYers under a strict budget since the plan uses only a few materials. The rack is small and can only hold about four bottles; however, you can increase this number by increasing the project size.
Get the miter or circular saw, the power drill, 5″ hole saw, stain and stain applier, wood glue, sandpaper, ½”x36″ oak dowel, 1″x6″x4′ pine, and protective gears to build this rack using the plan successfully. Stain the boards and dowels before joining all the pieces together.
19. Wood and Leather Wine Rack

Here is a wine rack that uses only wooden boards and leather, with the leather as wine holders attached to the board. The board holds three wines, but you can increase the number by extending the board and adding more leather holders.
Get 2 1x4x8 boards or utilize barn wood, screw covers, and leather strips. Lay out the right boards and join them using two 1 x 3 pieces of lumber that pass behind them.
With the leather straps, you want to have a nice side showing, so you put the nice side facing the board before folding, exposing the nice part. Adding the gold washer to the top of the leather straps completes the design.
20. Leather Sling Wine Rack

Here is another leather wine holder but in the form of a leather Sling for a countertop design. The wine rack features a wooden stand that can carry three wine bottles with a piece of leather attached to each crossbar, extending over all the other bars while ensuring the leather forms a loose sling.
Use needle and thread to hold the leather around the wooden bar of each wine section, with the leather loosely hanging over the bars. This leather attachment will form a sling where the wines can rest without falling off.
The lumber section is painted black with black enamel paint with an oil-based satin finish to create contrast against its colored background. You’ll need hardwood timber, a needle and thread, a long leather strap, polyurethane glue, a black timber screw, clamps, and a drill and its bits.
21. Classy Square Wine Rack

This wine rack sports a classy look but with a simple square design. Its navy green finish gives it a different look, further boosting its classy aesthetics. It features a wine rack layer that can house a few wine bottles and a glass layer underneath where you can store up to four wine glasses.
Start by cutting the stemware hooks from the lower part of the square before joining the square. You’ll need two pieces of 14″x16″ wood, three pieces of 4″x14″ wood, a sanding block, a pencil, saws, paint and paintbrush, hammer, wood glue, nails, drill with Forstner drill bit, straight edge with measure, and sanding block.
Assembling this project is easy after making the cuts, with the whole project taking less than three hours to complete, aside from the time the paint takes to dry. Only two nails into the wall are enough to hold this rack since it only carries a few wine bottles.
22. Dowel Board Wine Rack

Here is a wine rack made using long dowel plugs inserted into a wide wooden board. The dowels hold the wines in place while the board is hung on the wall. The design features unpainted wooden pieces leaving the project in its natural wooden frame and look.
Properly sand the board to ensure smoothness, especially since the rack will be unpainted. However, you can apply tungsten oil to the dowels and board to protect the wood from damage.
After marking the correct positions to hold each bottle firmly, create tiny dowel holes on the board. While this seems straightforward, the dowel must fit tightly into the board to prevent any accidental slip-off, which may break your win bottle.
23. Simple DIY Angular Wine Holder

Another simple DIY wine rack holds four wine bottles angularly, ensuring the wine remains in contact with the cork while displaying a huge part of the bottle. Perfect for housing and displaying the wine for visitors to see.
Aside from stain drying time, a small board and two pieces of lumber are the primary materials required to complete the project in about one hour. The material list includes wood glue, screws, 25″ 2×4, and 18″ 1×6 lumber. In comparison, the tools include a miter saw, drill with Forstner bit, safety gears, tape measure, and pencil.
Use the drill with a Forstner bit to cut the four wine bottle holes out of the wood. Joining the wooden pieces on the board will determine the angle of the wine bottle. You can complete this project without spending a dime with the right scraps.
Summary
Wine racks will not go out of fashion but will continue to evolve into more appealing designs. This list of free DIY wine rack plans featuring various wine racks contains a rack for different scenarios, making the guide a valuable tool.
Also, check out these DIY end table plans in case you’re looking for a mini-table for some corner of your home.

 By
By


