

Desks provide elevated surfaces to carry materials and a comfortable layer for your reading and workstation duties. The single desk surface often needs more room for your activities, and adding another desk may be challenging with limited space. Rotating desks provide more room for a fraction of the area since you can often fold them when unused.
With a bigger surface to work on and a space-conserving structure, rotating desks have become a popular choice of furniture. A rotating desk keeps your table clear and ensures work goes on faster with less clutter.
As a DIYer looking to add a rotating desk to their space, this guide is quite helpful as it includes a detailed building process. You’ll also find more information about rotating desks to make your construction easier. Before proceeding with the steps, let’s understand a rotating desk better.
What is a Rotating Desk?
A rotating desk is a workstation with swivel capabilities. It features an axis from which other parts are rotated with their positions, including the central axis and two or more desks. Sometimes it may also include a cupboard where you can store files.
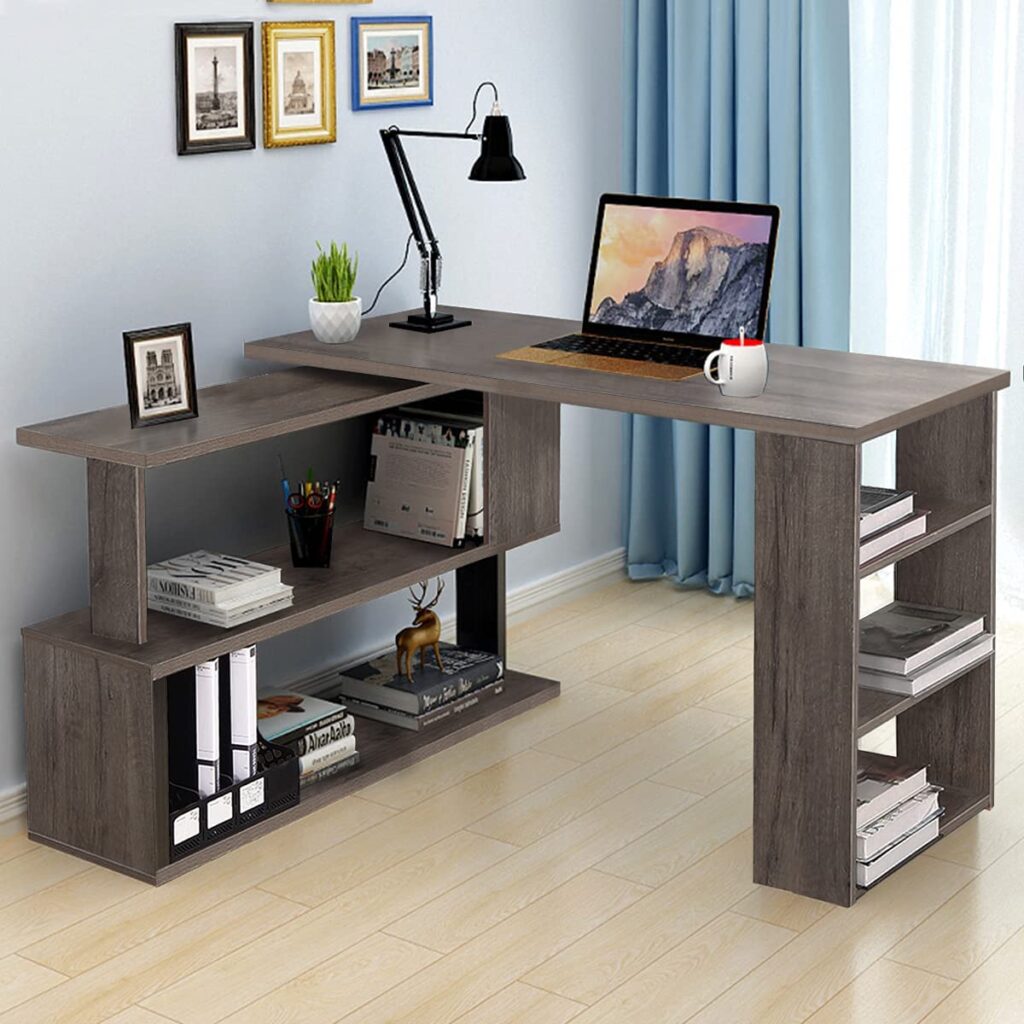
The typical structure of a rotating chair is an L-shaped desk with two desks attached at its axis and able to move in different directions. It is convenient and flexible as users have a large surface to work on while being able to reach other parts without moving. A swivel chair is the perfect combination for the rotating desk for easy reach.
The desk is excellent for a workspace due to the amount of space it provides to declutter the area. Depending on the design, the central axis can be controlled using a manual knob or motorized switch. Multiple tools can be arranged in different parts of the desk, which is especially valuable for designers, architects, and as a work-from-home setup.
How to Build a Rotating Desk?

Having a rotating desk in your office or home is beneficial as the furniture provides much flexibility and comfort, but it can be expensive. Building this furniture as a DIYer is a great way to reduce costs and add personalized features.
1. Supplies
Get all the supplies ready for this furniture before going ahead with the process. The collections involve materials and tools, which may vary depending on your desired rotating desk style. For this project, here are the supplies you need:
Materials
- Two plywood sheets ripped into six 15¾” wide parts
- 3″ wide 2x4s were ripped twice, and the rounded edges removed
- 1x trim parts
- Pocket hole screws
- Wood filler
- Paint
- Nail
Tools
- Table Saw
- Pocket hole jig
- 120 grit sandpaper/sander
- Paintbrush/roller
- Drill
- Pencil
- Brad nailer
- Tape measure
- Speed square
2. Steps
To build a 27″ and 30″ tall rotating desk, follow these simplified steps:
Step 1: Make the cuts and Drill Pocket Holes
Cut the plywood and lumber to their desired sizes with the help of the table saw tape measure, speed square, and pencil. For the 15 ¾” wide plywood cut into six strips, here are the pieces you want to cut out:
- A 92″ long plywood for the bookshelf top with pocket holes drilled on all four edges.
- 29 ¼” long desk inside legs with pocket holes drilled on the top edge.
- 27″ long desk legs and pocket holes drilled on top and side edges.
- 67″ long desk top with pocket holes on all four edges.
- Four 46 ⅜” shelves and pocket holes on the ends.
- 24″ long bookshelf sides and pocket holes on top and side edges.
- 26 ¼” bookshelf center and pocket holes in top and side edges.
The 1x cuts consist of the following:
- Four 46 ⅜” long 1×3 for the bottom support and pocket holes along the top edge and on ends.
- Two 27″ long 1×2 desktop legs.
- Eight 43″ long 1×2 trim for the shelf.
The 3″ wide 2×4 cuts with 1 ½” pocket holes will have the following:
- Two 27″ long 2×4 desk legs with pocket holes on one end.
- Four 15 ¾” long 2×4 table top ends with pocket holes on each end.
- Two 70″ long cuts to fit the side of the desk board.
- Two 95″ long cuts to fit the sides of the bookshelf tabletop.
- Six 24″ long bookshelf legs and pocket holes only on one end.
Step 2: Fix 2×4 Ends and Sides to the Bookshelf Board
Attach the 2×4 end and side trims to the bookshelf top plywood and secure using pocket holes screws through already drilled holes.
Step 3: Add Bookshelf Legs and Build the Shelf
Start this step by attaching the legs to the bookshelf frame and securing them with screws. The legs are fixed at the four ends and opposite in the middle.
The 93″ long 1×3 support attached to the lower part of the legs will provide the required support for the bookshelf, especially as it’ll carry a lot of weight. Next, you want to attach the leg boards between the 2×4 legs with the outside board set to flush outside.
Complete the step by attaching the four shelf boards under the bookshelf while ensuring equal space. Use 1x2s to trim the shelves and secure them with glue and brad nails for a clean look.
Step 4: Add Frame to Desk Tabletop
Similar to the bookshelf top, this desk table top starts with a frame. The edd and side pieces are attached and fastened to the desk plywood. With correct measurements, the lumbers will fit snugly at the outsides of the plywood.
Step 5: Build Desk Leg and Add Frame
Add 27″ legs to one end of the frame with the desk legs the same height as the bookshelf to let the other desk end sit comfortably on the bookshelf. The plywood panel between the legs should be flush to the outside while securing using screws. Adding 1×3 cleats to the insides of the legs makes for a clean finish and leads us to the final step.
Step 6: Finish
Much thought should go into finishing this rotating desk as it will sit in your office or workspace. Use the 120-grit sandpaper or a sanding machine to smoothen the furniture. Focus lightly rounding the edges to remove the sharp ends and prevent splitting.
The pocket hole joinery used for this furniture enhances its clean finish. Start by filling open screw holes with wood fillers and allowing them to dry.
Choose the most suitable wood paint for the furniture and apply using a combination of a paintbrush and roller. You want to add up to three coats of paint while lightly sanding after each coat.
What is The Benefit of a Rotating Desk?

If you’re still considering building a rotating desk for your space, here are some benefits to help make up your mind:
- Convenience: desks that can turn along their axis provide comfort as they feature large surfaces to carry all your tools and materials. With all your materials within reach, you can complete your work within a shorter period and without stress.
- Flexibility: rotating desks can turn in different directions which means you get the flexibility to reach other sections without physically moving.
- Space-Conserving: Although revolving desks provide larger surfaces, they can also be space-conserving. Some designs feature a foldable second desk that can go over or below the main desk.
How to Prevent Damage on Rotating Desk?
Revolving desks are large projects that would take a lot of time to complete and, as such, should be adequately maintained to prevent damage. To prolong the lifespan of your desk and ensure you get the total value, here are tips to avoid destruction:
1. Evenly Distribute Weight
Poorly distributed weight on the rotating desk will cause a strain on certain parts of the table and lead to cracks. Ensure the weight on the desk and the shelves are distributed equally to maintain balance and strength.
2. Use Quality Finishes

Ensure to cover the furniture with high-quality finishes, from stains to paints. The finish should make it challenging to absorb liquid and keep pests away. Using several coats of your favorite finish will make it easier to fix scratches.
3. Keep Desk Clean And Avoid Liquid Spills
Clear dirt and debris on the desk and around its rotating part that can obstruct its movement. You should also avoid liquid spillage on the desk to prevent damage, as moisture is one of the leading causes of wood destruction.
FAQ’s
Do you have questions about the process? Check out this section, where we answer popular questions about rotating desks.
Ans: Rotating desks can have up to three surfaces, depending on the design. Even though two desk surfaces and a single axis are the most common, you can have three surfaces with two axes, so you get a C shape.
Ans: Manual axes are easier to build and would require minimal resources. However, it is less convenient as you must move the desk with strength. Whereas desks with motorized axes can be moved using a switch which means more comfort. Motorized axis desks are more expensive to add to your DIY rotating workstation.
Ans: Some revolving desks have caster legs attached, and choosing to add this depends on your needs. Caster legs make it easy to turn the table but may be unstable without castor stoppers.
Summary
If you’re looking for a convenient and flexible desk with enough room for all your tools and materials, the rotating desk is the right furniture to build. Luckily, you can save a lot of money by making it rather than buying it, and this guide provides the steps to achieve it.

 By
By


